 Pardon the mess! The Support Center is undergoing construction.
 ![]()

Administration Settings
Last Updated: $action.dateFormatter.formatDateTime($content.getLastModificationDate())

Admin is only used for controller hosting and can be accessed at /admin.
If you are self-hosted, see Self Hosted for the information you need.
This page will NOT be migrated to the new Alexandria Support Center and will instead be archived.
Administration Settings
![]() /admin
/admin
Administration settings are high-level preferences intended for network administrators or IT support departments when hosting an Alexandria Controller.
See Controller Administration.
Old Administration
The Administration settings are high-level preferences intended for network administrators, IT support departments, or operators with administrator-level permissions. In other words, they're advanced settings used to configure your main Data Station once and then be forgotten.
While every operator with the proper security permissions can access the Administration module, it contains settings that most operators won't be able to configure without help. An operator's access to these settings is governed by their security preferences. Your library's administrator can manage these settings in Preferences > Security.
Status | These settings allow you to perform maintenance on your library catalog and update your Alexandria program. | |
| Web | These settings allow Alexandria and Textbook Tracker to communicate online. |
| Database | These settings allow you to set up automatic archives and database maintenance. |
| These settings allow you to designate an SMTP server to use for sending emails, such as Item Overdue Notices, to patrons and/or staff. |


Actions Menu
This menu appears on each interface of the administrative settings in the upper left corner. These options allow you to update to latest version, send your library data to COMPanion, log out of the program or quit the data station remotely.
Check for Updates
If there are any updates available, it will be listed here. You simply click on the version number to initiate the upgrade.
Send Data to COMPanion
If a Customer Support Representative needs your library data for troubleshooting you can easily send it to us by selecting this option and entering the Authorization Code you are provided.
Log Out
This button will log you out of Alexandria, despite if you have multiple windows open.
Quit Alexandria
This option will stop the Data Station from running and log out any active operators.
Status
This is where you can access your registration information, perform database maintenance, run or restore from archives, and update to the latest version.

Restore From Archive
Use this option to replace your current data folder with a previously created archive. This is useful if you need to undo a completed process such as imports or utilities.
Archive
Selecting this button performs an immediate, manual archive of your database. An archive is a complete copy of your library data file. However, archives are not backups. The difference between a backup and an archive is that backups are made on removable media and physically stored offsite or in cloud-based storage. Archives are entirely useless in the event of a hard drive failure hence keeping an offsite or cloud backup is highly recommended. While the archive is running all services on the data station are temporarily disabled. We recommend running an archive before making any large-scale changes to your database, such as imports, updates, utilities, or machine upgrades.
Restart
Selecting this button will restart the Data Station remotely. During the restart duration, Alexandria services and modules will be unavailable to all operators.
Database Maintenance
Selecting this button will examine your database files and perform patron, item, and circulation verification routines. If database damage is detected, it's automatically fixed. While maintenance is being performed the Data Station will be inaccessible. We recommend performing this maintenance at least once a month to keep your data in good, working order.
Database
Scheduled Archives and Database Maintenance are allocated in Database settings. These settings allow you to specify if and when automatic archives and/or database maintenance is performed. You are also able to configure the location where local archives are stored. For a Centralized or Distributed catalog these settings will apply to all sites. Cloud-Hosted customers don't have the database settings in the administration module because their hosted subscription includes automatic nightly archives and regular database maintenance.
Related Link: Archive Your Data
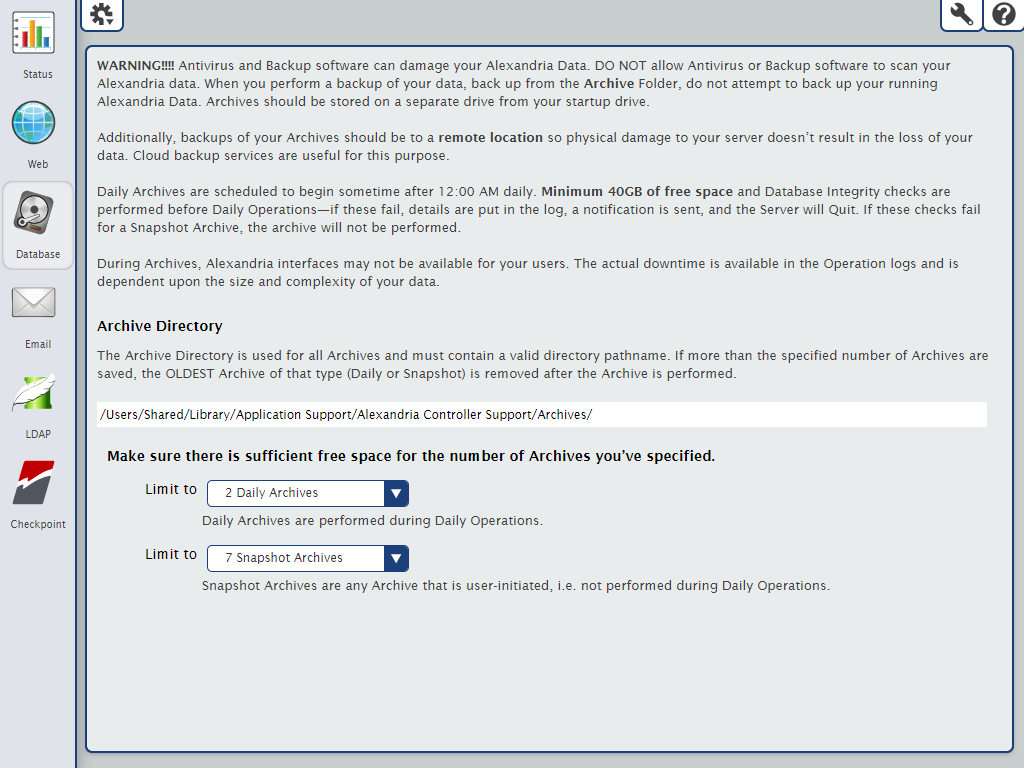
We strongly advise you to review these settings regularly to ensure that your archive directory is up to date and the number of archives stored is properly configured based on your needs and available disk space.
Web Settings
Self-Hosted customers will need to configure these setting before using the web modules of the program. For a Centralized and Distributed catalogs, these settings apply to all sites. A Cloud-Hosted customer doesn't have the web settings interface in the administration module because their data is hosted on a designated COMPanion server.
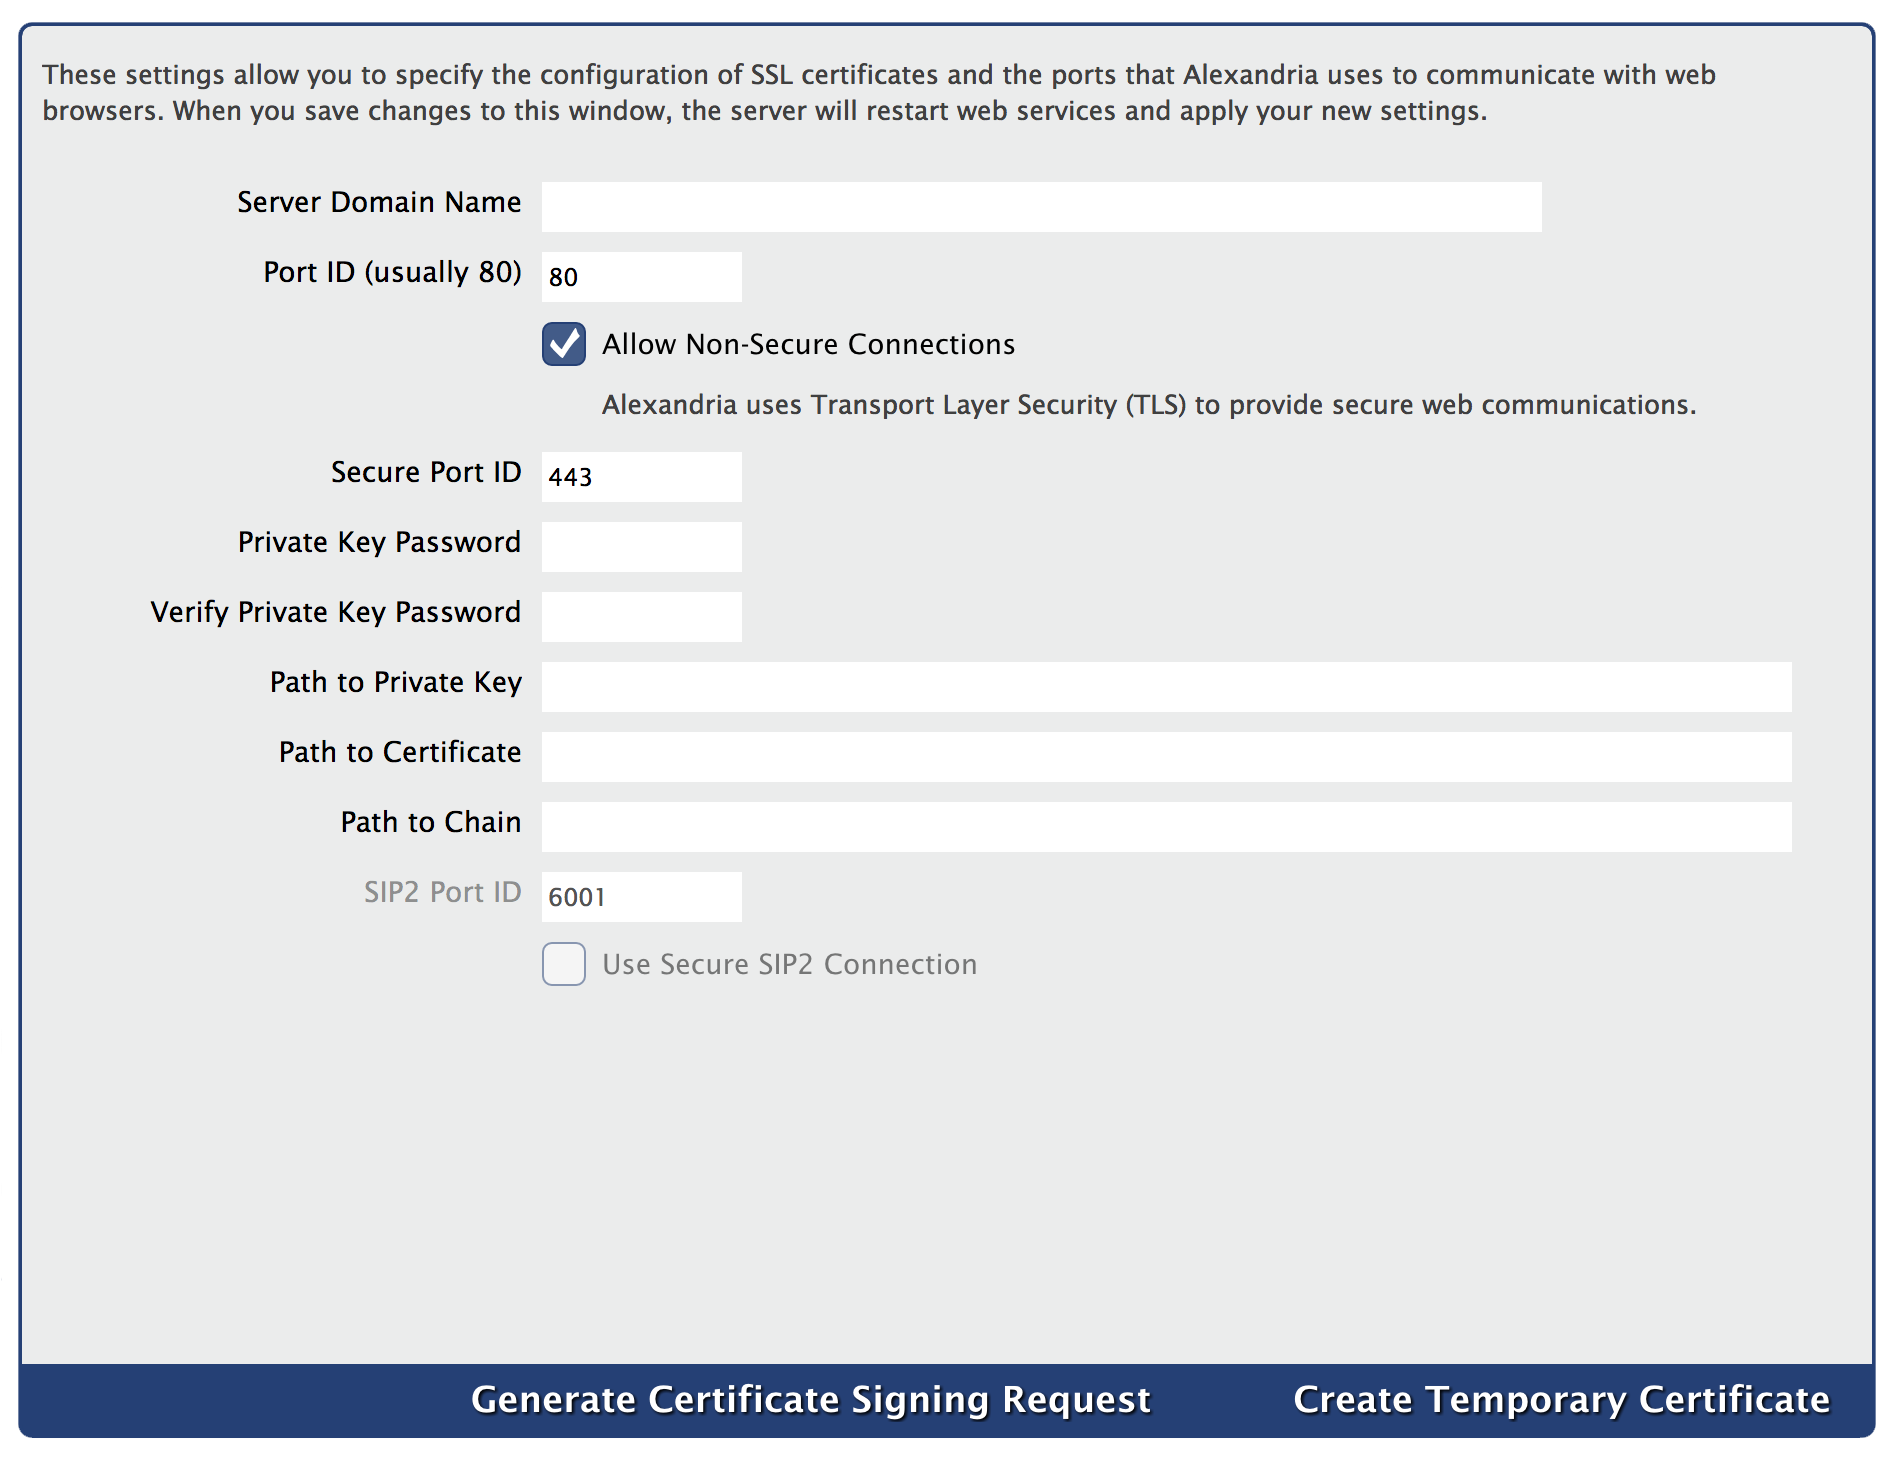
Alexandria uses Transport Layer Security (TLS) for secure web communications. These settings allow you to configure the certificates, ports, and server domain names that Alexandria uses to communicate with web browsers. When you save changes to this window, the Data Station will apply your new settings and restart web services.
Settings
Alexandria uses Transport Layer Security (TLS) for secure web communications.
When it comes to TLS certificates, “file specifications” stand for the correct (and required) directory location, file name, and file extension (e.g. C:\Program Data\Alexandria Support\SSL\*.pem) of your keys/certificates on the Data Station. Accurate file specifications must be provided in order for the key/certificates to be accessed.
Server Domain Name
Enter the domain name or IP address that connects to your Data Station.
Port ID
Enter the port number that Alexandria uses to access the web service. This is typically port 80 or 8080.
Allow Non-Secure Connections
Uncheck this box if you want to maintain secure web communications. (optional)
Secure Port ID
Enter the port number used for the secure web interface. The default is 443.
Private Key
Enter the private key password, if required. (optional)
Verify Private Key Password
Enter the private password again to verify it. (optional)
Path to Private Key
Enter the file name and location of the Data Station’s private key. (optional)
The file name and location may be entered or changed manually on a connected Web or Librarian Workstation, but it must follow the correct file specifications.
Only certificates in PEM format are recognized. (optional)
Path to Certificate
Enter the file name and location of the Data Station’s public certificate.
The file name and location may be entered or changed manually on a connected Web or Librarian Workstation, but it must follow the correct file specifications.
Only certificates in PEM format are recognized. (optional)
Path to Chain
Enter the file name and location of the Data Station’s chain file.
- The file name and location may be entered or changed manually on a connected Web or Librarian Workstation, but it must follow the correct file specifications.
- Only certificates in PEM format are recognized. (optional)
SIP2 Port ID
Enter the port number used for the SIP2 communications. The default is 6001.
Use Secure SIP2 Connection
Enable this setting if you're using a Secure SIP2 Connection
PEM Format
The PEM format (Privacy Enhanced Mail), an early standard for securing electronic email; the PEM format is not widely adopted as an internet mail standard.
Generate Certificates
Create Temporary Certificate
This creates a temporary private key and public certificate from Alexandria’s registration information then saved to to the SSL folder in the Alexandria Support folder, even if the Path to Certificate that you entered is different than the SSL folder. They expire 365 days after creation.
Generate Certificate Signing Request
This creates a request for a certificate. This request can be sent to a certificate authority.
Important
The Microsoft Certificate Server is not supported. You will need to use a code signing authority such as GoDaddy™, Comodo ©, or VeriSign™.
see also Email Preferences