 Pardon the mess! The Support Center is undergoing construction.
 ![]()

How helpful was this page?
Related Blog Posts
Blog Posts
-
Librarian hack: schedule your overdue notices
created by
Sep 13, 2023
-
Circulation: Items out tab
created by
Mar 21, 2023
-
Circulation: homeroom tab
created by
Mar 15, 2023
-
Circulation: command line
created by
Mar 08, 2023
-
Overdue items notices–"Yes, I am sending them"
created by
Jan 25, 2023
-
Transaction Scripts–Not just for inventory
created by
Nov 26, 2022
-
Keep track of items on display
created by
Nov 02, 2022
-
Shortcut to vendors
created by
Oct 13, 2022
-
Cash drawer report to the rescue!
created by
Oct 04, 2022
-
When does an overdue item become lost?
created by
Mar 15, 2022
Circulation Tabs
Last Updated: $action.dateFormatter.formatDateTime($content.getLastModificationDate())

This page has been moved over to https://support.goalexandria.com/circulation/circulation-tabs/.
Contents

Click the tabs below to expand for more information on the Circulation Tabs.
Circulation
![]() Circulation > Circulation tab
Circulation > Circulation tab
The Circulation tab is where you'll find your transaction log, to keep track of things happening during your session, and the homeroom subtab so you can locate or view students by the homeroom (location) they are in.
Transaction Log
Transaction Log shortcut: TL
The transaction log contains a history of everything that has occurred on your machine during your current session (for the last 100 transactions), and most of the changes that are made through management, utilities, and importing. It will also record who has logged in to your workstation and performed certain transactions and changes.
If you're Self-Hosted, archived transaction logs are placed in the Log folder, located in Alexandria's shared application support folder.
![]()
![]()
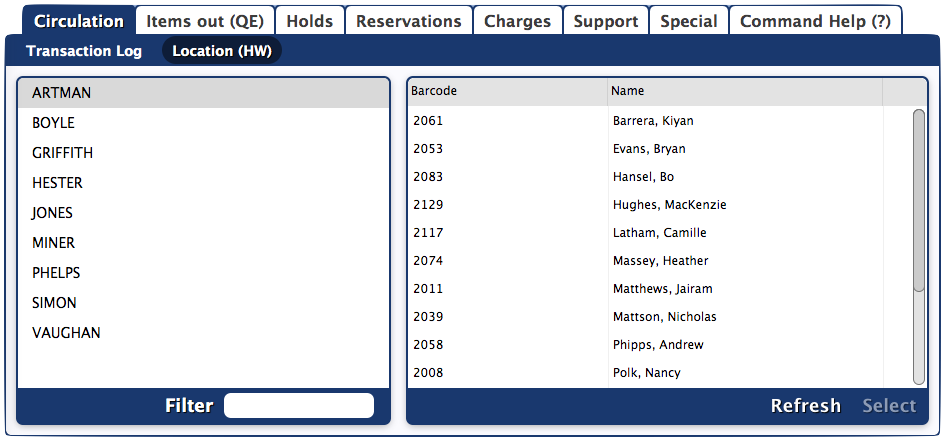
Homeroom
Homeroom shortcut: HW
The Homeroom subtab contains a list of the patrons in a particular homeroom, with their barcode, name, number of items they have out and items checked out today. With the Pictures checkbox checked, the patron's picture will also load. Double clicking on a patron makes them current.
![]()
You can use the homeroom shortcut (HW) to not only jump to this subtab, but also directly to a particular homeroom. For example, HW Jones will select the homeroom Jones. Using a patron barcode instead of the homeroom name will open the patron's homeroom, e.g. HW 1001.
"Homeroom" is a term that can be altered in Terminology Preferences.
This list shows all homerooms in your system; to clean up this list, update your patrons and clean up homerooms via Authority Control. See also: Changing teacher names in Alexandria.
Type HW into the command line to automatically go to this tab.
"Location" is a localization term that can be altered in Localization Preferences. "Homeroom" is a popular alternative.
The Homeroom subtab contains a list of all the patrons that belong to a particular homeroom.
Step-by-Step Instructions
Locate a Homeroom via Patron Barcode or Last Name
- Type HW {patron barcode} or {patron last name} (i.e. HW 1001 or HW Wilson) into the command line. The Homeroom subtab with a list of homerooms and patrons will open on the main Circulation window.
- Select a patron from the list on the right section of the Homeroom subtab, then scan the items the patron is checking out.
- Repeat step 2 until you have finished checking out items to all the patrons in the homeroom.
- Once you have finished, you may safely navigate away from the Homeroom subtab.
Locate a Homeroom from the List
- Type HW or HW {portion of homeroom} (i.e. HW or HW Smi) into the command line. The Homeroom subtab with a list of homerooms and patrons will open on the main Circulation window.
- Select a homeroom from the list on the left section of the Homeroom subtab. The list in the right section of the Homeroom subtab will display all the students that belong to that particular homeroom.
- Select a patron from the list on the right section of the Homeroom subtab, then scan the items the patron is checking out.
- Repeat step 3 until you have finished checking out items to all the patrons in the homeroom.
- Once you have finished, you may safely navigate away from the Homeroom subtab.
Open a Specific Homeroom
- Type HW {homeroom} (i.e. HW STARK) into the command line. The Homeroom subtab with a list of homerooms and patrons will open on the main Circulation window.
- Select a patron from the list on the right section of the Homeroom subtab, then scan the items the patron is checking out.
- Repeat step 2 until you have finished checking out items to all the patrons in the homeroom.
- Once you have finished, you may safely navigate away from the Homeroom subtab.
Items out
![]() Circulation > Items out tab
Circulation > Items out tab
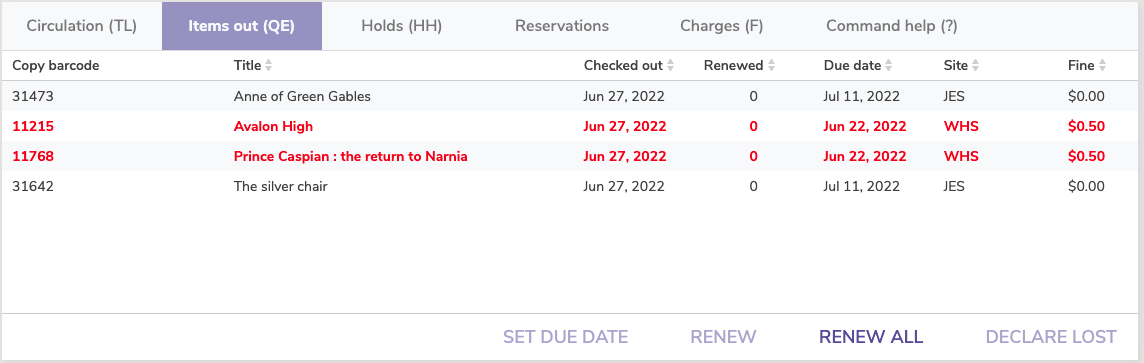
Items Out shortcut: QE
The Items out tab displays a list of all items checked out to the Current Patron, allowing you to choose which items to renew or declare lost. If one of the patron's items is past due, it will be listed in red.
Additional Options
| Button | Description |
|---|---|
| Set Due Date | This function is sometimes referred to as an override date, which replaces the default due date normally used by the system. |
| Renew | Renews one item, or a range of selected items. |
| Renew All | Renews all of the current patron's items, even if your policies or circulation preferences indicate that renewing items with holds is disallowed. |
| Declare Lost | The selected item is assigned to the Lost system patron, and you'll have options to charge the patron. |
Step-by-Step Instructions
Renew A Single Item
To renew a single item for a patron:
- Make the patron the current patron.
- Click on the Items out tab.
- Select the item that you would like to renew.
- Click on the Renew button.
Renew Multiple Items
To renew multiple items for a patron:
- Make the patron the current patron.
- Click on the Items out tab.
- Select the items to renew by using one of the following methods:
- For consecutive items: Select the first item that you would like to renew, hold down the <shift> key and click on the last item in the group of desired items.
- For non-consecutive items: Hold down the <Cmd/Ctrl> key and select/highlight/click on each item that you would like to renew.
- Click Renew.
Renew All Items
To renew all items:
- Make the patron the current patron.
- Click on the Items out tab.
- Click Renew All.
Troubleshooting
- Unless your preferences are set differently, items with holds can not be renewed.
- When you renew an item that has fines, the fine window will open for each copy that is overdue.
- If the item has been renewed the maximum number of times, Alexandria will ask if you wish to override the policies for each copy.
Items out (QE)
In the 7.19.10 release, the Renewals subtab was moved to a main tab and renamed Items out.
Type QE into the command line to automatically go to this tab.
The Items out tab displays a list of all items checked out to the Current Patron, allowing you to choose which items to renew or declare lost (Renew Patron Items <Ctrl+R> is also an Actions menu option). If one of the patron's items is past due and has accrued a fine, it will be listed in red.
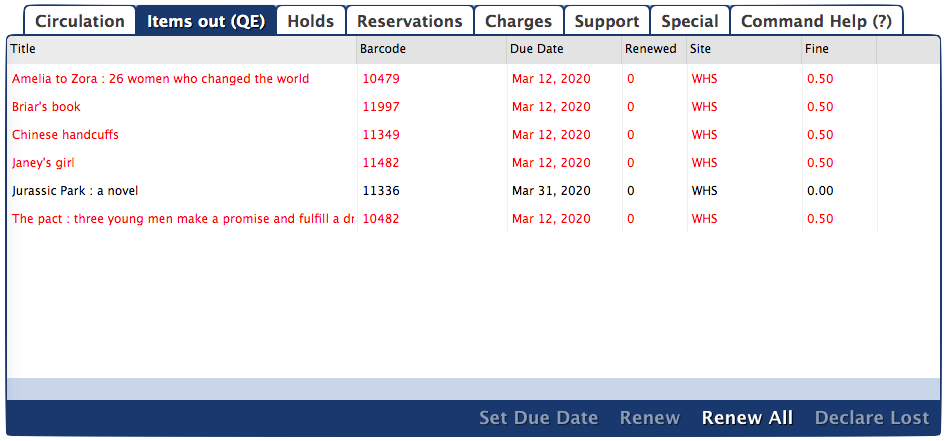
Additional Options
Double-click a column heading to sort the list by that column. Transactions cannot be sorted by date, however.
| Button | Description |
|---|---|
| Set Due Date | This function is sometimes referred to as an override date, which replaces the default due date normally used by the system. |
| Renew | Renews one item, or a range of selected items, at a time. |
| Renew All | Renews all of the current patron's items, even if your policies or circulation preferences indicate that renewing items with holds is disallowed. |
| Declare Lost | The selected items will be assigned to the Lost system patron. |
Step-by-Step Instructions
Renew A Single Item
To renew a single item for a patron:
- Make the patron the current patron.
- Click on the Items out tab.
- Select/highlight/click the item that you would like to renew.
- Click on the Renew button.
Renew Multiple Items
To renew multiple items for a patron:
- Make the patron the current patron.
- Click on the Items out tab.
- Select the items to renew by using one of the following methods:
- For consecutive items: Select the first item that you would like to renew, hold down the <shift> key and click on the last item in the group of desired items.
- For non-consecutive items: Hold down the <Ctrl> key and select/highlight/click on each item that you would like to renew.
- Click Renew.
Renew All Items
To renew all items:
- Make the patron the current patron.
- Click on the Items out tab.
- Click Renew All.
Troubleshooting
- Renewals will be denied if the item is on hold.
- If fines are charged, the fine window will open for each copy that is overdue.
- If the maximum number of renewals has already been reached, Alexandria will ask if you wish to override the policies for each copy.
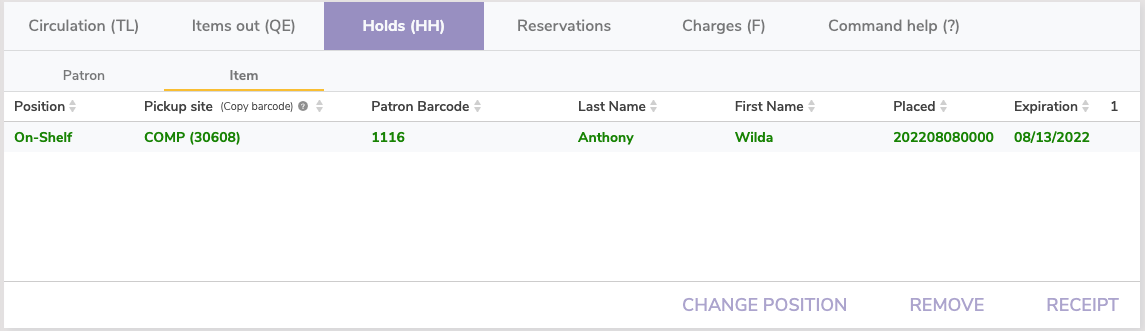
Holds
See also Place a Hold
![]() Circulation > Holds
Circulation > Holds
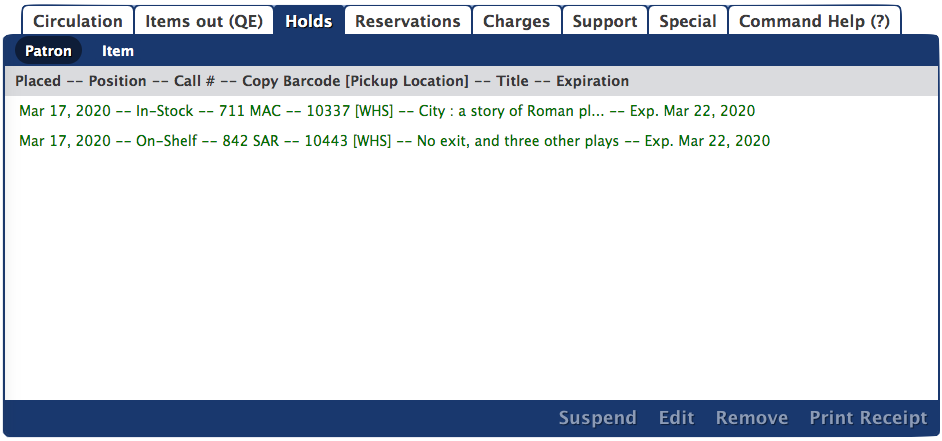
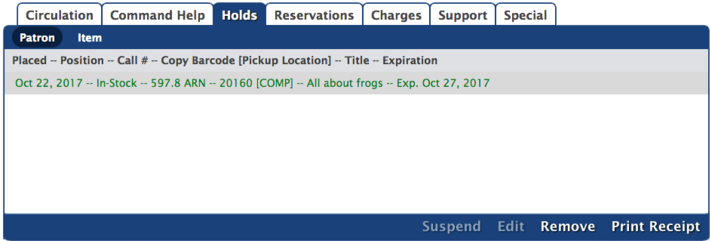
The Patron subtab shows items that have holds placed on them by the current patron.
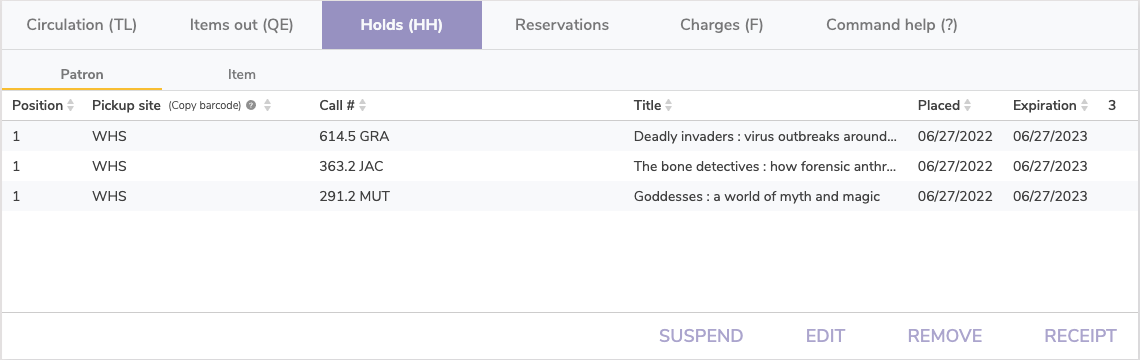
The Item subtab shows information for any holds placed on the current item.
Suspend a Hold
In some cases, you might wish to suspend a hold for a period of time. To do so:
- Click on the Patron subtab from the Holds tab.
- Select the item you wish to suspend and click Suspend. You will then be presented with a calendar window.
From the Suspend Hold window, enter a date and click Save. The hold will be suspended until this date.
You cannot suspend in-stock/on-shelf holds.
Edit a Hold
In order to change the site copies can come from and the pickup location for a hold:
- Click on the Patron subtab from the Holds tab.
- Select the item you wish to edit and click Edit. You will be presented with a Edit Hold window.
- Choose the site copies can come from and the desired pickup location.
- Click Save.
You cannot edit in-stock/on-shelf holds.
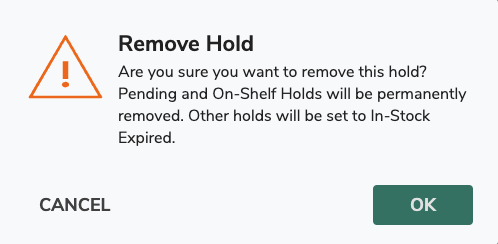
Remove a Hold
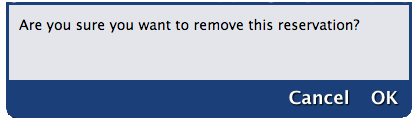
In order to remove hold requests for the current item:
- Click on the Item subtab from the Holds tab. Removal of all current item hold requests are done here.
- To remove an item hold request, select the hold you want to remove and click Remove. You will then be presented with a window to confirm the removal of the hold.
- Click OK. The hold will vanish from the field and be permanently deleted.
If an in-stock hold is removed, it will show as expired, and you can run the Expired In-Stock Holds to pull those items.
Remove a Patron's Hold
In order to remove a patron hold:
- Click the Circulation window's Holds tab and then click on Patron.
- To remove a patron hold request, select (highlight) the hold you want to remove from the Patron holds and click Remove.
- The hold will vanish from the window and be permanently deleted.
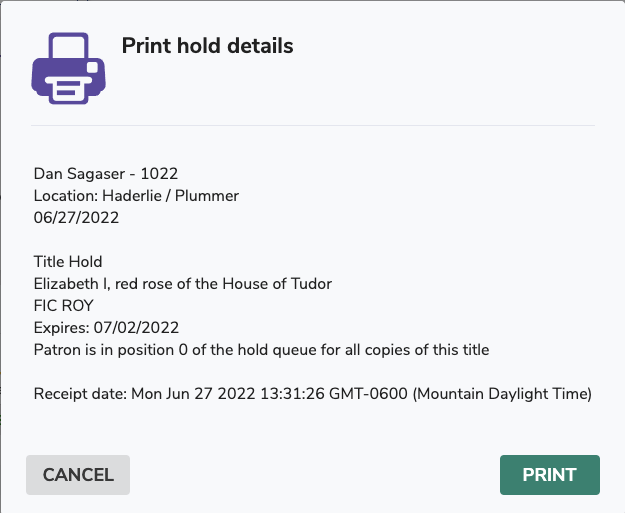
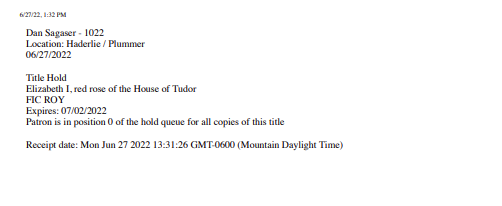
Print a Holds Receipt
Click Print Receipt when viewing holds from either the Patron or Item subtabs.
|
|
Patron
The Patron subtab shows items that have holds placed on them by the current patron.
Step-by-Step Instructions
Suspend a Hold
In some cases, you might wish to suspend a hold for a period of time. To do so:
- Click on the Patron subtab from the Holds tab.
- Select the item you wish to suspend and click Suspend. You will then be presented with a calendar window.
From the Suspend Hold window, enter a date and click Save. The hold will be suspended until this date.
You cannot suspend in-stock/on-shelf holds.
Edit a Hold
In order to change the site copies can come from and the pickup location for a hold:
- Click on the Patron subtab from the Holds tab.
- Select the item you wish to edit and click Edit. You will be presented with a Edit Hold window.
- Choose the site copies can come from and the desired pickup location.
- Click Save.
You cannot edit in-stock/on-shelf holds.
Remove a Hold
In order to remove hold requests for the current item:
- Click on the Item subtab from the Holds tab. Removal of all current item hold requests are done here.
- To remove an item hold request, select the hold you want to remove and click Remove. You will then be presented with a window to confirm the removal of the hold.
- Click OK. The hold will vanish from the field and be permanently deleted.
Change the Position of an Item Hold
In order to change the positions of hold requests for the current item:
- Go to Circulation > Holds > Item. Adjustments of all current item hold requests are done from here.
- To change the order of hold requests in the Item queue, select a patron name click on Change Position. You will be presented with the Change Queue Position window.
- Enter the position you'd like to move the patron to and click Save.
Print a Holds Receipt
There are two ways to print a holds receipt:
When placing an item on hold, click Print at the bottom of the confirmation window.
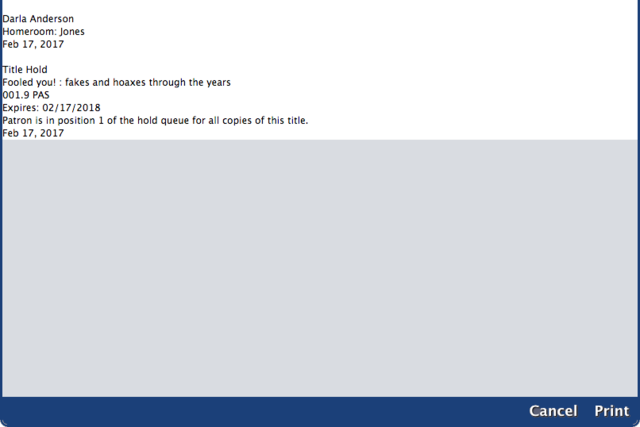
2. Click Print Receipt when viewing holds from either the Patron or Item subtabs.
Reservations
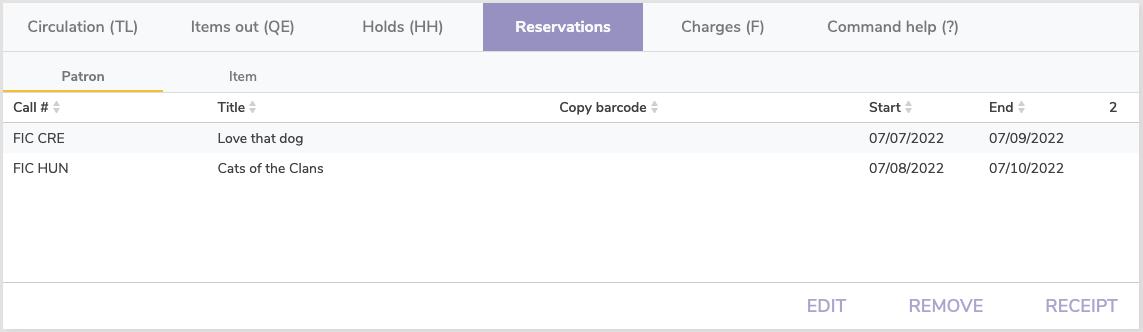
Patron / Item Subtabs
Reservations differ from hold requests. A reservation checks out a specific copy in advance for a particular time. A hold request puts your name in a hold queue (a waiting list) to check out any item copy when it becomes available.
Use reservations when patrons want to check out items from the library for specified future dates. When patrons have item reservations, they are only available for checkout by the requesting patron during their specified dates. If another patron tries to check out an item during it's reservation period, Alexandria rejects the request or adjusts the date range to accommodate the reservation.
Reservations are shown on patron and item status reports. Unlike hold requests, reservations are placed on specific copies. If you have multiple copies of an item, you must place the reservation on one copy. Alexandria will automatically remove expired reservations.
You can also use reservations with the For Library Use patron (barcode 3) to ensure that an item is available for use in the library during a specified date range. For example, you can use the For Library Use patron to make reservations for all Thanksgiving books on November 15th through the 30th. No other patrons can check out Thanksgiving books while those reservation dates are active. Another method is to place the copies on Reserve (J).
How to Place a Reservation in Librarian
Part 1: Initiate a Reservation
There are two circulation modes you could use to start placing a reservation:
- Reservation (G): Places a reservation for the current patron on whichever item(s) you enter a barcode for or scan.
- Reservation by Patron (GP): Places a reservation on the current item for whichever patron(s) you enter a barcode for or scan.
Alternatively, you could use one of these two circulation commands to automatically set the reservation once you enter the command (then you can skip Part 2):
- Reservation for Any Copy: Places a reservation for the current patron on any available copy of the title for the specified date. The full formula is GA [barcode] -D [beginning date in mm/dd/yyyy format] : [ending date in mm/dd/yyyy].
- Reservation for Specific Copy: Places a reservation for the current patron on the specified copy for the specified date. The full formula is GB [barcode] -D [beginning date in mm/dd/yyyy format] : [ending date in mm/dd/yyyy].
Part 2: Fill out the Place Reservation dialog box
- The Place Reservation dialog box will pop up. Here you will select the site, number of copies (or enter the copy barcode if you want one specific copy), how many days you need the reservation to last, and during which month you need the reservation. Your policies determine the maximum number of days allowed for a copy reservation and how many reservations patrons can place. If you have the proper security clearance, you can check the box to override these policy restrictions. To deactivate reservations, you can set the maximum number of days to “zero” in your policies.
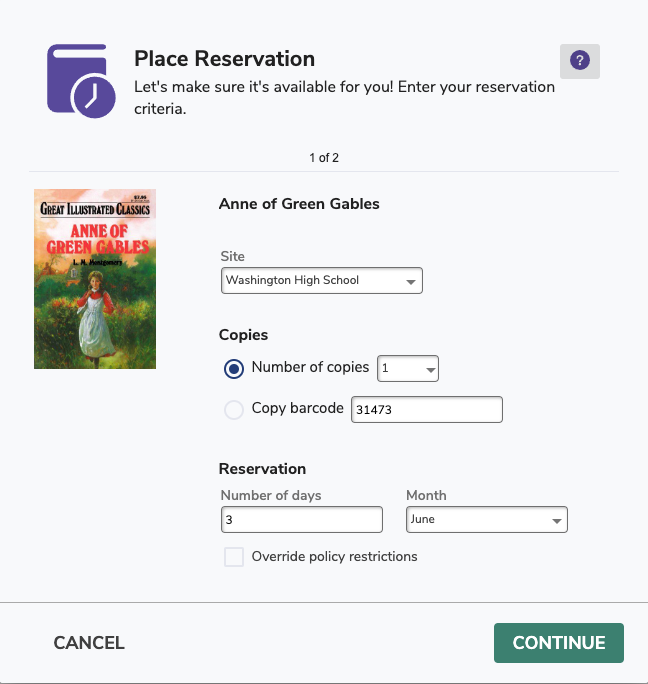
- After you have made the appropriate selections, click Continue.
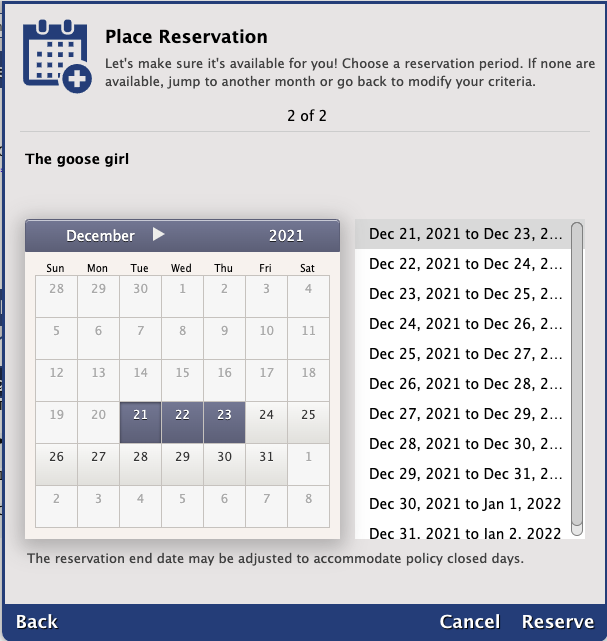
- Next, you'll see a calendar view. This is where you'll choose the specific date range for which you want to place the reservation. You can select days by clicking on the calendar itself or by clicking on a date range in the list to the right. Note that if you double click on a date range in the list, the reservation will be set and a confirmation will pop up. Reservations can begin only on open days but can end on closed days; if it does end on a closed day, the due date is actually the next open day. If there aren’t enough copies available for a date range, it will not show on the list.
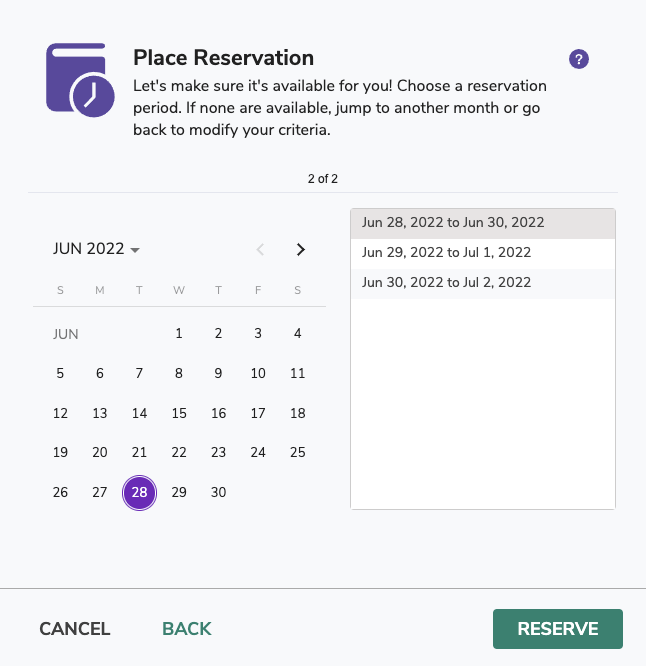
- Click Reserve when you have selected the appropriate days. You could also click Cancel to stop making a reservation or Back to return to part one of the Place Reservation dialog box.
- A record of the reservation will show in the Transaction Log. It will also appear under the Reservations tab when the patron or item is current.
Edit a Reservation
Make sure the patron/item is current, select the reservation, and then click Edit. You can change the number of copies, the copy barcode, the site location, and the start/end dates. When you're done, click Reserve to save your changes. Please note that if you placed reservations on multiple copies, you will need to edit the reservation for each copy.
Click Print Receipt to view the reservation details, then either click Cancel to close the dialog or Print to print the receipt.
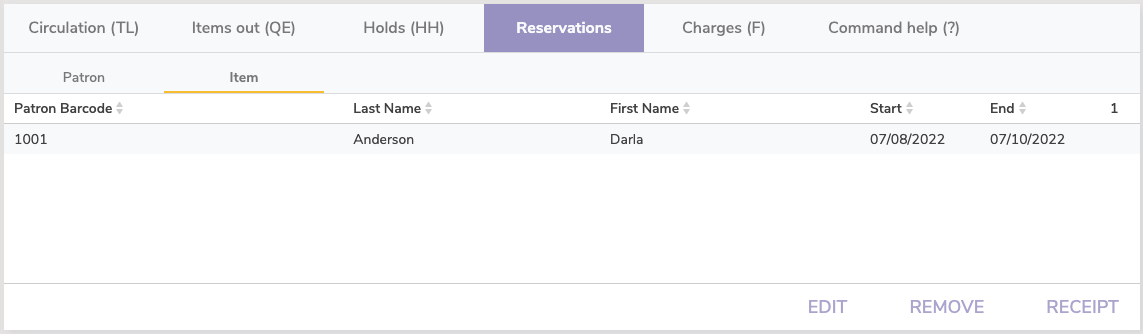
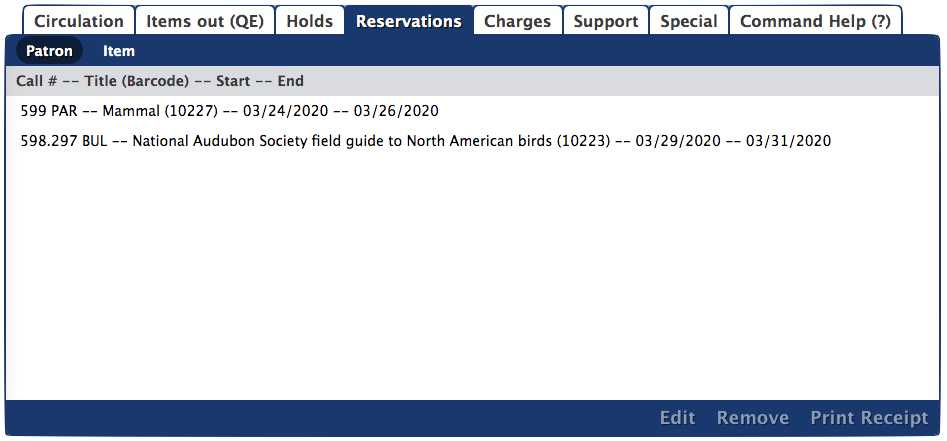
Remove a Patron/Item Reservation
- Click the Circulation window's Reservations tab and then click on the Patron reservations subtab.
- A list of reservations for the current patron will be shown in the Patron reservations subtab field.
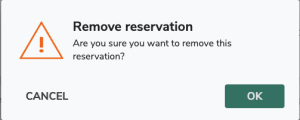
- To remove a patron reservation, select (highlight) the reservation you want to remove and click on Remove.
- The reservation will be permanently deleted.
You cannot undo a remove you made to a reservation in this window. The only way to restore a reservation that was incorrectly removed is to place a new reservation for the patron.
Reservations tab
Patron
Edit a Reservation
Make sure the patron is current, select the reservation, and then click Edit. You can change the number of copies, the copy barcode, the site location, and the start/end dates. When you're done, click Reserve to save your changes. Please note that if you placed reservations on multiple copies, you will need to edit the reservation for each copy.
Click Print Receipt to view the reservation details, then either click Cancel to close the dialog or Print to print the receipt.
Remove a Patron Reservation
- Select Remove Patron Reservations from the Circulation window's main Actions menu.
- Alternately, you can click the Circulation window's Reservations tab and then click on the Patron reservations subtab; removal of all current patron reservations can be done from this subtab.
- A list of reservations for the current patron will be shown in the Patron reservations subtab field.
- To remove a patron reservation, select (highlight) the reservation you want to remove and click on Remove.
- The reservation will vanish from the field and be permanently deleted.
Remove an Item Reservation
- Select Remove Copy Reservations from the Circulation window's main Actions menu.
- Alternately, you can click on the Circulation window's Reservations tab and then click on the Item reservations subtab; removal of all reservations for the current item can be done from this subtab.
- A list of patrons who have reservations for this copy will be shown in the Item reservations section of the Reservations tab.
- To remove a reservation, select (highlight) the patron you want to remove and click on Remove.
- You will be asked if you are sure that you want to remove the reservation. Click OK or Cancel.
You cannot undo a remove you made to a reservation in this window. The only way to restore a reservation that was incorrectly removed is to place a new reservation for the patron.
The Circulation window's Reservations tab has two modes: Patron reservations and Item reservations. You can access these different modes by clicking on the subtabs that horizontically cross the top of the Reservations pane.
Reservations differ from hold requests. A reservation checks out a specific copy in advance for a particular time. A hold request puts your name in a hold queue (a waiting list) to check out any item copy when it becomes available.
Use reservations when patrons want to check out items from the library for specified future dates. When patrons have item reservations, they are only available for checkout by the requesting patron during their specified dates. If another patron tries to check out an item during it's reservation period, Alexandria rejects the request or adjusts the date range to accommodate the reservation.
Reservations are shown on patron and item status reports. Unlike hold requests, reservations are placed on specific copies. If you have multiple copies of an item, you must place the reservation on one copy. Alexandria will automatically remove expired reservations.
You can also use reservations with the For Library Use patron (barcode 3) to ensure that an item is available for use in the library during a specified date range. For example, you can use the For Library Use patron to make reservations for all Thanksgiving books on November 15th through the 30th. No other patrons can check out Thanksgiving books while those reservation dates are active.
How to Place a Reservation in Librarian
Part 1: Pull up the Place Reservation dialog box
There are two circulation modes you could use to start placing a reservation:
- Reservation (G): Places a reservation for the current patron on whichever item(s) you enter a barcode for or scan.
- Reservation by Patron (GP): Places a reservation on the current item for whichever patron(s) you enter a barcode for or scan.
Alternatively, you could use one of these two circulation commands to automatically set the reservation once you enter the command (then you can skip Part 2):
- Reservation for Any Copy: Places a reservation for the current patron on any available copy of the title for the specified date. The full formula is GA [barcode] -D [beginning date in mm/dd/yyyy format] : [ending date in mm/dd/yyyy].
- Reservation for Specific Copy: Places a reservation for the current patron on the specified copy for the specified date. The full formula is GB [barcode] -D [beginning date in mm/dd/yyyy format] : [ending date in mm/dd/yyyy].
Part 2: Fill out the Place Reservation dialog box
- The Place Reservation dialog box will pop up. Here you will select the site, number of copies (or enter the copy barcode if you want one specific copy), how many days you need the reservation to last, and during which month you need the reservation. Your policies determine the maximum number of days allowed for a copy reservation and how many reservations patrons can place. If you have the proper security clearance, you can check the box to override these policy restrictions. To deactivate reservations, you can set the maximum number of days to “zero” in your policies.
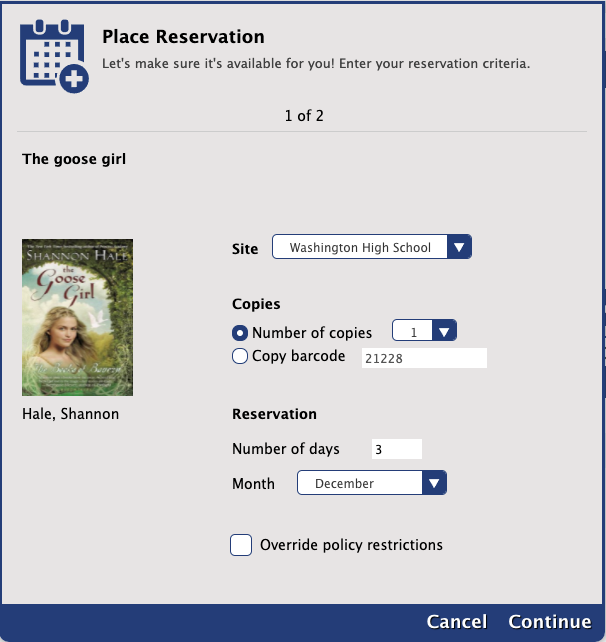
- After you have made the appropriate selections, click Continue.
- A calendar will pop up. This is where you'll choose the specific date range for which you want to place the reservation. You can select days by clicking on the calendar itself or by clicking on a date range in the list to the right. Note that if you double click on a date range in the list, the reservation will be set and a confirmation will pop up. Reservations can begin only on open days but can end on closed days; if it does end on a closed day, the due date is actually the next open day. If there aren’t enough copies available for a date range, it will not show on the list.
- Click Reserve when you have selected the appropriate days. You could also click Cancel to stop making a reservation or Back to return to part one of the Place Reservation dialog box.
- A record of the reservation will show in the Transaction Log. It will also appear under the Reservations tab when the patron or item is current.
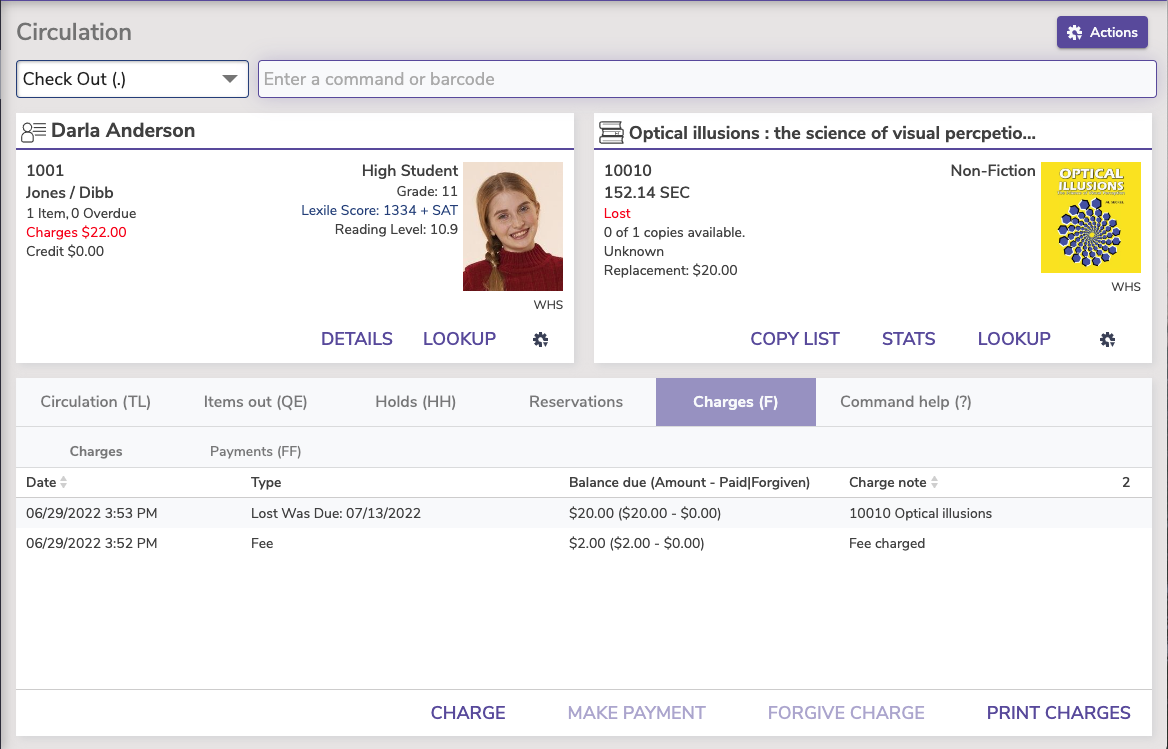
Charges
![]() Circulation > Charges > Charges
Circulation > Charges > Charges
Charges shortcut: F
Charges tab
Types of Charges
Lost Item Fee
When a book is lost, the patron is automatically charged a lost fee equal to the replacement cost. Additionally, when an item is declared lost, if it was overdue, the patron can be charged an overdue fine (up to the Maximum Fine for an Overdue Item in your Overdue patron policies). When an item that was declared Lost is later found and bookdropped, you have the option to add an extra fee. See Lost and Returned Items.
Overdue Fines
If the item you check in is past due and carries a fine, a payment can be made through the Make Payment option by either selecting the subtab at the bottom of the window or double clicking on the line item.
See also Fee, Fine, Foe, Um?—All About Charges.
Additional Options
Charge
This option allows the librarian to manually assign charges to a Patron or for Alexandria to automatically assign charges based upon your preferences. This can be used for late fees, lost or damaged books, or miscellaneous charges.
Make Payment
Select a charge to get this option. Select multiple charges (command or shift + click) to make a payment on multiple items.
Print Charges
Print all charges for the current patron. Click Print Charges at the bottom of the Charges window to download a PDF report of the patron's charges.
If the Network Printer is enabled, the receipt will be sent to the printer. However, if the Network Printer is not enabled, an HTML receipt will open in a new tab so it can be saved as a PDF and/or printed from your browser.

Step-by-Step Instructions
Charge an Overdue Fine
Overdue fines are charged automatically according to your fine rate (determined by item policy). However, if you need to charge an additional fee, you can do that here.
- With the patron current, go to the Charges tab and then the Charges subtab.
- Click Charge to open the Charge fee window.
- Enter the amount to be charged.
- You have the option to fill out payment details now, or at a later point.
- When you're satisfied with the fee you have charged, check Process. By checking the applicable boxes, you can either Email Receipt or Print Receipt.
Make a Payment
- With the patron active, go to the Charges tab and then the Charges subtab.
- Select the charge you want to pay.
- Click Make Payment, or double-click the item to open the Make Payment window.
- Enter the payment information.
- From the Method drop-down menus, choose from Cash, Check, Charge, Other, Forgive, or Credits.
- If you would like to forgive the entire charge, check the box to Forgive remaining balance.
- If the Current Patron has a credit balance on their account, you can choose Credit. If credit is available, their current credit balance is shown in parentheses.
- If you choose Other, you must fill in the Payment note to explain what the payment method was.
- Check the box(es) for Email Receipt and/or Print Receipt (optional).
- Click Process.

Charges (F)
Type F into the command line to automatically go to this tab.
The Charges tab is where you can view charges assigned to a patron for overdue items or fees assigned for special circumstances (such as lost items or loan fees). Textbook Tracker calculates the amounts for overdue charges and loan fees based on your patron and item policies. You can also use the additional options to charge miscellaneous fees to a patron; record the payments a patron makes, amounts you have forgiven, or refunded payments; and print a record of the patron's charges.
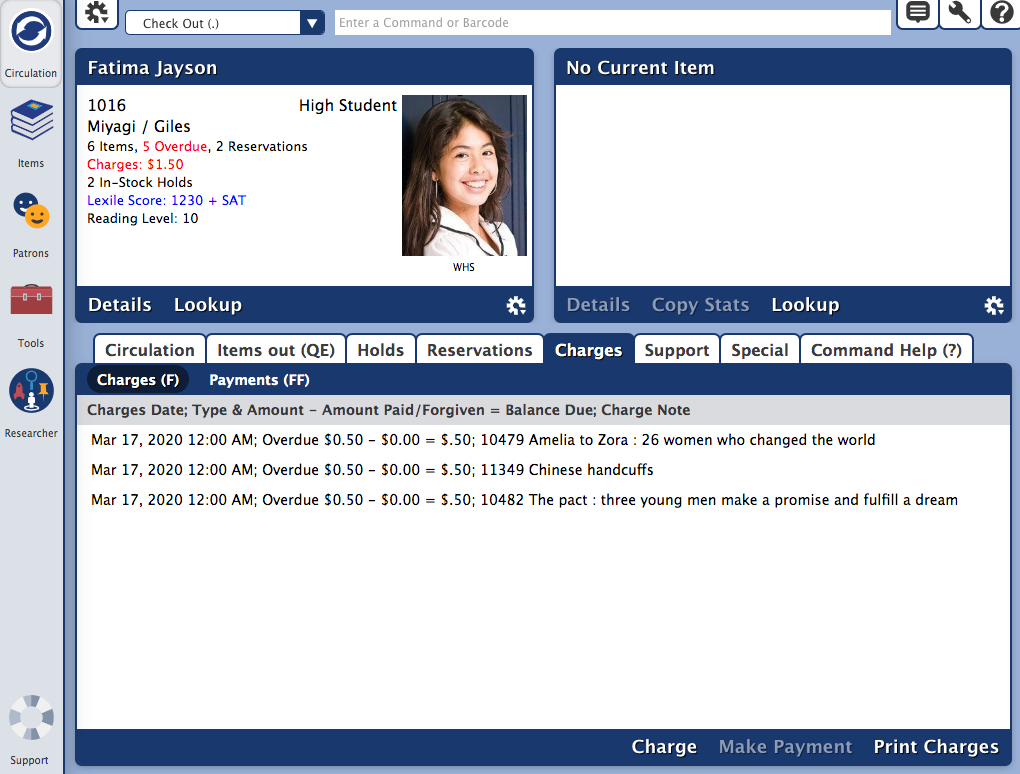
Types of Charges
Lost Item Fee
When a book is lost, the patron is automatically charged a lost fee equal to the replacement cost. Additionally, when an item is declared lost, if it was overdue, the patron can be charged an overdue fine (up to the Maximum Fine for an Overdue Item in your Overdue patron policies). When an item that was declared Lost is later found and bookdropped, you have the option to add an extra fee. See Lost and Returned Items.
Overdue Fines
If the item you check in is past due and carries a fine, a payment can be made through the Make Payment option by either selecting the subtab at the bottom of the window or double clicking on the line item.
See also Fee, Fine, Foe, Um?—All About Charges.
Additional Options
Charge
This option allows the librarian to manually assign charges to a Patron or for Alexandria to automatically assign charges based upon your preferences. This can be used for late fees, lost or damaged books or miscellaneous charges, such as printing services or items available for purchase at the library.
Make Payment
This option is available when a charge is highlighted. Select multiple charges (command or shift + click) to make a payment on multiple items.
Print Charges
Print all charges for the current patron.
If the Network Printer is enabled, the receipt will be sent to the printer. However, if the Network Printer is not enabled, an HTML receipt will open in a new tab so it can be saved as a PDF and/or printed from your browser.
Step-by-Step Instructions
Charge an Overdue Fine
- With the patron active, go to the Charges tab and then the Charges subtab.
- Click Charge to open the Fee window.
- If applicable, enter the amount of the accrued fine or overdue charge to be forgiven in the Forgive field. If you would like to forgive the entire charge (plus any additional amounts) minus the entire amount in the Forgive field.
- If the Current Patron has a credit balance on their account, choose to Pay From Credit. If credit is available, the Pay from Credit field becomes modifiable, and their current credit balance is shown between the parenthesis.
- From the Payment Method drop-down menu choose from Cash, Check, Charge, or Other - See Note.
- When you're satisfied with the fee you have charged, check Process. By checking the applicable boxes, you can either Email Receipt or Print Receipt.
Make a Payment
- With the patron active, go to the Charges tab and then the Charges subtab.
- Select the item.
- Click Make Payment, or double-click the item to open the Make Payment window.
- Enter the payment information.
- Check the box(es) for Email Receipt and/or Print Receipt (optional).
- Click Process.
Print Charges
- Click Print Charges at the bottom of the Charges window to download a PDF report of the patron's charges.
- Check out this sample report.
Payments tab
Payments shortcut: FF
The Payments subtab contains a record of the payments made by the selected patron, as well as Refund, Details, Add Credit, Refund Credit, and Print Receipt options.
Additional Options
Refund
- Select the Payments subtab from the Charges tab.
- Highlight the payment you'd like to refund.
- Select the Refund option from the bottom of the page.
- Enter the total amount that you'd like to refund in the Refund as cash or Refund as credit field.
- Supply an (optional) explanation as to why you are issuing a refund and/or credit to the patron in the Refund note field.
- Determine whether you want to Print Receipt or Email Receipt after applying the refund.
- When you are ready, click Process to issue the refund and print an optional receipt.
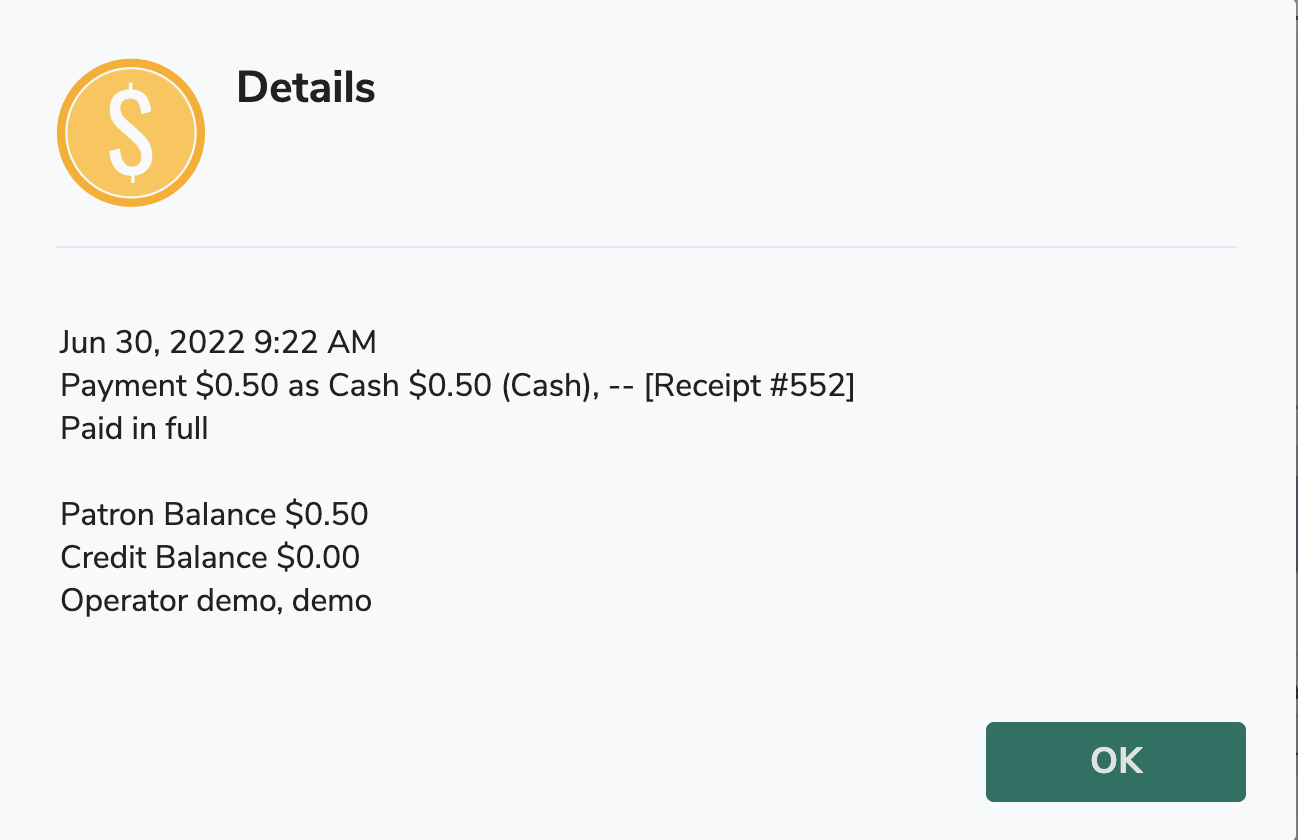
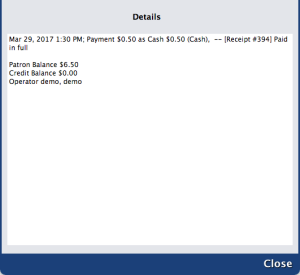
Details
Select a transaction and then click the Details button to view more information about the transaction.
Add Credit
The Add Credit windows allows the librarian to add credit to the account of the selected patron.
- Select the Payments subtab from the Charges tab.
- Select the Add Credit option from the bottom of the page.
- From the dropdown menu, select the payment method.
- Enter the total amount that you'd like to add in the Credit amount field.
- Use the Credit Note field to supply an (optional) explanation as to why you are adding a credit for this patron.
- Select to Print Receipt or Email Receipt after applying the credit.
- When you are ready, click Process to issue the credit and print an optional receipt.
Refund Credit
This allows the librarian to refund credit to the selected patron, if they have credit on their account.
- Under the Charges tab, select Payments.
- At the bottom of the page, select Refund Credit.
- The Refund credits window will appear.
- Supply the correct amount you'd like to refund in the Refund amount field.
- Select to Print Receipt or Email Receipt after applying the refund.
- When you are ready, click Process to issue the refund and print an optional receipt.
Print Receipt
The Payments subtab lets you print or email additional receipts for past transactions.
- Go to Circulation > Charges tab > Payments subtab.
- Select the line item you'd like to print a receipt for.
- Click Receipt to open the Receipt window.
- Select send a receipt as Print or Email.
- When you are ready, click Print to print and/or email the receipt.
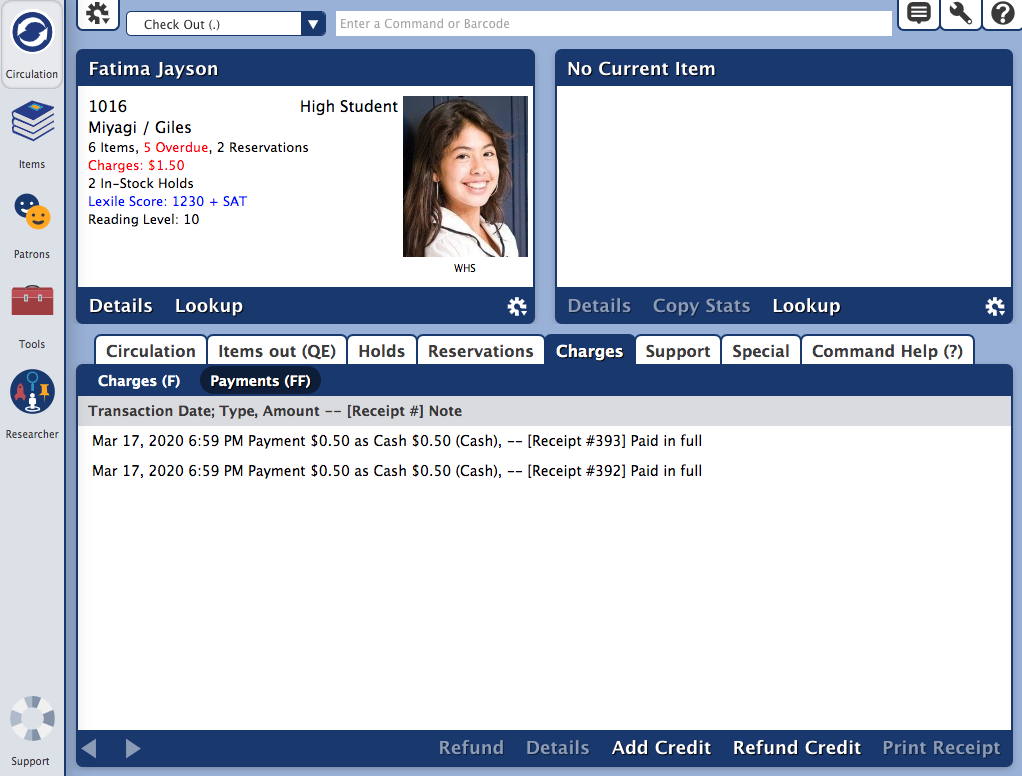
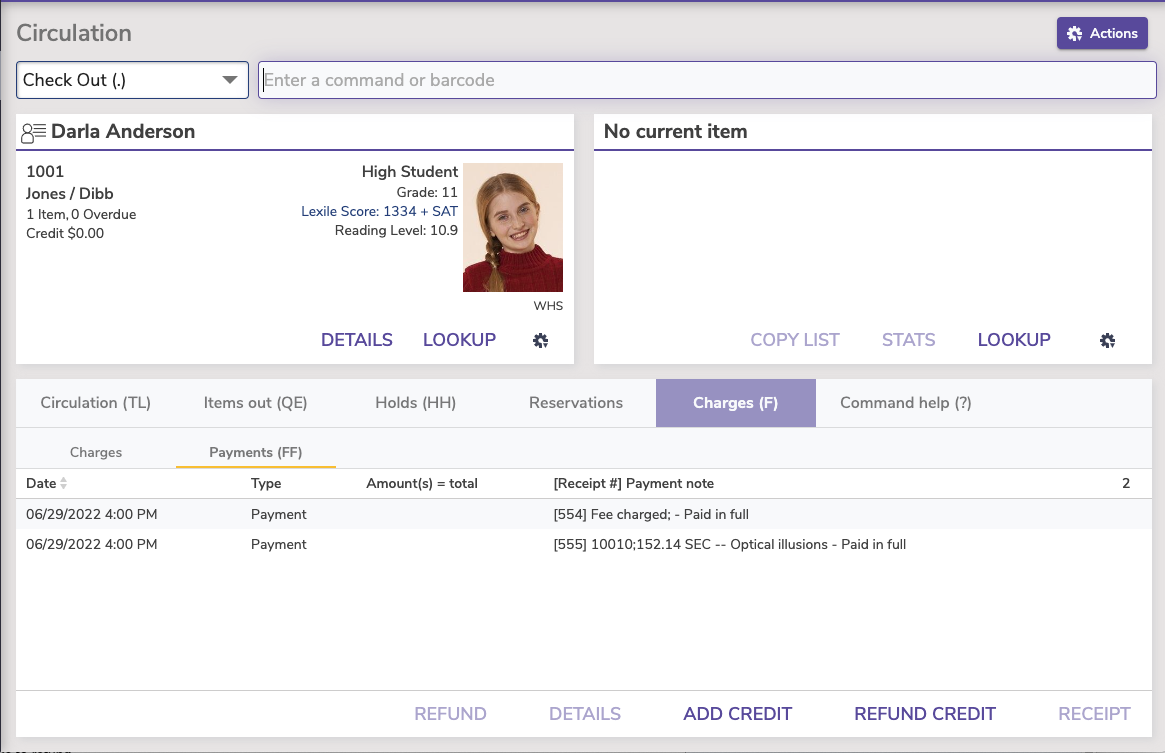
Payments (FF)
In the 7.19.10 release, the History subtab was renamed Payments.
Type FF into the command line to automatically go to this tab.
The Payments subtab contains a record of the payments made by the selected patron, as well as Refund, Details, Add Credit, Refund Credit, and Print Receipt utilities. Scroll through the first 50 transactions, then click the![]() arrow to view the next page.
arrow to view the next page.
Step-by-Step Instructions
Refund
- Select the Payments subtab from the Charges tab.
- Highlight the payment you'd like to refund.
- Select the Refund option from the bottom of the page.
- First, enter the total amount that you'd like to refund in the Refund Cash or Refund Credit field.
- Supply an (optional) explanation as to why you are issuing a refund and/or credit to the patron in the Refund Note field.
- Determine whether you want to Print Receipt or Email Receipt after applying the refund. These receipts can either be given to the patron at time of refund or filed by the library for safekeeping. If a receipt is to be emailed, be sure to enter an email address in the field to the right of the Email Receipt radio button.
- When you are ready, click Process to issue the refund and print an optional receipt.
Details
Select a transaction and then click the Details button to view more information about the transaction.
Add Credit
The Add Credit windows allows the librarian to add credit to the selected patron.
- Select the Payments subtab from the Charges tab.
- Highlight the line item you'd like to add a credit to.
- Select the Add Credit option from the bottom of the page.
- First, enter the total amount that you'd like to add in the Credit Amount field.
- From the dropdown menu, select the payment method from: Cash, Check, Charge or Other - See Note.
- Supply an (optional) explanation as to why you are adding a credit to the patron in the Credit Note field.
- Determine whether you want to Print Receipt or Email Receipt after applying the refund. These receipts can either be given to the patron at time of refund or filed by the library for safekeeping. If a receipt is to be emailed, be sure to enter an email address in the field to the right of the Email Receipt radio button.
- When you are ready, click Process to issue the refund and print an optional receipt.
- If you are not satisfied with the refund, click Cancel.
Refund Credit
This utility allows the librarian to refund a credit to the selected patron.
- Under the Charges tab, select Payments.
- If you would like to refund a payment to your current patron, select/highlight the credit and click the Refund Credit button.
- At the bottom of the page, select Refund Credit.
- The Refund Payment window will appear.
- Supply the correct amount you'd like to refund in the Refund Amount field.
- Determine whether you want to Print Receipt or Email Receipt after applying the refund. These receipts can either be given to the patron at time of refund or filed by the library for safekeeping. If a receipt is to be emailed, be sure to enter an email address in the field to the right of the Email Receipt radio button.
- When you are ready, click Process to issue the refund and print an optional receipt.
- If you are not satisfied with the refund, click Cancel.
Print Receipt
The Payments subtab provides a utility to print or email receipts.
- Go to Circulation > Charges tab > Payments subtab.
- Select the line item you'd like to print a receipt for.
- Click Print Receipt to open the Print Receipt window.
- These receipts can either be given to the patron at time of refund or filed by the library for safekeeping. If a receipt is to be emailed, be sure to enter an email address in the field to the right of the Email Receipt radio button.
- When you are ready, click Process to print and/or email the receipt.
- If you are not satisfied with the refund, click Cancel.
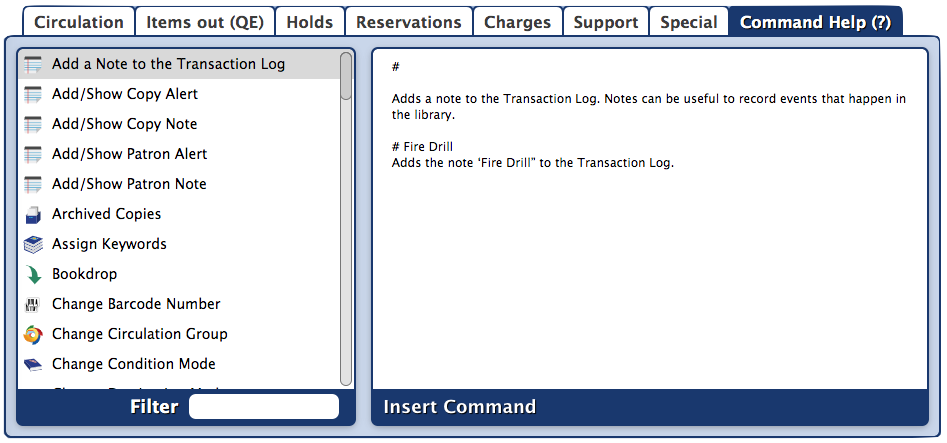
Command Help
![]() Circulation > Command Help tab
Circulation > Command Help tab
Command Help shortcut: ?
The Command Help tab contains information about Alexandria commands and how to use them. Select a command from the list to see its code and a description of its functionality on the right. You can also double-click the command to insert it into the Command Line.
To execute the command you've selected, type or scan a barcode.
If you select a command and click Enter without entering a barcode, the action taken depends on the command you selected. For example:
- If the command you select is a mode, Alexandria changes the current mode and displays the Circulation window under this mode.
- If you select the locate command, a Lookup browse window will appear. You may then make a selection from the Browse window.
- If the command you select performs a circulation function, then that function is performed, the Circulation window will appear, and the transaction log records the results. For example, if you select the Hold Request command and enter a barcode, Alexandria puts a hold on the item and the Circulation window will appear, appropriately logging the entry.
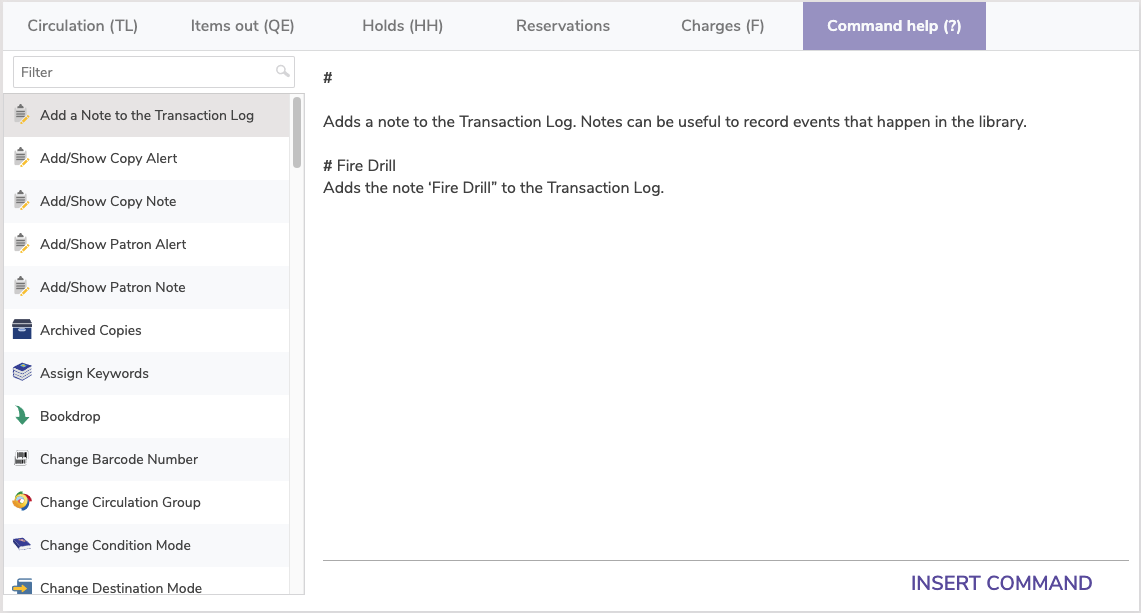
See Circulation Commands for a complete list of commands and how to use them.
Command Help (?)
Type ? into the command line to automatically go to this tab.
The Command Help tab contains information about Alexandria commands and how to use them. Select a command from the list to see its code and a description of it's functionality on the right. You can also double-click the command to insert it into Command Line.
To execute the command you've selected, type or scan a barcode.
- If you select a command and click Enter without entering a barcode, the action taken depends on the command you selected. For example:
- If the command you select is a mode, Alexandria changes the current mode and displays the Circulation window under this mode.
- If you select the locate command, a Lookup browse window will appear. You may then make a selection from the Browse window.
- If the command you select performs a circulation function, then that function is performed, the Circulation window will appear, and the transaction log records the results. For example, if you select the Hold Request command and enter a barcode, Alexandria puts a hold on the item and the Circulation window will appear, appropriately logging the entry.
See Circulation Commands for a complete list of commands and how to use them.
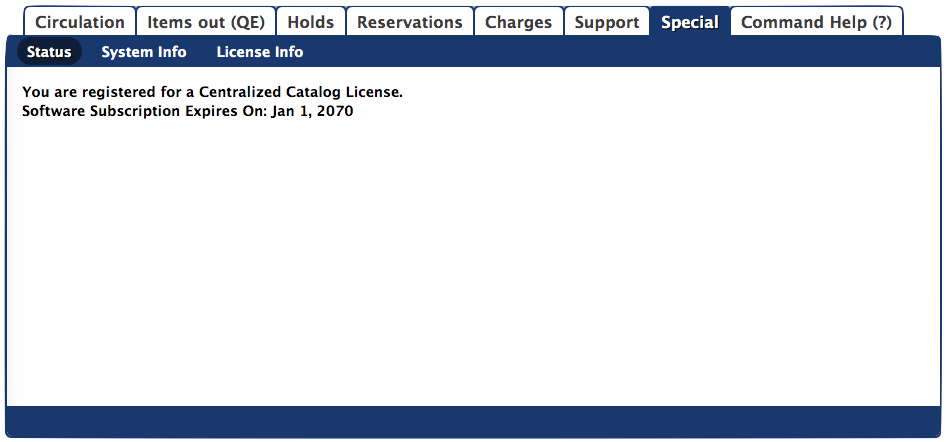
Special
Status, System Info, License Info
Status, System Info, and License Info are now accessed through the topnav under "About Alexandria."
Status
The information on the Status subtab shows the number of concurrent downloads, the number of current connections, your remaining hard drive space, and a shortcut to the Application Data Folder.
The Status subtab will also display the current date and time, how many communication channels are open, whether an application update is available.
System Info
The System Info subtab contains information about your system. This information is automatically attached to your email messages so that our Customer Support team has as much of the basic information as possible to help solve your problems and answer your questions.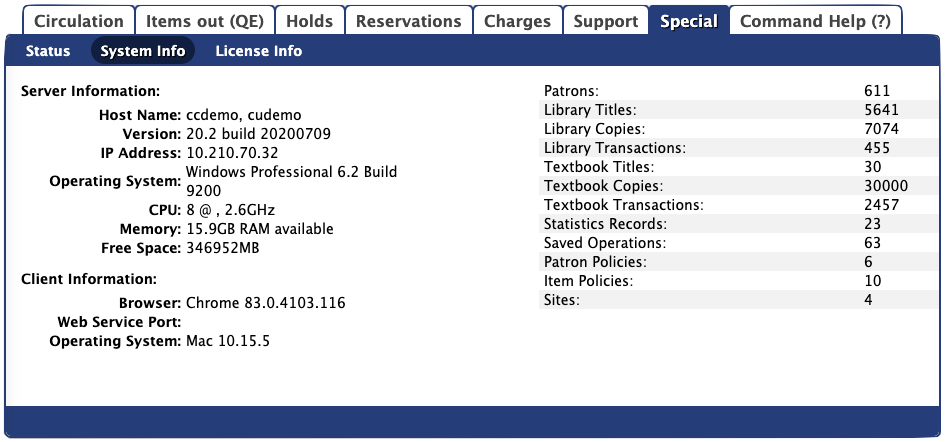
Please note that the information in these counters is used mainly for Customer Support analysis and may not be accurately interpreted by the uninitiated. For example, while the transactions counter might seem self-explanatory, it really only keeps track of current (outstanding) circulation transactions. Items that are currently reserved, put on hold, or circulated will increment the counter by one (+1); items that are checked back in will decrease the counter by one (-1). Therefore, to get an accurate count of your circulation transactions, don't rely on the counters below—run the Usage by Period report instead.
The Client Information section contains information about the client (you are using) that is currently connected to your data station.
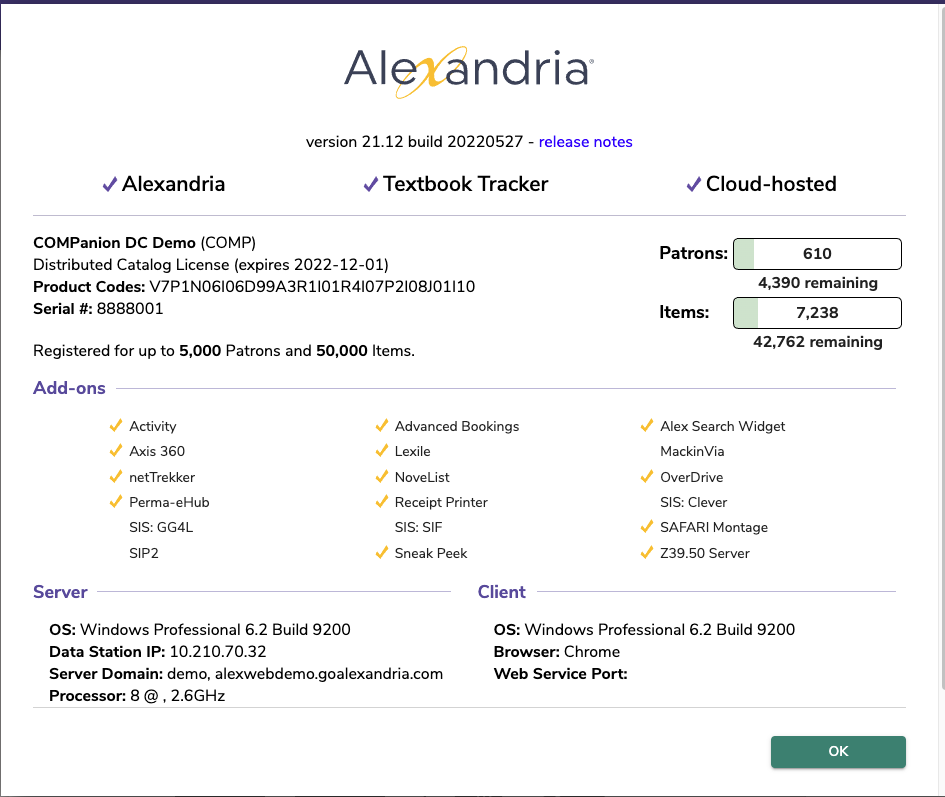
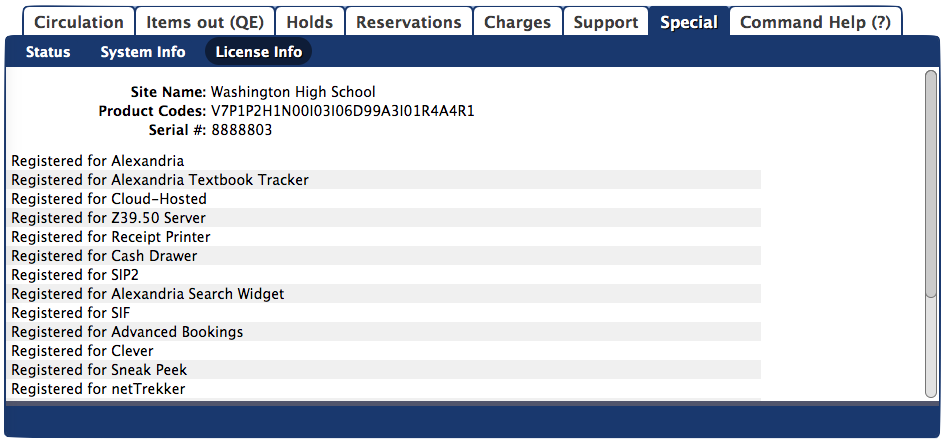
License Info
The License Information subtab contains information about your Alexandria license. This information shows what you are registered to use. Note that you can also check your patron and item record limits.
Support
Support is now accessed through the Help Menu on the Topnav. See Dashboard for details.

Use the Email subtab to send questions to COMPanion's Customer Support team or other departments.
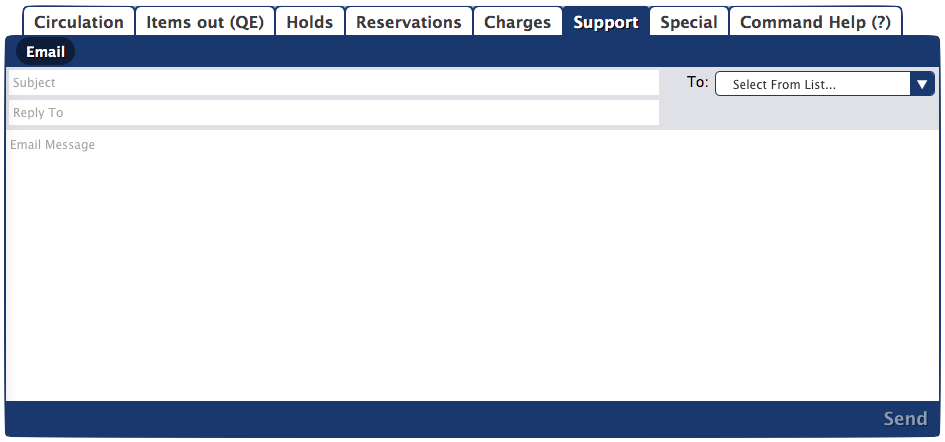
Subject: Enter a subject.
Reply To: Enter the email address our response will be sent to. If left blank, this will be the email in the Site record.
To: Click the dropdown menu on the right to choose which department to contact. The default is Customer Support.
- For example, if you have a question about how something in Alexandria works, choose Customer Support.
- Or if you have feedback on our Support Center and help resources, select UX Team.
Email Message: Describe the nature of your problem or the question you need answered.
Send: When you're ready, click Send.
If you haven't yet provided an email address in the Sites Management interface interface or properly configured your Administration Email settings, you will not be able to send emails with this method.
Emails sent directly from the program include essential information on your registration and system, so this is a great way to get faster help for your issue!