 Pardon the mess! The Support Center is undergoing construction.
 ![]()

Controller Administration
Last Updated: $action.dateFormatter.formatDateTime($content.getLastModificationDate())

When this page is migrated to the new Support Center, it should be named simply 'Administration'.
Controller Administration Settings
See also Email Preferences and Self Hosted.
-
Although you are allowed to make changes to individual Preferences for every site your Alexandria Controller maintains, the actual Controller Administration contains some globally-based settings of its own.
The Administration settings are high-level preferences intended for network administrators or IT Technology Support departments; in other words, advanced settings that ordinary operators wouldn't be able to configure without help. These settings are used to configure your Controller Data Station (i.e. server) email information, archive schedules, database maintenance, web settings, and system updates.
- These Database settings only appear for those running a Centralized Catalog, Distributed Catalog, or an independently operated Data Station in a Distributed Catalog. Administration settings apply to all sites and contain configurable settings for the entire union.
- The term "data station" is an old term for "database". You may see both terms in this doc.
- The only person able to access the Controller's Administration settings is the Admin operator defined in the Admin Settings; this operator is not a standard patron and can not be modified in Patrons Management. COMPanion will have emailed you the Admin Username and Password required to access Controller Administration; your access and registration information can also be found on the back of your Getting Started Guide. If you still can't locate your login information, contact our support at Customer Support at (800) 347-4942 or by email via: support@companioncorp.com. If needed, you can also use the Can't access your account? link during Login to reset the Controller's Admin Username and Password.
Database Management, Controller Management, and Monitor?
Database Management is analogous to Controller Management and allows our internal teams or your IT personnel to manage the databases under a controller.
The Monitor interface, used internally by COMPanion Support and Hosting personnel only, gives our teams the ability to monitor the status of various Controllers. Monitor contains many of the actions/options available in Administration.
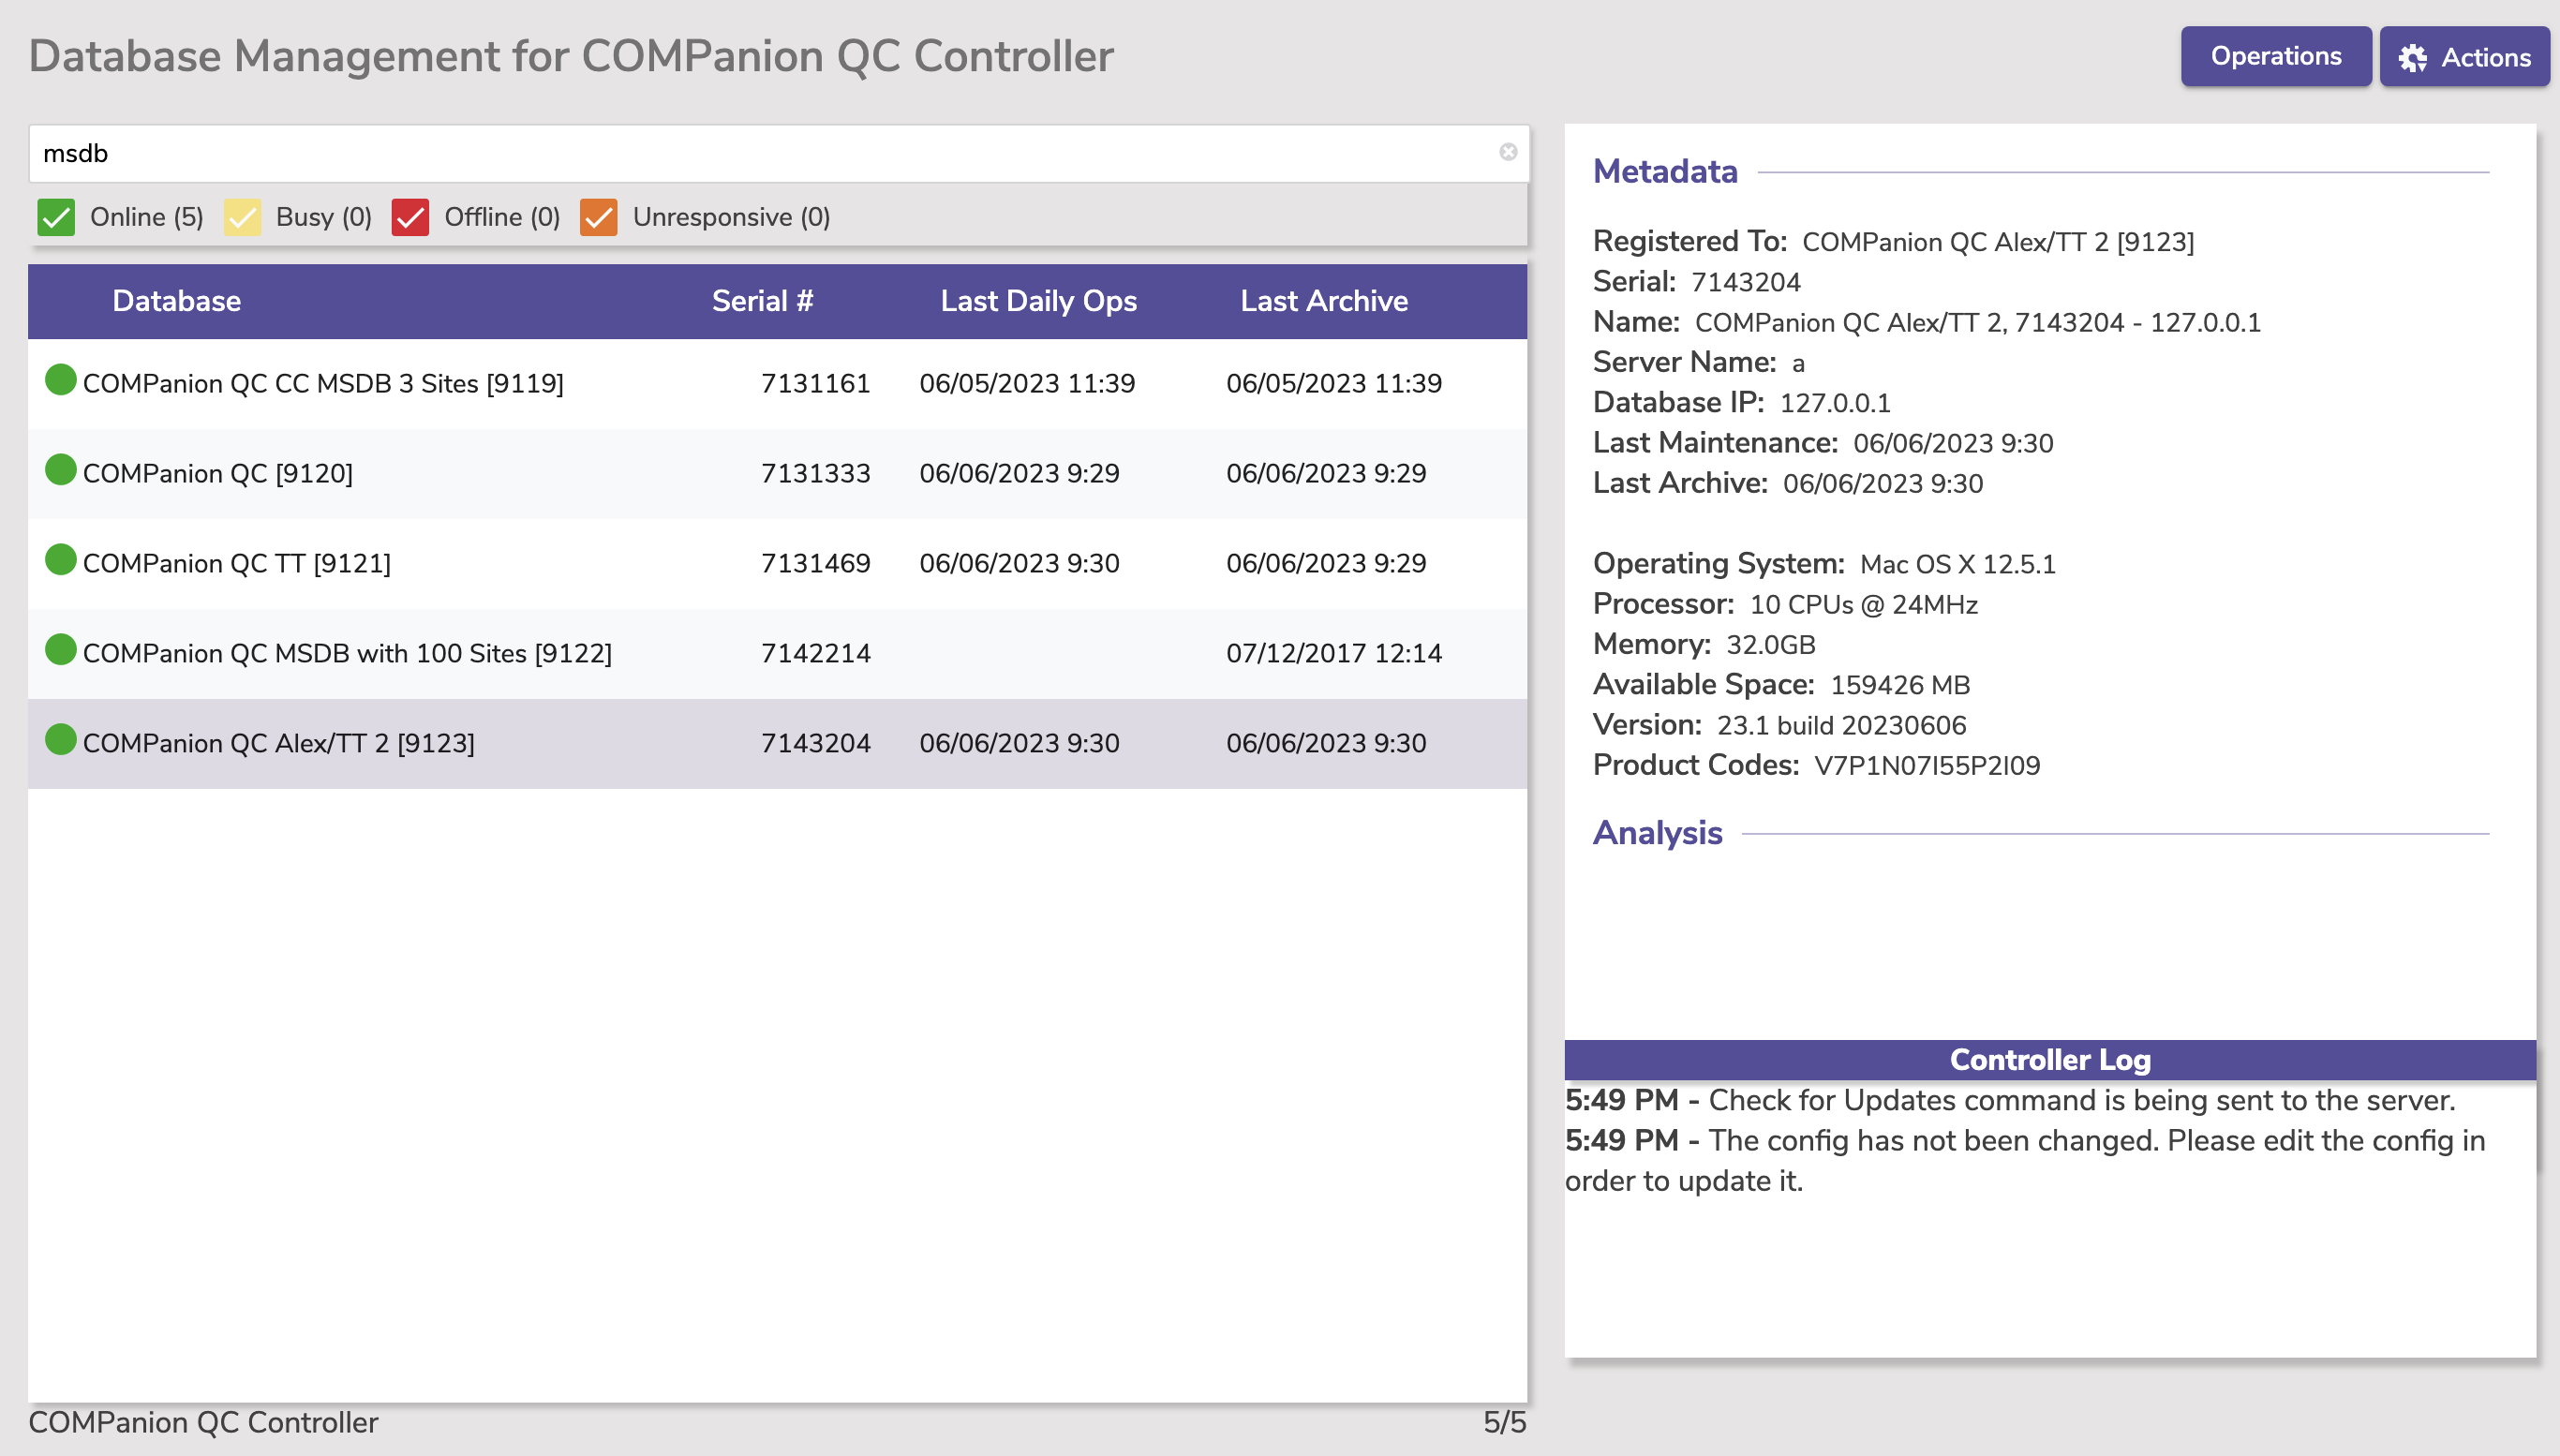
First, you have a list of managed Data Stations which contains information about which Data Stations are active or stopped, their names, serial numbers, and the last time daily operations/jobs and archives were run.
The Search box at the top-left allows you to quickly isolate a Data Station from the list (using the Data Station/PID or Serial/Host Name).
Use the Online, Busy, Offline, and Unresponsive filters to only show (or hide) Data Stations with corresponding statuses.
Controller Log
The bottom right of the interface contains the Controller log. This log captures and stores all pertinent Controller information, including when each Data Station is stopped or started, and any special operations (e.g. archive or rebuild) that have been initiated or performed. The controller log is automatically saved by the Controller. Logs are saved inside the Log folder, located in the Alexandria Controller Support program directory.
Operations
Clicking this takes you to the Operations queue for this controller/database.
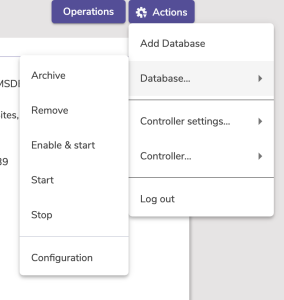
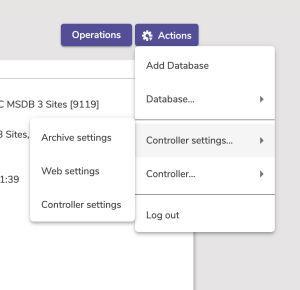
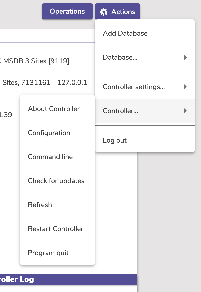
Actions
Allows you to perform a number of useful functions and operations, including modifying managed Data Station's Administration settings (e.g. configure email, set web options, etc.), Add or Remove a Data Station, or perform an archive or rebuild on a selected Data folder.
| Actions | |
|---|---|
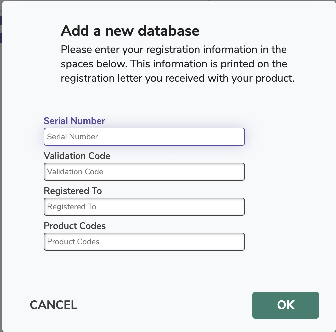
Add DatabaseYou may also click on the Add button, causing a message window to appear. You will be given a choice to Add a new Data folder or Create a new one. If you wish to do neither, click Cancel. For more information on importing or creating new Data Stations, please review Adding New / Existing Data Stations. |
|
DatabaseThese settings allow you to configure the location where local archives are stored. It is where you will also perform manual archives for your Data Stations.
|  |
Controller settings
|
|
Controller
|
|
Activate Alexandria Data Stations on the Controller
The Alexandria Controller has the ability to Start and Stop Selected Data Stations that it manages. When you Add a new or existing Data Station, they will initially appear as Stopped in the monitor list.
- Select the Data Station(s) you would like to activate from the list and choose Start Selected from the Actions menu.
- You can activate more than one Data Station at a time. When Alexandria Controller is shut down and restarted, all of the individual Data Stations automatically activate. If a Data Stations fails to auto-start on launch, an “unable to start” error message will be recorded to the log. The green Running box located in the Status column of the managed list indicates the Data Station is active.
At this point, activated Data Stations are broadcasting—awaiting connections on their default Port ID.
To send email reminders, such as the Overdue Items Notice, you will need to configure how Alexandria communicates with your library's email server. Alexandria's email system is designed to potentially cope with hundreds of emails being sent (or resent) over many machines at the same time.
What happens if an email fails to send?
If a send fails, the next resend time is generated by adding a random value between 3 and 9 minutes, spreading out the resend times so all the undelivered email still in the “short range” period isn't sent at the same time. If a send hasn't succeeded by the end of the “short range” period, the program will generate new send times using random values between 60 and 90 minutes. If a send still hasn't succeeded after 100 hours the email is discarded and a “return-to-sender” email will be sent.
For emails to work, you will also need to...
- Add a valid email address to your site record.
- Add a valid email address to at least one operator record.
Set Up Your SMTP Server
See Email PreferencesUse Gmail As Your SMTP Server
A Gmail account can be used as a portable SMTP server if your library's network does not already have one. Before you configure Alexandria to use Gmail, you need to set your Gmail preferences to Allow Less Secure Apps*.
- Go to /admin > Email.
- Enter the following settings for Server 1:
- SMTP Server Address: smtp.gmail.com
- Port: 587
- Login: Enter the username for your email server.
- Password: Enter the password for your email server.
- Click Save in the upper-right corner of the window.
- Click Test Server, to ensure the Gmail account is acting as a server.
- Repeat for Server 2 (optional).
*End of May 2022, Google will not let you choose to 'allow less secure apps'. See this article. At the moment, the COMPanion Support Team is recommending that you make use of an SMTP relay service. Read more: What is SMTP relay? | SMTP relay: Route outgoing non-Gmail messages through Google.
Database
See Self Hosted.
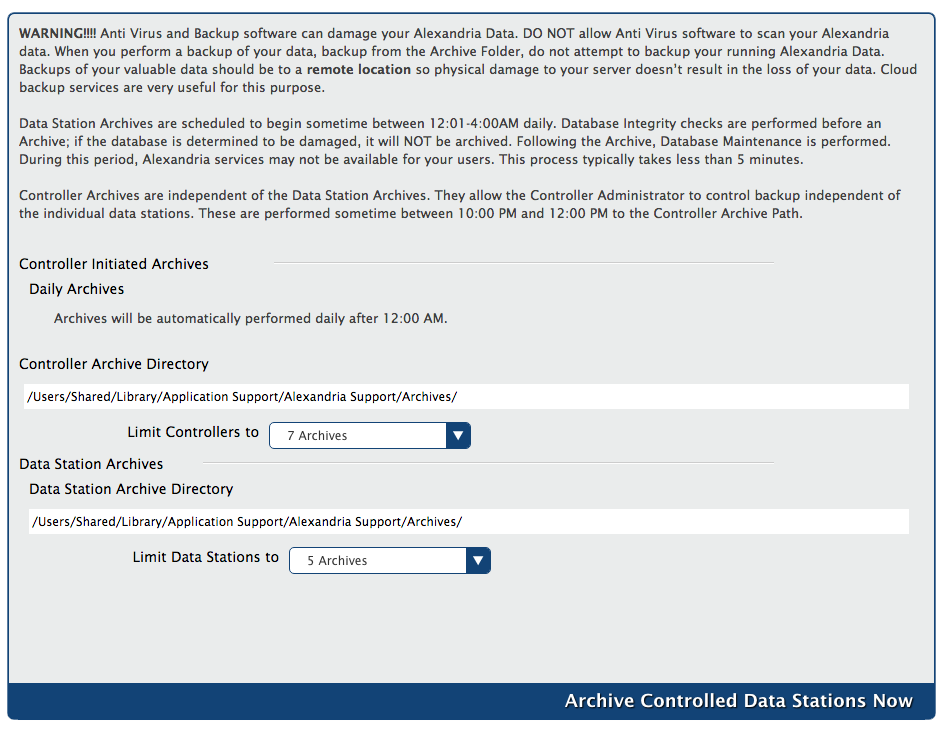
Archiving is an automatic method of making complete, regular copies of your database and storing them in a designated folder on your hard drive. Manual archives should be performed before making any large-scale changes to your database, such as imports, updates, utilities, or machine upgrades. Your most recent archives are handy when trying to fix a bad import and are invaluable in securing the safety of your data. However, archives are not backups; the major difference between a backup and an archive is that backups are made on removable media and physically stored offsite (or in the cloud). Since archives are entirely useless in the event of a hard drive failure, keeping an offsite or cloud backup is highly recommended!
Database maintenance examines your database files and indexes and then performs patron, item, and circulation verification routines. If database damage is detected, it's automatically fixed. The maintenance should be performed at least once a month to keep your data in good, working order.
The Controller will automatically archive the data folder for each of your data sets between 12:01 and 4:00 a.m. daily. It will archive the Controller data folder between 10:00 p.m. and 12:00 p.m. During an archive, all other Data Station operations are temporarily suspended.
Settings
Archive Directory
By default, archives are stored in folder within the Alexandria Support folder. However, we highly recommend that you change the location to a one outside of the Alexandria Support folder, preferably on a separate drive. You can set a custom location for your Archive Directory in Administration > Database. If you enter an invalid folder, or if it becomes invalid for any reason (such as disconnecting the drive it's on), it will automatically be replaced with the default folder.
We control the folder structure within your Archive Directory. Within the Archive folder is a subfolder for each of your database serial numbers, in which individual archives are stored. Archives are titled by the date and time in the YYYYMMDD HHMMSS format. Daily archives include "DAILY" in the title; Snapshot archives do not.
Archives > Serial Number > Archive YYYYMMDD HHMMSS
Archives > 8888001 > Archive 20180720 110704 DAILY
Storage Limits
Here, you can choose how many Daily Archives and Snapshot Archives to store at a time, up to 14 of each. Just make sure you have enough free space for them all! If you begin to run out of space, or if you're already storing more than the number you specified, the oldest archive of the type being run will be removed.
We strongly advise you to review these settings regularly to ensure that your archive directory is up to date and the number of archives stored is properly configured based on your needs and available disk space.
Web Settings
See this information on Self Hosted.
Self-Hosted customers will need to configure these setting before using the web modules of the program. For a Centralized and Distributed catalogs, these settings apply to all sites. A Cloud-Hosted customer doesn't have the web settings interface in the administration module because their data is hosted on a designated COMPanion server.
Alexandria uses Transport Layer Security (TLS) for secure web communications. These settings allow you to configure the certificates, ports, and server domain names that Alexandria uses to communicate with web browsers. When you save changes to this window, the Data Station will apply your new settings and restart web services.
Settings
Alexandria uses Transport Layer Security (TLS) for secure web communications.
When it comes to TLS certificates, “file specifications” stand for the correct (and required) directory location, file name, and file extension (e.g. C:\Program Data\Alexandria Support\SSL\*.pem) of your keys/certificates on the Data Station. Accurate file specifications must be provided in order for the key/certificates to be accessed.
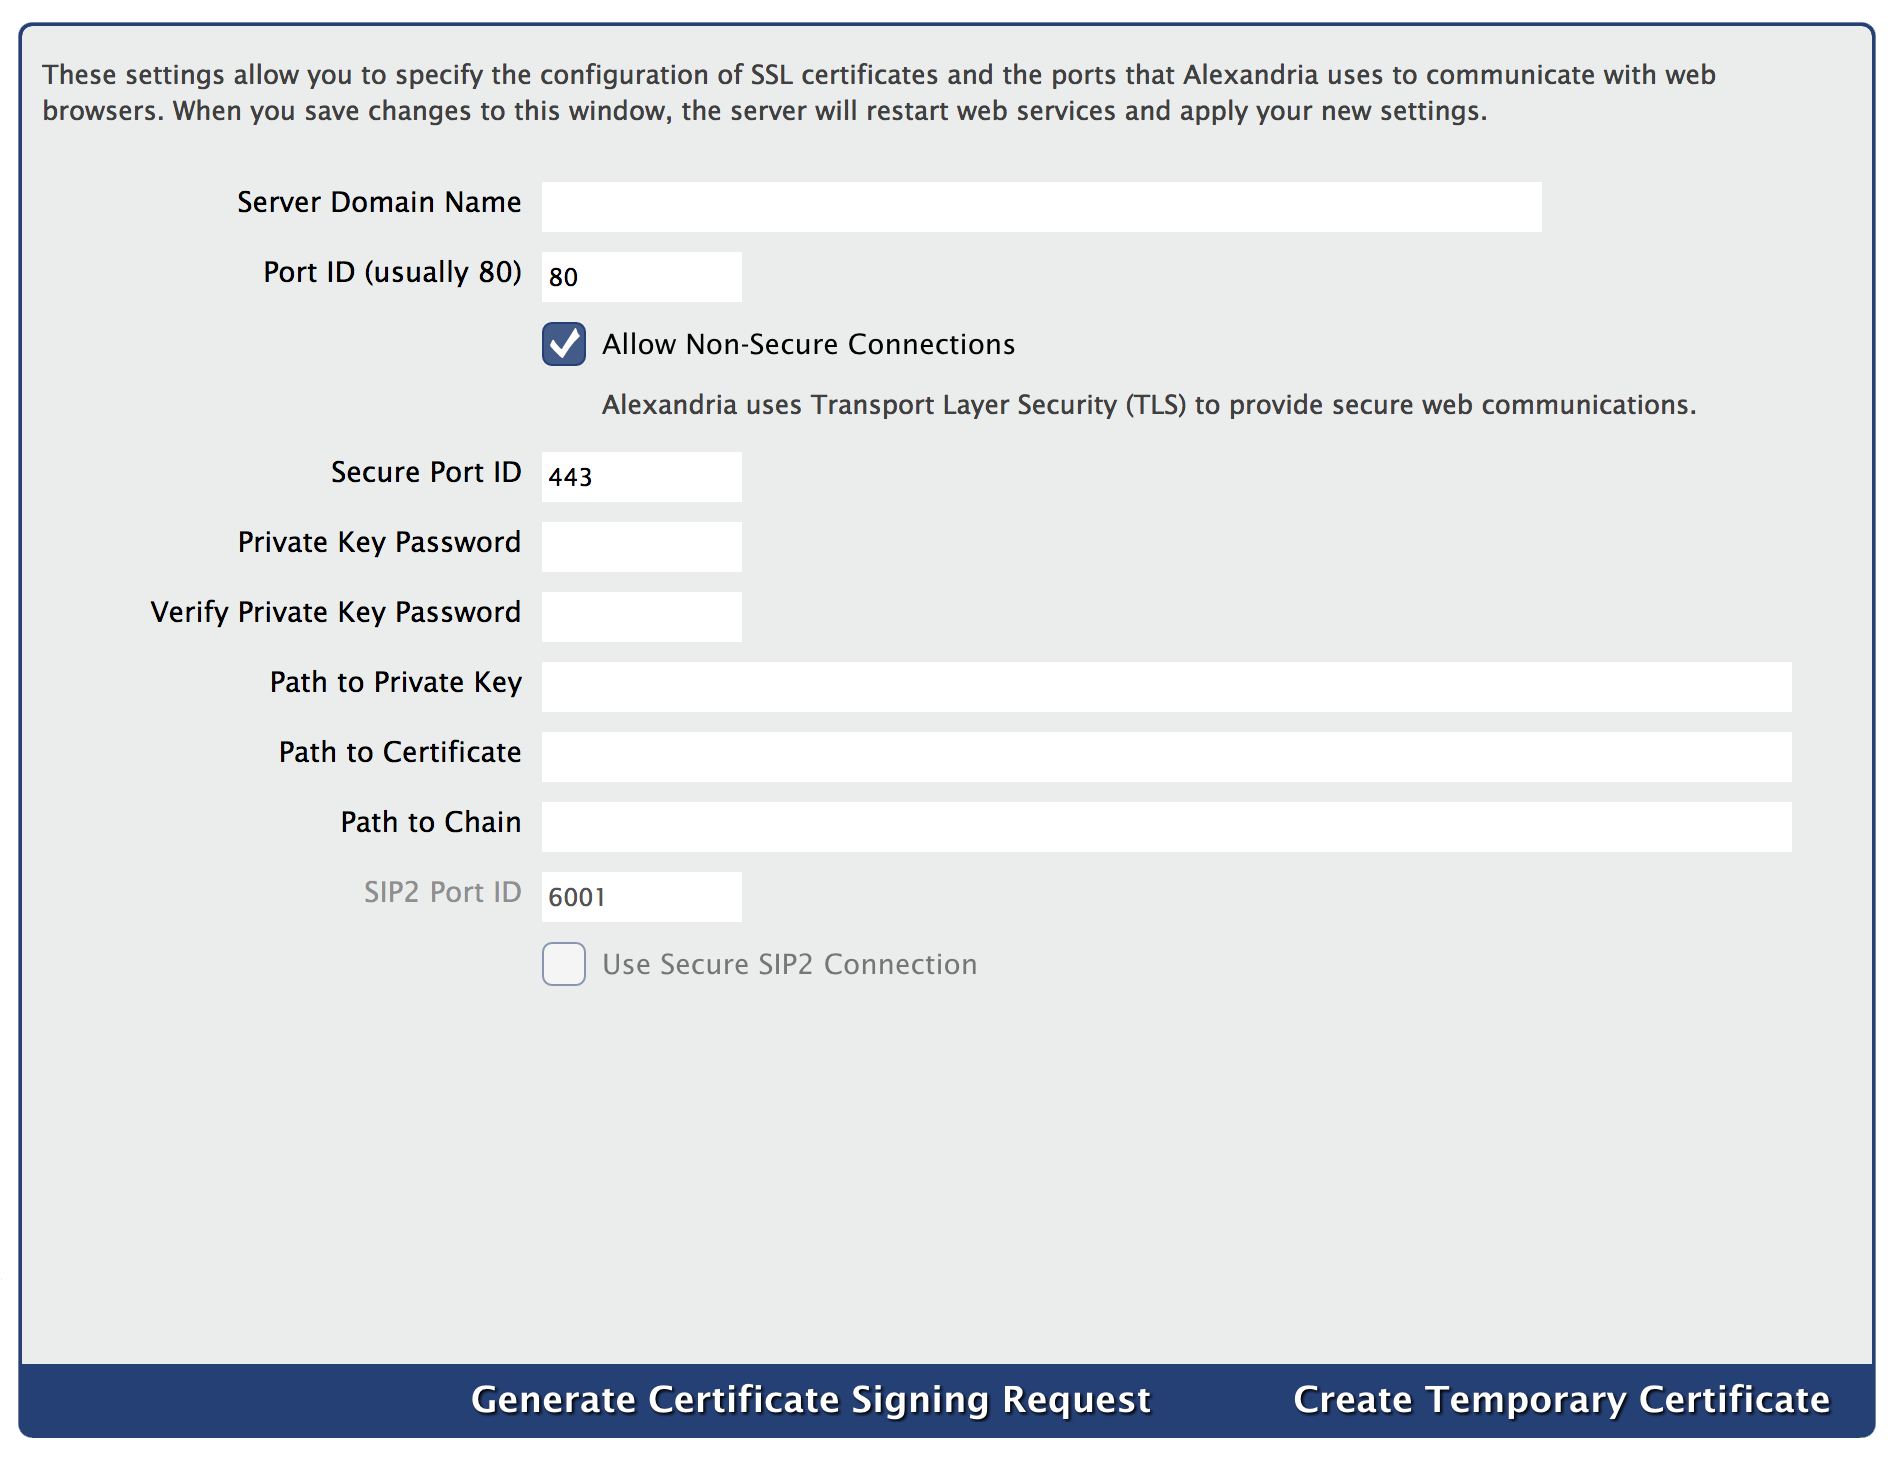
- Server Domain Name. Enter the domain name or IP address that connects to your Data Station.
- Port ID. Enter the port number that Alexandria uses to access the web service. This is typically port 80 or 8080.
- Allow Non-Secure Connections. Uncheck this box if you want to maintain secure web communications. (optional)
- Secure Port ID. Enter the port number used for the secure web interface. The default is 443.
- Private Key. Enter the private key password, if required. (optional)
- Verify Private Key Password. Enter the private password again to verify it. (optional)
- Path to Private Key. Enter the file name and location of the Data Station’s private key. (optional)
The file name and location may be entered or changed manually on a connected Web or Librarian Workstation, but it must follow the correct file specifications.
Only certificates in PEM format are recognized. (optional)
- Path to Certificate. Enter the file name and location of the Data Station’s public certificate.
The file name and location may be entered or changed manually on a connected Web or Librarian Workstation, but it must follow the correct file specifications.
Only certificates in PEM format are recognized. (optional)
Path to Chain. Enter the file name and location of the Data Station’s chain file.
The file name and location may be entered or changed manually on a connected Web or Librarian Workstation, but it must follow the correct file specifications.
Only certificates in PEM format are recognized. (optional)
- SIP2 Port ID. Enter the port number used for the SIP2 communications. The default is 6001.
- Use Secure SIP2 Connection. Enable this setting if you're using a Secure SIP2 Connection
PEM Format
The PEM format (Privacy Enhanced Mail), an early standard for securing electronic email; the PEM format is not widely adopted as an internet mail standard.
Generate Certificates
- Create Temporary Certificate. This creates a temporary private key and public certificate from Alexandria’s registration information then saved to to the SSL folder in the Alexandria Support folder, even if the Path to Certificate that you entered is different than the SSL folder. They expire 365 days after creation.
- Generate Certificate Signing Request. This creates a request for a certificate. This request can be sent to a certificate authority.
Important
The Microsoft Certificate Server is not supported. You will need to use a code signing authority such as GoDaddy™, Comodo ©, or VeriSign™.