 Pardon the mess! The Support Center is undergoing construction.
 ![]()

How helpful was this page?
Related Blog Posts
Blog Posts
-
How to add reports in the new beta–you beta be trying it!
created by
Jan 16, 2024
-
Remind me with reports... for notes!
created by
Oct 04, 2023
-
Loaned Items Notice for teachers
created by
Sep 21, 2023
-
Summer tip: how to print library cards
created by
Jul 12, 2023
-
End-of-year reports
created by
May 10, 2023
-
Curate your collection–Stats with Super Summary
created by
Feb 01, 2023
-
How to share your district report standards
created by
Jan 18, 2023
-
Share your top titles
created by
Jan 10, 2023
-
Cash drawer report to the rescue!
created by
Oct 04, 2022
-
¿Hablas español?- Filter search results by language
created by
Aug 16, 2022
Copies Labels Reports
Last Updated: $action.dateFormatter.formatDateTime($content.getLastModificationDate())

Alexandria custom label reports give you a way to control and customize the look of your barcode and spine labels. You can choose what information to display, where it's displayed on the label, and whether it's bold, regular, or even colored.
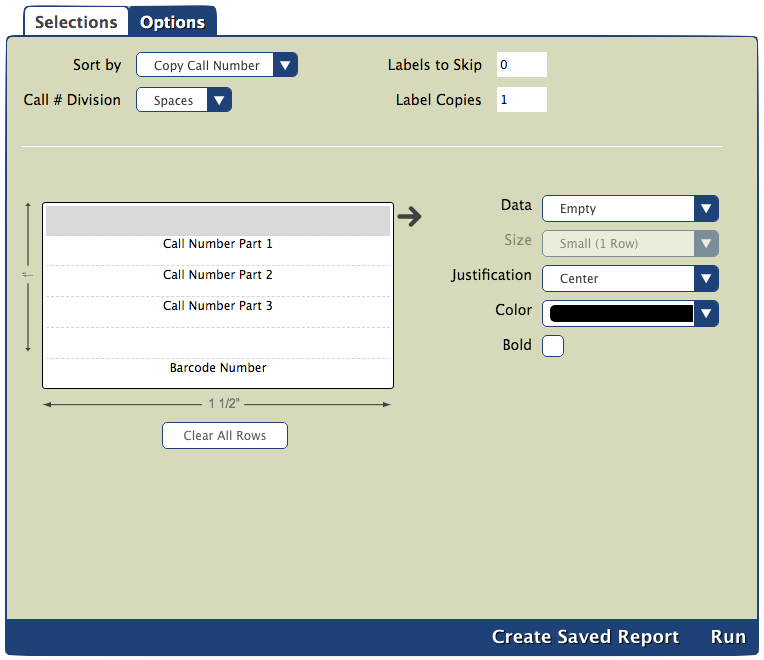
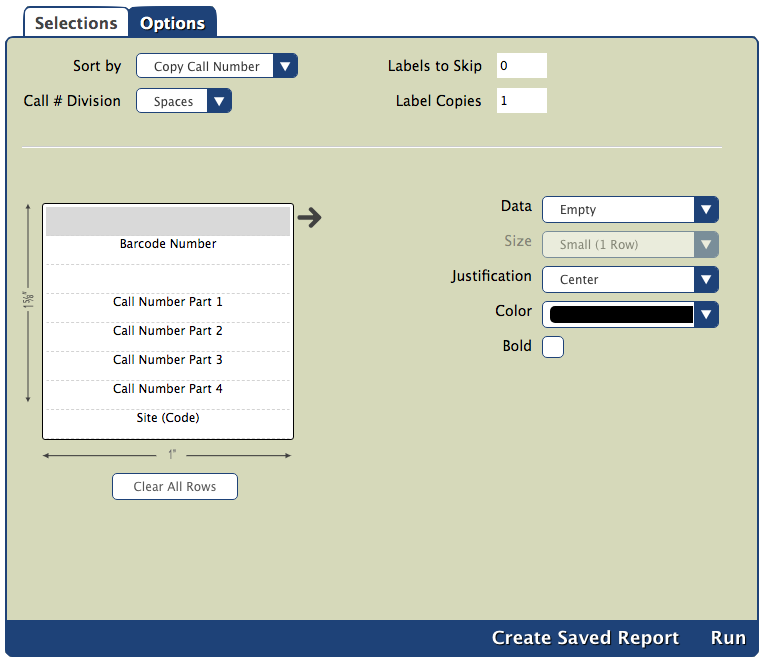
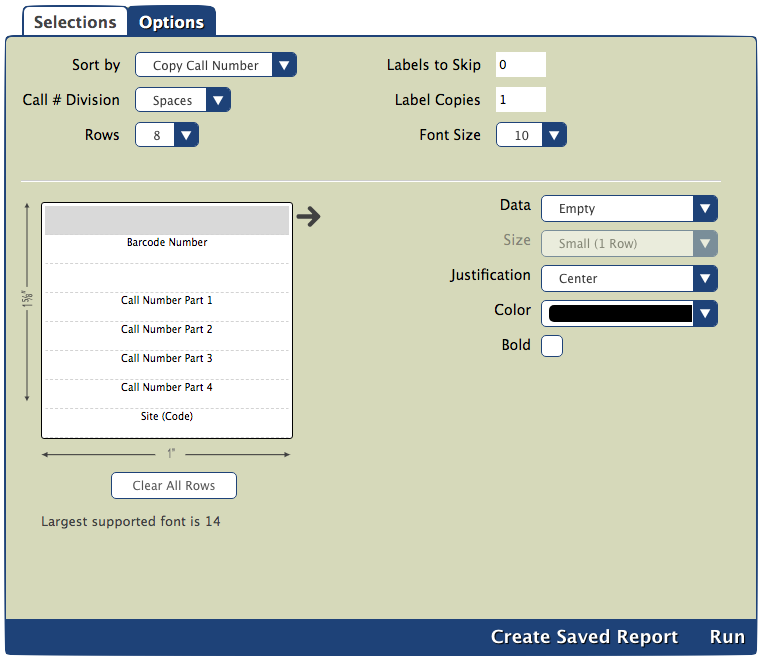
Options
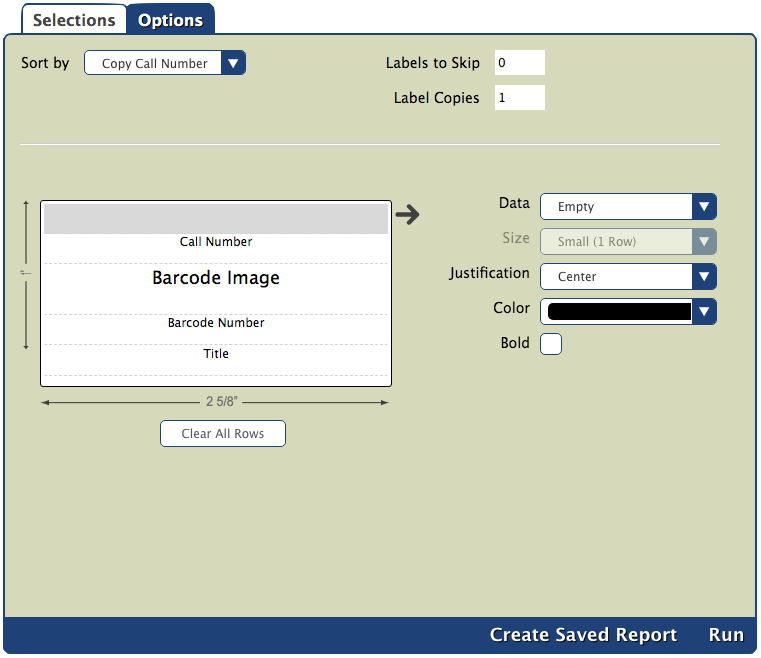
The custom label report interface contains a loose representation of an actual label's height and width. These are not meant to be an exact—just enough to get a rough feel for how they are laid out. Each field in the template can be customized using the options on the right. Formatting options can vary based on the type of data you've chosen to display in that field. For example, a barcode image cannot be bold. If you would like to start over with a blank label, simply click on the Clear All Rows button below the label image.
| Field | Options |
|---|---|
| Printing Options | |
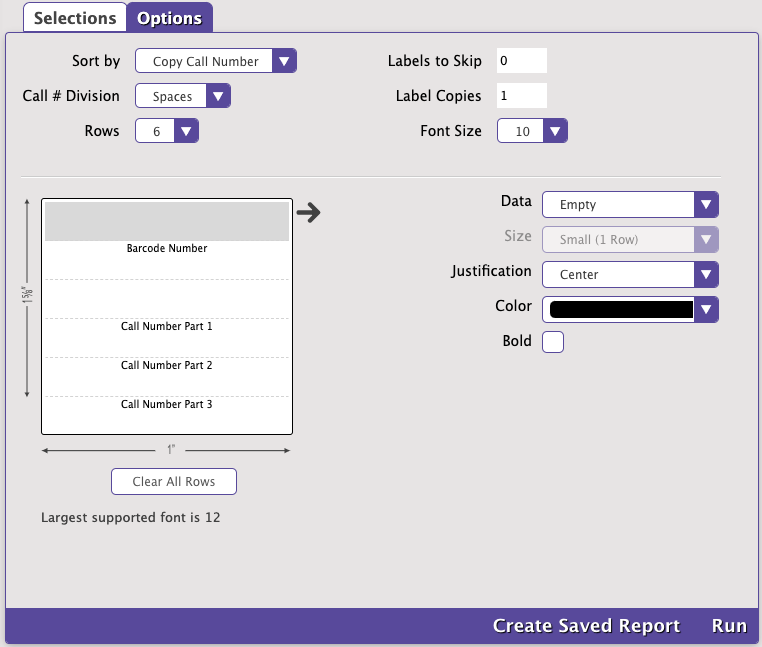
| Sort by | Choose how you want the labels to be ordered. |
| Labels to Skip | Skips a certain number of labels from the top before beginning printing. Useful if you're using a sheet of labels in which you've already begun printing. Applies to the first page only. (Character limit of two.) |
| Label Copies | Allows you to make multiple copies of the same label. (Character limit of two.) |
| Call # Division | Choose whether you want call number sections to be split into separate rows when there are Spaces or Spaces & Periods (spine labels only). |
| Formatting Options | |
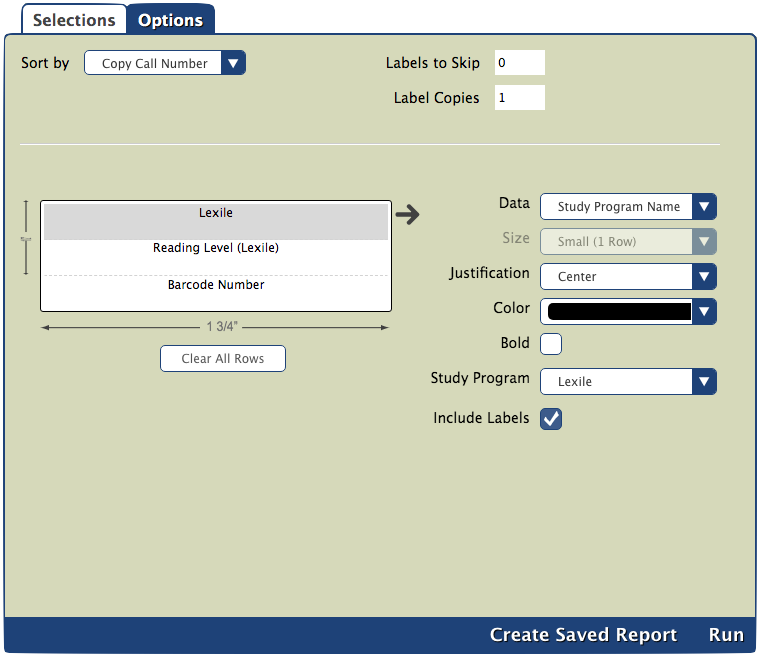
| Data | Select the data to be displayed in the selected field. In the label portion on the left, select the line you want to change and then pick from the Data drop down. Add series and series volume to your barcode or spine labels to make finding the next volume easier! |
| Size | Choose if this field will be small (1 row) or large (2 rows). The text will be formatted to fit the size. Labels are limited by the number of rows, so not all of them can be large. |
| Justification | Position the text (or barcode image) on the left, right, or center of the label. |
| Color | If you are printing these labels on a color printer, you can have certain fields show up in different colors: black, blue, red, purple, green, brown, and orange. |
| Bold | Format the text in this field bold. |
| Study Program | Choose the Study Program type. This option only appears when Study Program data is added to copy labels. |
| Include Labels | When checked, this option adds abbreviations that label the data type (e.g. RL indicates Reading Level). This option only appears when Study Program data is added to copy labels. |
Check out our Alignment Troubleshooting tips if you're having problems printing labels.
Copy Labels (3x10)
![]() Textbook Tracker: Textbook Copy Labels (3x10)
Textbook Tracker: Textbook Copy Labels (3x10)
Generates barcode or envelope labels
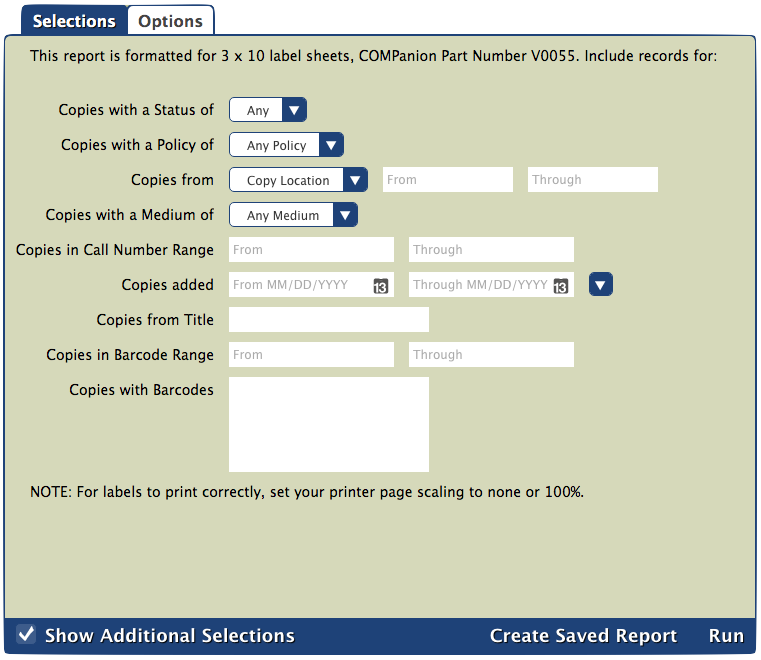
This report is formatted for 3x10 (1" x 2 5/8") label sheets, such as COMPanion's V0055 Blank Barcode Labels.
Check out Barcode Labels for more information on barcode label types, alignment troubleshooting tips, and FAQs.
Use(s)
Use these labels to place barcodes on library items (equipment, books, DVDs, etc.) for easy scanning.
Selections
| Options |
Example Report
Copy Labels (4x20)
Generates study program or envelope labels
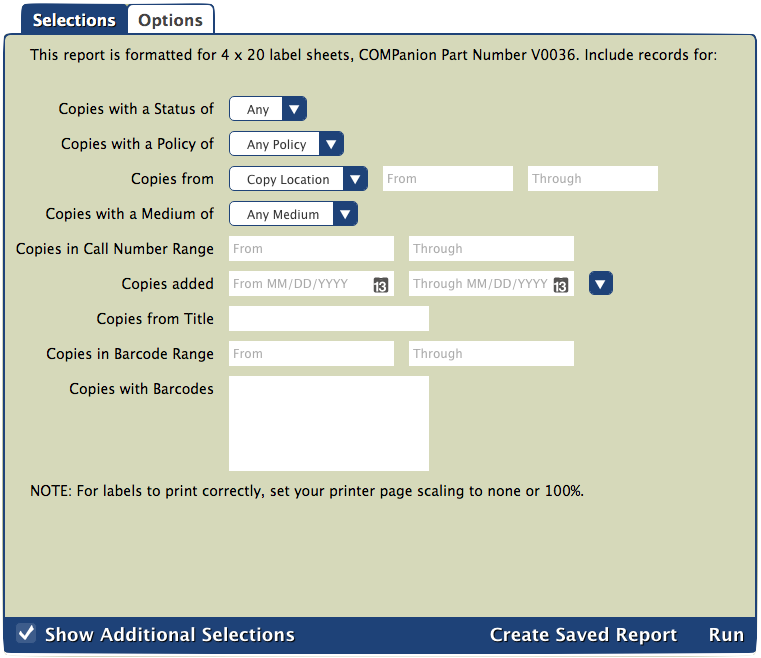
This report is formatted for 4x20 (1/2" X 1 3/4") label sheets, such as COMPanion's V0036 Blank Reading Level/Lexile Labels.
It's possible but not recommended to put barcode images on these labels. Use the Copy Labels (3x10) report if you want labels with barcode images.
Use(s)
- Create small labels with study program information. Place these on the outside or inside of book covers.
- Create small labels with additional information about a copy (author, genre, publication year, and more). Place these on the outside or inside of book covers.
Selections
| Options |
Example Report
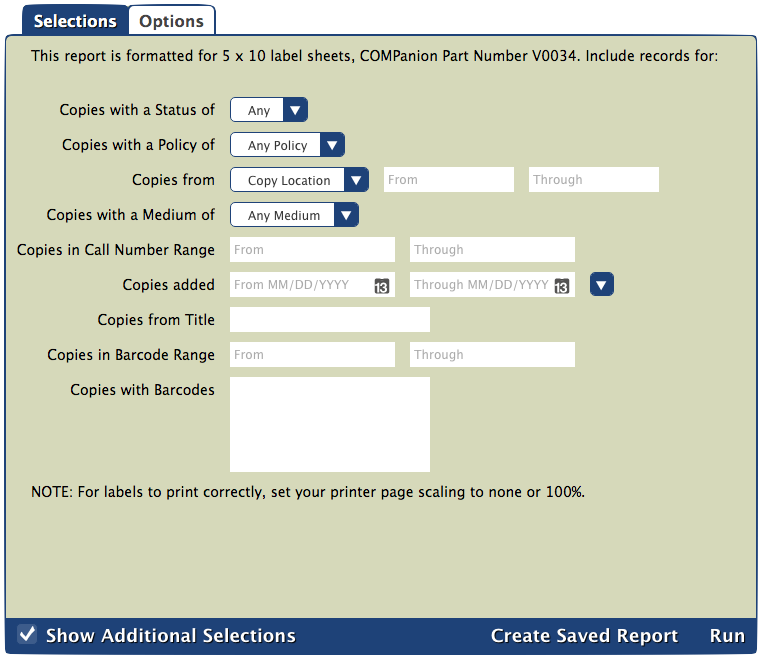
Copy Labels (5x10)
Generates spine labels
This report is formatted for 5x10 (1" x 1 1/2") labels sheets, such as COMPanion's V0034 Blank Spine Labels.
Use(s)
Use these labels when you have longer call number segments, but fewer total segments. These are wider than the 8x6 labels.
Selections
| Options
|
Example Report
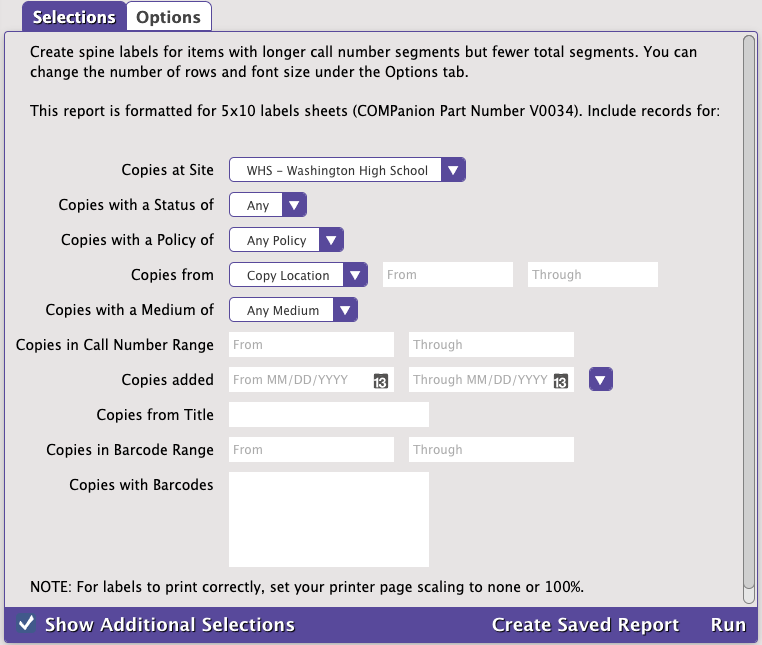
Copy Labels (5x10), Variable
Generates spine labels
This report is formatted for 5x10 (1" x 1 1/2") labels sheets, such as COMPanion's V0034 Blank Spine Labels.
The only difference between this report and the Copy Labels (5x10) report are additional options that allow you to change the font size and number of rows on these labels.
Use(s)
Use these labels when you have longer call number segments, but fewer total segments. These are wider than the 8x6 labels.
Selections
| Options
|
Example Report
Font Size Recommendations
To lower the chances of the text on your labels being cut off while printing, use these recommended font sizes:
| Number of Rows | Largest Recommended Font Size | Largest Supported Font Size |
| 2 | 20 | 30 |
| 4 | 14 | 18 |
| 6 | 10 | 12 |
Copy Labels (8x6, Tall)
Generates spine labels or study program labels
This report is formatted for 8x6 (1 5/8" x 1") labels sheets, such as COMPanion's V0032 Blank Spine Labels.
Use(s)
- Use these spine labels if you have several lines in your call numbers, as these are a bit taller than the 5x10 labels.
- Use these labels to put study program information on book spines.
Selections
| Options |
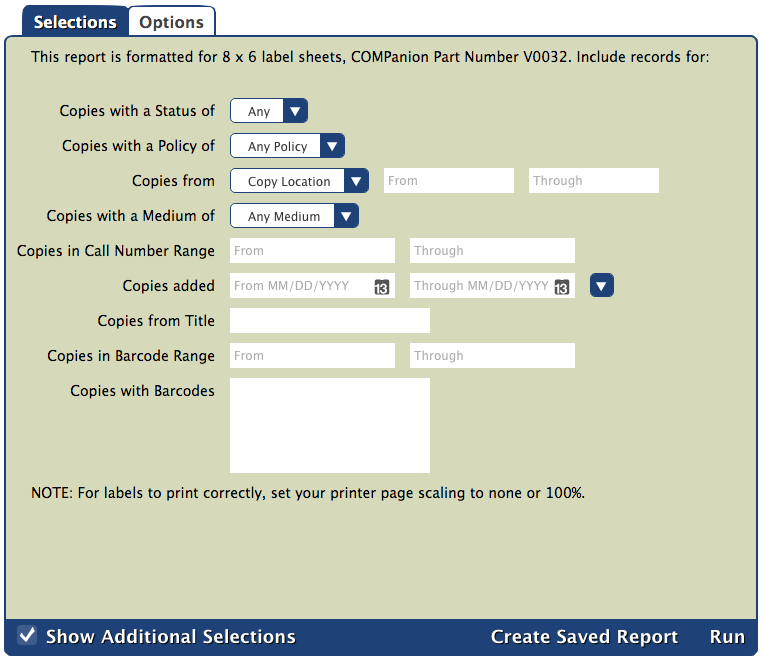
Example Report
Copy Labels (8x6, Tall), Variable
Generates spine labels or study program labels
This report is formatted for 8x6 (1 5/8" x 1") label sheets, such as COMPanion's V0032 Blank Spine Labels.
The only difference between this report and the Copy Labels (8x6, Tall) report are additional options that allow you to change the font size and number of rows on these labels.
Use(s)
- Use these spine labels if you have several lines in your call numbers, as these are a bit taller than the 5x10 labels.
- Use these labels to put study program information on book spines.
Selections
| Options
|
Example Report
Font Size Recommendations
To lower the chances of the text on your labels being cut off while printing, use these recommended font sizes:
| Number of Rows | Largest Recommended Font Size | Largest Supported Font Size |
| 2 | 20 | 34 (3 characters max) |
| 4 | 24 | 26 |
| 6 | 18 | 20 |
| 8 | 12 | 14 |
Copy Labels (8x6, Wide)
Generates wide and short spine labels
This report is formatted for 8x6 (1" x 1 5/8") labels sheets, such as COMPanion's V0032 Blank Spine Labels.
Use(s)
Use these labels when you need wide and short spine labels.
Remember to set the orientation to landscape in Adobe Reader.
Selections
| Options |

Example Report
Copy Labels (8x6, Wide), Variable
Generates wide and short spine labels
This report is formatted for 8x6 (1" x 1 5/8") label sheets, such as COMPanion's V0032 Blank Spine Labels.
The only difference between this report and the Copy Labels (8x6, Wide) report are additional options that allow you to change the font size and number of rows on these labels.
Use(s)
Use these labels when you need wide and short spine labels.
Remember to set the orientation to landscape in Adobe Reader.
Selections
| Options
|

Example Report
Font Size Recommendations
To lower the chances of the text on your labels being cut off while printing, use these recommended font sizes:
| Number of Rows | Largest Recommended Font Size | Largest Supported Font Size |
| 2 | 20 | 30 |
| 4 | 14 | 18 |
| 6 | 10 | 12 |