

Contents
Contents

Click the tabs below to expand for more information on the Circulation Tabs.
The Circulation tab is where you'll find your transaction log, to keep track of things happening during your session, and the homeroom subtab so you can locate or view students by the homeroom (location) they are in.
Transaction Log
Transaction Log shortcut: TL
The transaction log contains a history of everything that has occurred on your machine during your current session (for the last 100 transactions), and most of the changes that are made through management, utilities, and importing. It will also record who has logged in to your workstation and performed certain transactions and changes.
![]()
Homeroom (HW)
Homeroom shortcut: HW
The Homeroom subtab contains a list of the patrons in a particular homeroom, with their barcode, name, number of items they have out and items checked out today. With the Pictures checkbox checked, the patron's picture will also load. Double clicking on a patron makes them current.
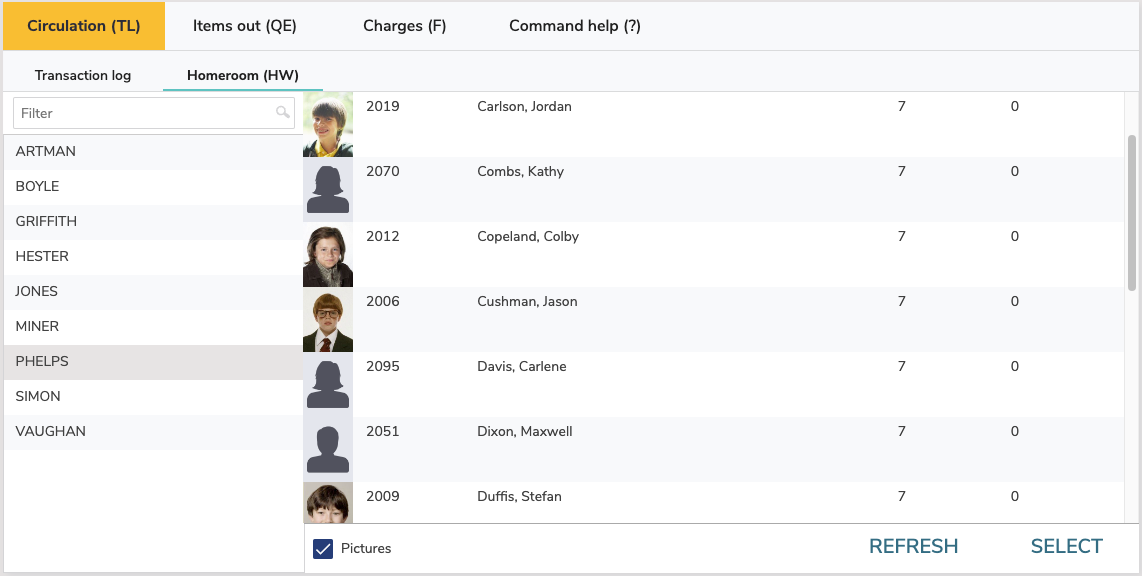
You can use the homeroom shortcut (HW) to not only jump to this subtab, but also directly to a particular homeroom. For example, HW Jones will select the homeroom Jones. Using a patron barcode instead of the homeroom name will open the patron's homeroom, e.g. HW 1001.
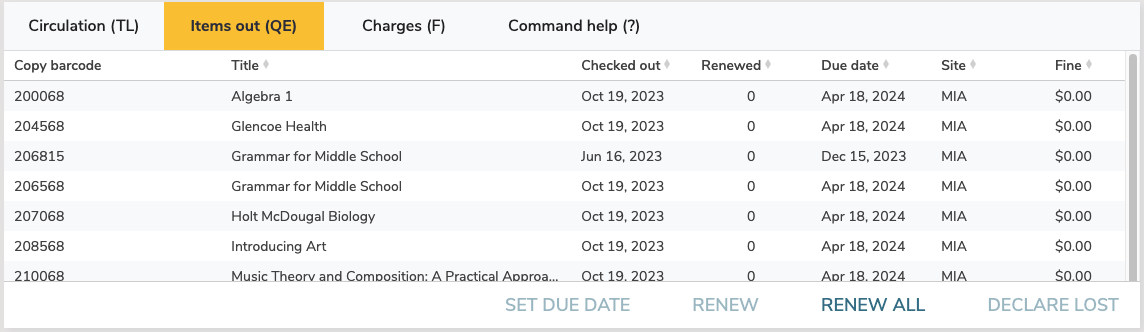
Items out
Items out shortcut: QE
The Items out sub-tab displays a list of all items checked out to the Current Patron, allowing you to choose which items to renew or declare lost (Renew Patron Items <Ctrl+R> is also an Actions menu option). If one of the patron's items is past due and has accrued a fine, it will be listed in red.
Additional Options
| Button | Description |
|---|---|
| Set Due Date | This function is sometimes referred to as an override date, which replaces the default due date normally used by the system. |
| Renew | Renews one item, or a range of selected items. |
| Renew All | Renews all of the current patron's items, even if your policies or circulation preferences indicate that renewing items with holds is disallowed. |
| Declare Lost | The selected item is assigned to the Lost system patron, and you'll have options to charge the patron. |
Troubleshooting
- If fines are charged, the fine window will open for each copy that is overdue.
- If the maximum number of renewals has already been reached, Alexandria will ask if you wish to override the policies for each copy.
Charges tab
Charges shortcut: F
In the Charges tab, view Patron charges, fees, payments, as well as forgiven charges and refunded payments.
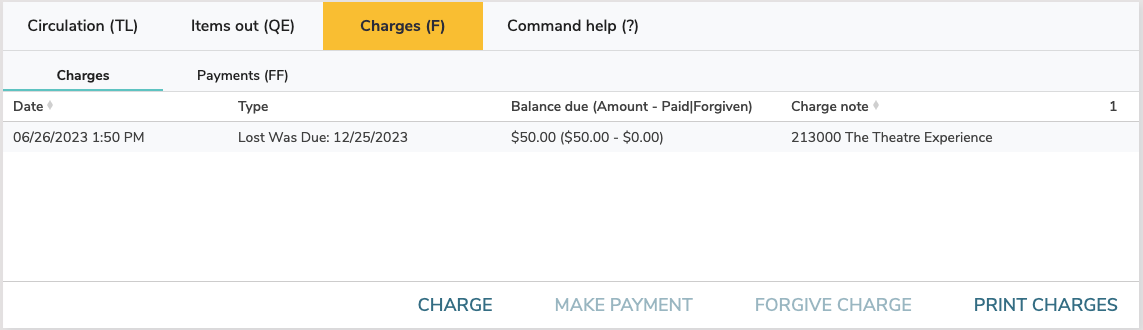
Types of Charges
Lost Item Charge
When an item that was declared Lost is later found and bookdropped, and you have the Charge Late Fee on Found Books preference checked, the patron who last had the book is charged an overdue fine for the period between when the item was lost and when it was found (up to the Maximum Fine for an Overdue Item) in your Overdue patron policies.
Overdue Charge
If the item you check in is past due and carries a fine, a payment can be made through the Make Payment option by either selecting the subtab at the bottom of the window or double clicking on the line item.
Additional Options
Charge
This option allows the librarian to manually assign charges to a Patron or for Alexandria to automatically assign charges based upon your preferences. This can be used for late fees, lost or damaged books, or miscellaneous charges.
Make Payment
Select a charge to get this option. Select multiple charges (command or shift + click) to make a payment on multiple items.
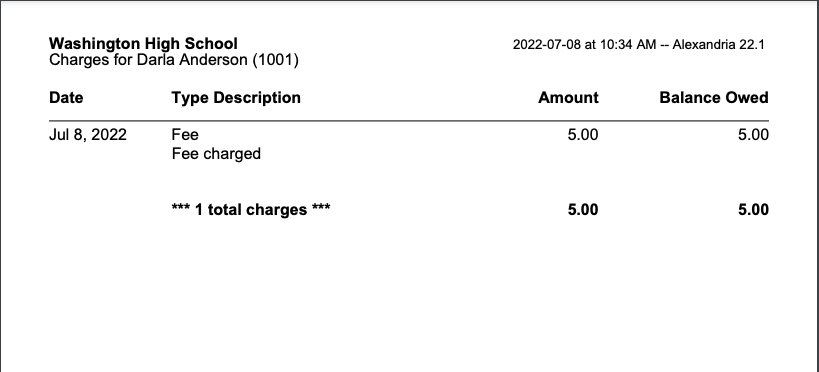
Print Charges
Print all charges for the current patron. Click Print Charges at the bottom of the Charges window to download a PDF report of the patron's charges.
If the Network Printer is enabled, the receipt will be sent to the printer. However, if the Network Printer is not enabled, an HTML receipt will open in a new tab so it can be saved as a PDF and/or printed from your browser.
Step-by-Step Instructions
The Payments subtab contains a record of the payments made by the selected patron, as well as Refund, Details, Add Credit, Refund Credit, and Print Receipt utilities.
The patron's history includes data for both Alexandria and Textbook Tracker.
Charge an Overdue Fine
Overdue fines are charged automatically according to your fine rate (determined by item policy). However, if you need to charge an additional fee, you can do that here.
- With the patron current, go to the Charges tab and then the Charges subtab.
- Click Charge to open the Charge fee window.
- Enter the amount to be charged.
- You have the option to fill out payment details now, or at a later point.
- When you're satisfied with the fee you have charged, check Process. By checking the applicable boxes, you can either Email Receipt or Print Receipt.
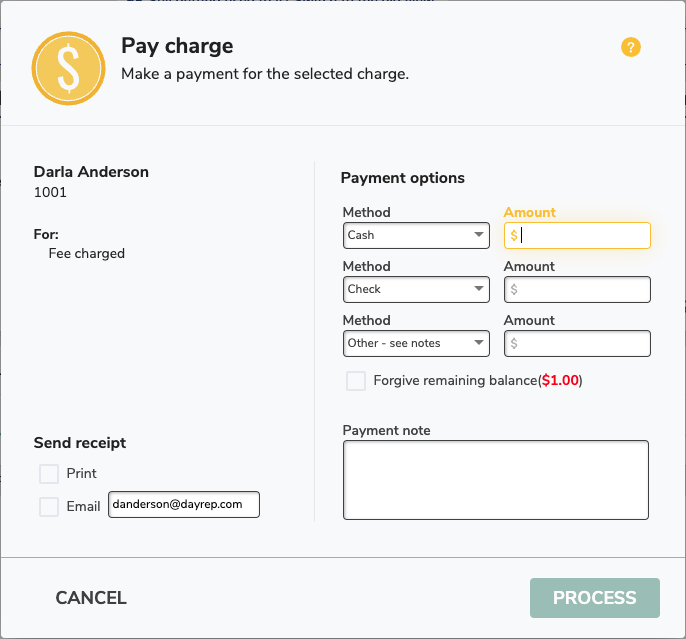
Make a Payment
- With the patron active, go to the Charges tab and then the Charges subtab.
- Select the charge you want to pay.
- Click Make Payment, or double-click the item to open the Make Payment window.
- Enter the payment information.
- From the Method drop-down menus, choose from Cash, Check, Charge, Other, Forgive, or Credits.
- If you would like to forgive the entire charge, check the box to Forgive remaining balance.
- If the Current Patron has a credit balance on their account, you can choose Credit. If credit is available, their current credit balance is shown in parentheses.
- If you choose Other, you must fill in the Payment note to explain what the payment method was.
- Check the box(es) for Email Receipt and/or Print Receipt (optional).
- Click Process.
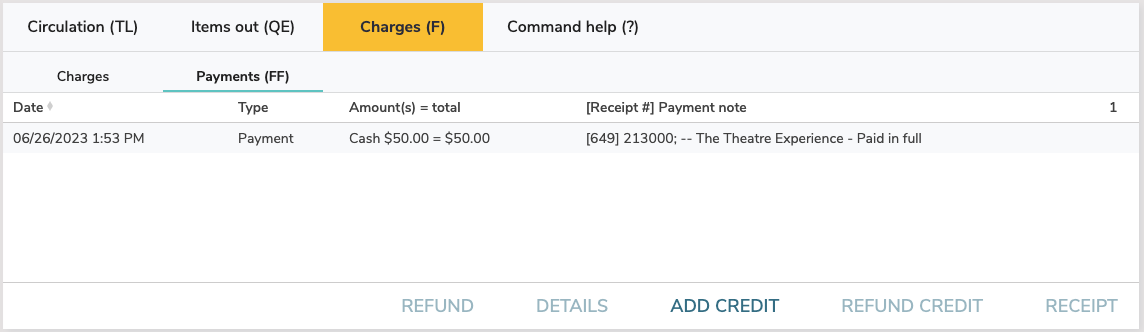
Payments tab
Payments shortcut: FF
The Payments subtab contains a record of the payments made by the selected patron, as well as Refund, Details, Add Credit, Refund Credit, and Print Receipt options.
Additional Options
Refund
- Select the Payments subtab from the Charges tab.
- Highlight the payment you'd like to refund.
- Select the Refund option from the bottom of the page.
- Enter the total amount that you'd like to refund in the Refund as cash or Refund as credit field.
- Supply an (optional) explanation as to why you are issuing a refund and/or credit to the patron in the Refund note field.
- Determine whether you want to Print Receipt or Email Receipt after applying the refund.
- When you are ready, click Process to issue the refund and print an optional receipt.
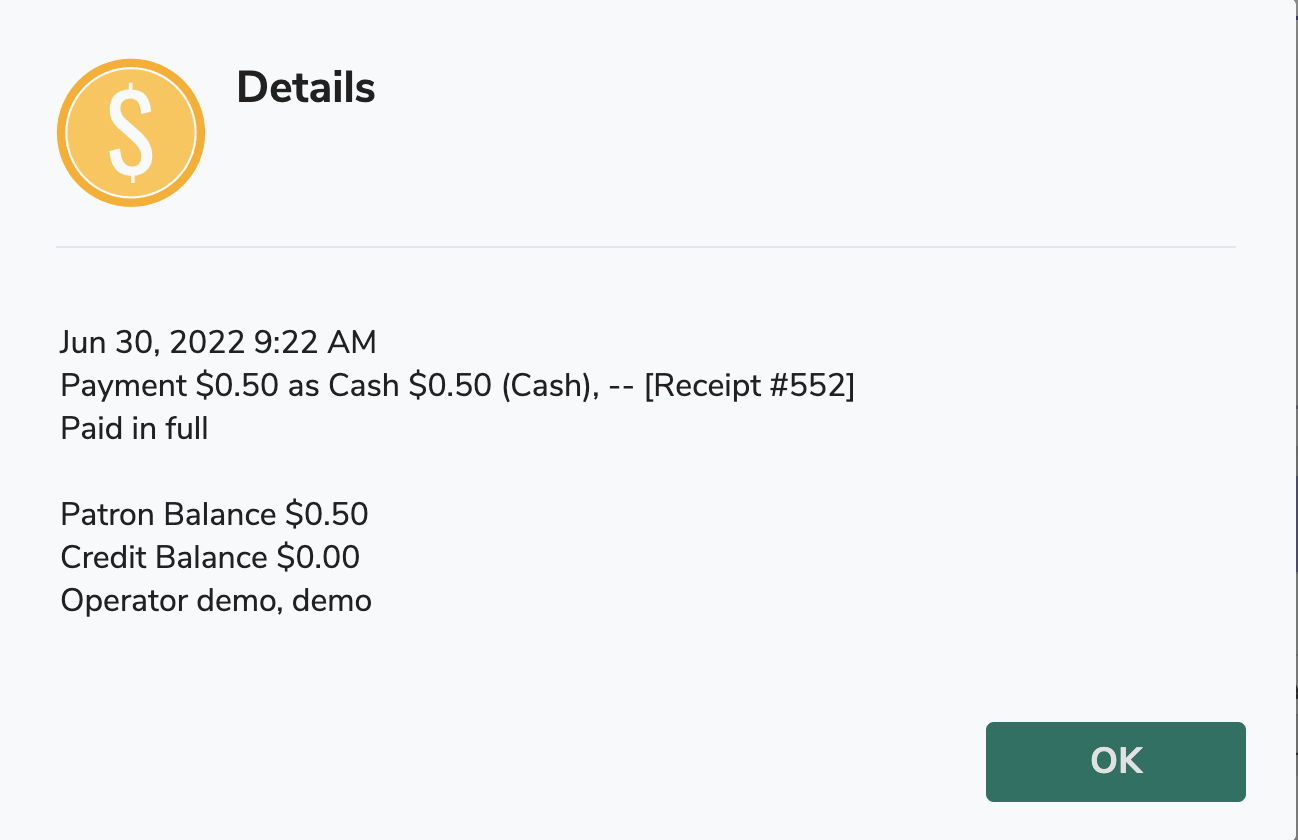
Details
Select a transaction and then click the Details button to view more information about the transaction.
Add Credit
The Add Credit windows allows the librarian to add credit to the account of the selected patron.
- Select the Payments subtab from the Charges tab.
- Select the Add Credit option from the bottom of the page.
- From the dropdown menu, select the payment method.
- Enter the total amount that you'd like to add in the Credit amount field.
- Use the Credit Note field to supply an (optional) explanation as to why you are adding a credit for this patron.
- Select to Print Receipt or Email Receipt after applying the credit.
- When you are ready, click Process to issue the credit and print an optional receipt.
Refund Credit
This allows the librarian to refund credit to the selected patron, if they have credit on their account.
- Under the Charges tab, select Payments.
- At the bottom of the page, select Refund Credit.
- The Refund credits window will appear.
- Supply the correct amount you'd like to refund in the Refund amount field.
- Select to Print Receipt or Email Receipt after applying the refund.
- When you are ready, click Process to issue the refund and print an optional receipt.
Print Receipt
The Payments subtab lets you print or email additional receipts for past transactions.
- Go to Circulation > Charges tab > Payments subtab.
- Select the line item you'd like to print a receipt for.
- Click Receipt to open the Receipt window.
- Select send a receipt as Print or Email.
- When you are ready, click Print to print and/or email the receipt.
Command Help
Command Help shortcut: ?
The Command Help tab contains information about Textbook Tracker commands and how to use them. Select a command from the list to see its code and a description of it's functionality on the right. You can also double-click the command to insert it into the command line.

To execute the command you've selected, type or scan a barcode. If you select a command and click Enter without entering a barcode, the action taken depends on the command you selected. For example
- If the command you select is a mode, Textbook Tracker will change the current mode and display the Circulation window under this mode.
- If you select the Locate Patron command, the Patron Lookup dialog will open so you can search for a patron.
- If the command you select performs a circulation function, then that function is performed, the Circulation window will appear, and the transaction log records the results.