| Content Column |
|---|
| | Content Block |
|---|
| Go to Patrons and click into the  Image Added Search for patrons box. The basic search allows you to narrow results by Name, Barcode, Homeroom, Recently Modified, and Recently Created. Basic Searches only apply to the site you are logged into. Image Added Search for patrons box. The basic search allows you to narrow results by Name, Barcode, Homeroom, Recently Modified, and Recently Created. Basic Searches only apply to the site you are logged into.  Image AddedWhen you click Find in the patron Records List pane of the Patrons management module, it triggers the Patron Lookup dialog, which allows you to locate specific patrons or operators in your database. Image AddedWhen you click Find in the patron Records List pane of the Patrons management module, it triggers the Patron Lookup dialog, which allows you to locate specific patrons or operators in your database.
For example, if you are looking for a patron or an operator with the last name “Anderson,” every patron record that closely (or exactly) matches that name will be shown (in the selected View order) in the patrons Records List of the Patrons Management module; the title at the top of the Records List will be selected. Use the From and Through fields to limit and/or expand the scope of your search and help you find better results. For example, correctly using the From and Through fields that follow Accession Date allow you to indicate a date range between a starting and ending value. | Expand |
|---|
| When you enter any type of specially-formatted information—such as dates—you can enter values in a wide range of formats. For example, you can enter the date February 14, 2018 as: “Feb 14, 2018” or “02/14/2018” or “02.14.2018” or “02 14 2018”. If using the current year, you can just enter “02/14”. If the current month is December, you can just enter “14”. If you enter only a From, the program generates a “far future” date—which is the first of January, thirty years from the current date. If you enter only an ending date, the Through defaults to January 1st, 1904 (i.e. the “far past”). If you don't enter any date, the From is set for one year in the past. |
If you enter only a From value, Alexandria will select all records that begin with the entered text. Using Grade as an example, a solitary From value of GR1 would select grades GR100, GR10 and GR1B37. Therefore, you can use both the From and Through fields, even if you are only searching for one value (e.g. From: Silver, Through: Silver). To do an exact match for a text field range, enter an Through value that matches the From value followed by space and exclamation mark (for example, From: GR1 and Through: GR1—unless you really do have data named GR1 !).
| Expand |
|---|
| title | Want to know what options are in each of those dropdown menus? |
|---|
| - Patrons Added
- Birthdate
- Graduation Date
- Suspension End Date
- Username
- Email
- No Picture
- No Email
- Sex
- Other
- Add to current results (checkbox)
|
| Tip |
|---|
| | Search by Other to locate data in the following fields: Phone, Mobile, Address1, Address2, City, State, Postal, Country, Contact Note, Categories, Alert Note, and Note. |
Step-by-Step Finding Patrons and Operators To use the Patron Lookup dialog to locate a specific patron record in your database: - Select Patrons from Alexandria's Librarian module. Alternately, you can access Patrons management by typing the domain name (or IP address), (optional) port number, and (optional) serial number of your Data Station followed by “/patrons” into your browser's Address field (usually located in the upper-left corner of the window).
- The Patrons management module will appear.
- Click Find in the bottom-right corner of the patron Records List pane in Patrons management.
- This will trigger the Patron Lookup dialog, allowing you to locate a specific patron record in your database.
- Using the Patron Lookup dialog, you can provide search criteria other than Last Name (default); for instance, you can also search by Grade (i.e. Level), Student # (i.e. Community ID), Homeroom (i.e. Location), Second Location (i.e. Sublocation), or Site.
- If you check the Add to current results box, any patrons or operators found during your search will be added to that which already exists in the patron Records List pane. If you do not check this box, then the Records List pane will be cleared of everything except your most recent search results.
- Click Search to locate records or the Cancel button to stop the Patron Lookup operation and return to the last selected patron record.
- When a Patron Lookup returns results, every patron/operator record that closely matches your search criteria will be sorted according to the View selection at the top of the patron Records List pane. The patron or operator at the top of the list is automatically selected.
- If no records matching your search criteria can be located, you will be asked to Cancel or Try Again.
Step-by-Step Only Show Operators in the Patron Records List There are times you may need to only show operators in your Records List pane: Open the Patrons management module. - Click Find in the patron Records List pane of the Patrons management module, it triggers the Patron Lookup dialog, which allows you to locate specific patrons or operators in your database.
- Any of these will trigger the Patron Lookup dialog.
- Commonly, use Last Name.
- In the associated From field, type “A”.
- In the associated Through field, type “Z”.
- Finally, press <enter> or click Search.
- Results for your search will appear in the patron Records List pane of the Patrons management window, containing all the operator records (i.e. non-patrons) that exist in your database.
| Expand |
|---|
| title | Click to view the old interface |
|---|
| When you click Find in the patron Records List pane of the Patrons management module, it triggers the Patron Lookup dialog, which allows you to locate specific patrons or operators in your database. For example, if you are looking for a patron or an operator with the last name “Anderson,” every patron record that closely (or exactly) matches that name will be shown (in the selected View order) in the patrons Records List of the Patrons Management module; the title at the top of the Records List will be selected. 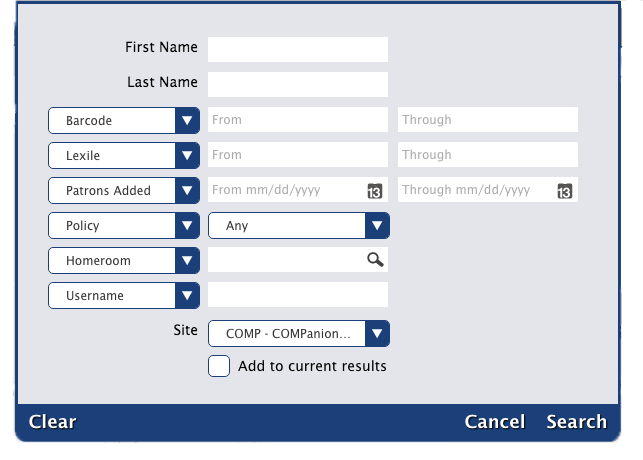
Use the From and Through fields to limit and/or expand the scope of your search and help you find better results. For example, correctly using the From and Through fields that follow Accession Date allow you to indicate a date range between a starting and ending value. | Expand |
|---|
| When you enter any type of specially-formatted information—such as dates—you can enter values in a wide range of formats. For example, you can enter the date February 14, 2018 as: “Feb 14, 2018” or “02/14/2018” or “02.14.2018” or “02 14 2018”. If using the current year, you can just enter “02/14”. If the current month is December, you can just enter “14”. If you enter only a From, the program generates a “far future” date—which is the first of January, thirty years from the current date. If you enter only an ending date, the Through defaults to January 1st, 1904 (i.e. the “far past”). If you don't enter any date, the From is set for one year in the past. |
If you enter only a From value, Alexandria will select all records that begin with the entered text. Using Grade as an example, a solitary From value of GR1 would select grades GR100, GR10 and GR1B37. Therefore, you can use both the From and Through fields, even if you are only searching for one value (e.g. From: Silver, Through: Silver). To do an exact match for a text field range, enter an Through value that matches the From value followed by space and exclamation mark (for example, From: GR1 and Through: GR1—unless you really do have data named GR1 !).
| Expand |
|---|
| title | Want to know what options are in each of those dropdown menus? |
|---|
| - Patrons Added
- Birthdate
- Graduation Date
- Suspension End Date
- Username
- Email
- No Picture
- No Email
- Sex
- Other
- Add to current results (checkbox)
|
| Tip |
|---|
| | Search by Other to locate data in the following fields: Phone, Mobile, Address1, Address2, City, State, Postal, Country, Contact Note, Categories, Alert Note, and Note. |
Step-by-Step Finding Patrons and Operators To use the Patron Lookup dialog to locate a specific patron record in your database: - Select Patrons from Alexandria's Librarian module. Alternately, you can access Patrons management by typing the domain name (or IP address), (optional) port number, and (optional) serial number of your Data Station followed by “/patrons” into your browser's Address field (usually located in the upper-left corner of the window).
- The Patrons management module will appear.
- Click Find in the bottom-right corner of the patron Records List pane in Patrons management.
- This will trigger the Patron Lookup dialog, allowing you to locate a specific patron record in your database.
- Using the Patron Lookup dialog, you can provide search criteria other than Last Name (default); for instance, you can also search by Grade (i.e. Level), Student # (i.e. Community ID), Homeroom (i.e. Location), Second Location (i.e. Sublocation), or Site.
- If you check the Add to current results box, any patrons or operators found during your search will be added to that which already exists in the patron Records List pane. If you do not check this box, then the Records List pane will be cleared of everything except your most recent search results.
- Click Search to locate records or the Cancel button to stop the Patron Lookup operation and return to the last selected patron record.
- When a Patron Lookup returns results, every patron/operator record that closely matches your search criteria will be sorted according to the View selection at the top of the patron Records List pane. The patron or operator at the top of the list is automatically selected.
- If no records matching your search criteria can be located, you will be asked to Cancel or Try Again.
Step-by-Step Only Show Operators in the Patron Records List There are times you may need to only show operators in your Records List pane: Open the Patrons management module. - Click Find in the patron Records List pane of the Patrons management module, it triggers the Patron Lookup dialog, which allows you to locate specific patrons or operators in your database.
- Any of these will trigger the Patron Lookup dialog.
- Commonly, use Last Name.
- In the associated From field, type “A”.
- In the associated Through field, type “Z”.
- Finally, press <enter> or click Search.
- Results for your search will appear in the patron Records List pane of the Patrons management window, containing all the operator records (i.e. non-patrons) that exist in your database.
|
|
|
|
 Pardon the mess! The Support Center is undergoing construction.