![]()

Contents
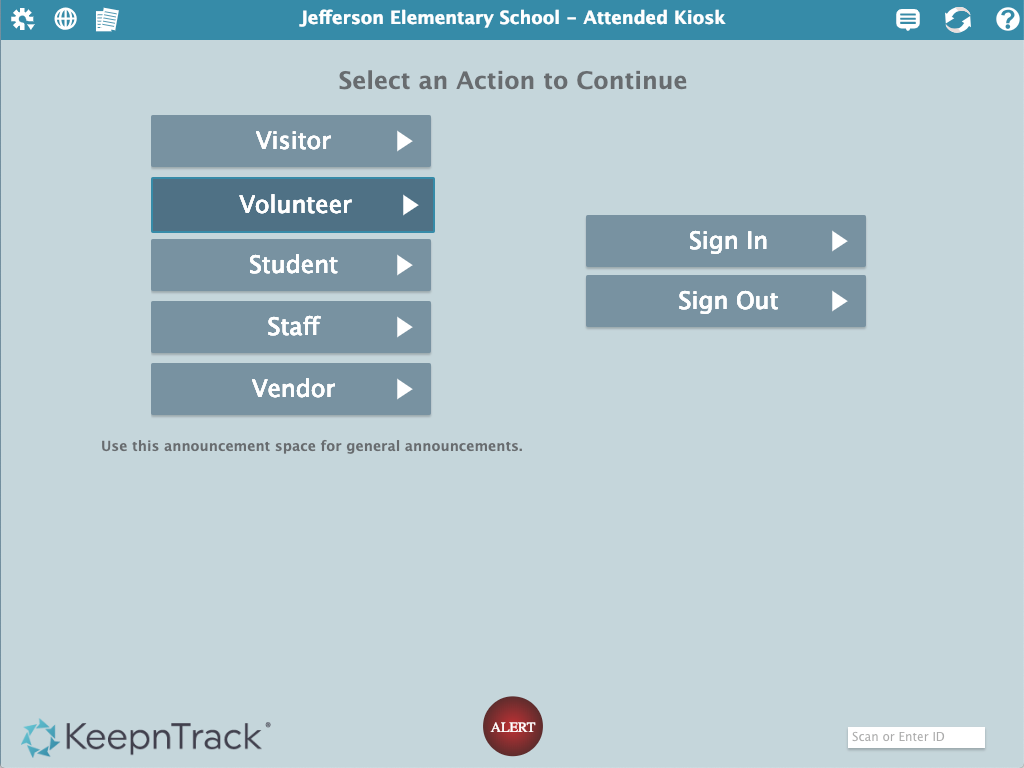
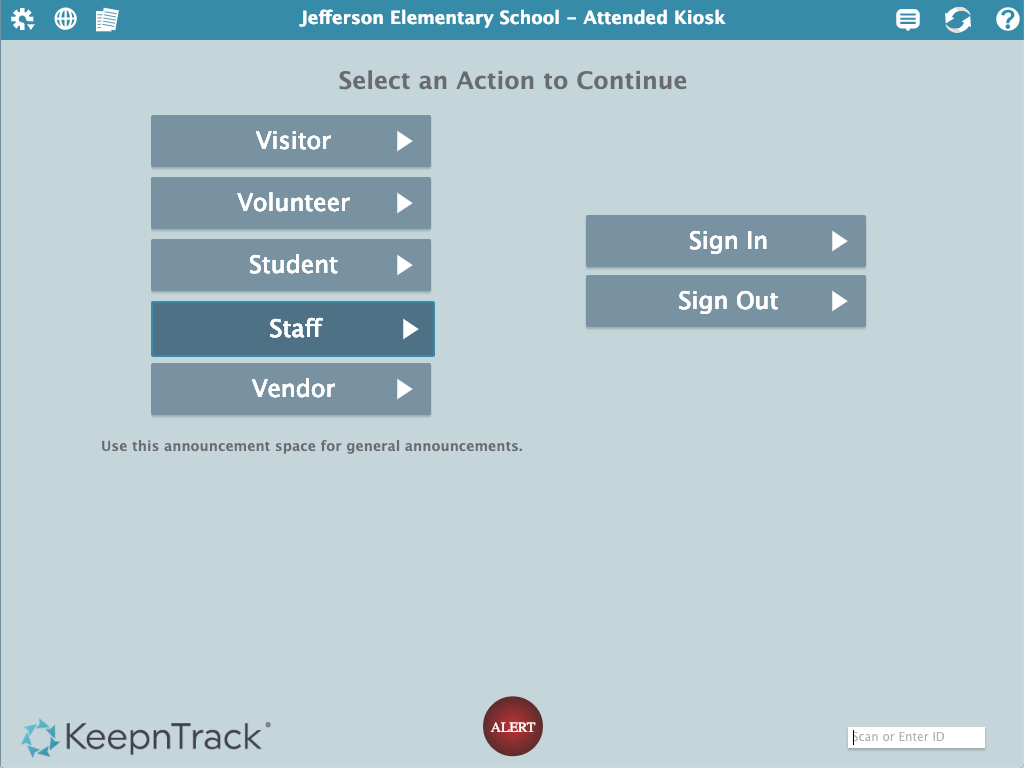
Below is an interactive representation of the Attended Kiosk page containing links to different areas within the Support Center to help you setup, navigate and use the Attended Kiosk feature. Click on any label (Visitor, Volunteer, Student, Staff or Vendor) or element, such as the actions menu "![]() " for additional information. The Attended Kiosk interface is used by operators to easily sign the people who use your facility in and out. There are five default classifications: Visitor, Volunteer, Student, Staff, and Vendor. This list can be customized and specific classifications disabled in the Workstation Management settings. The Attended Kiosk will remain active until manually logged out or the automatic log out time is reached.
" for additional information. The Attended Kiosk interface is used by operators to easily sign the people who use your facility in and out. There are five default classifications: Visitor, Volunteer, Student, Staff, and Vendor. This list can be customized and specific classifications disabled in the Workstation Management settings. The Attended Kiosk will remain active until manually logged out or the automatic log out time is reached.
MAP
Attended Kiosk Overview
The Attended Kiosk behaves similarly for each classification whose hours and activities you want to track and record. For example, after selecting the classification and Sign In/Out is selected, people may be asked to identify themselves using their date of birth, identification code, or job number. Regardless, everybody is required to enter their full name.
If a matching person is not located in your database, KeepnTrack will present you with an Alert Dialog box with three options: "Clear", "Cancel" or "Create". "Clear" will remove all the information from the input boxes and allow you to start over again. "Cancel" will dismiss the Alert Dialog box and leave all the information you entered in place. "Create" will present you with a window that will allow you to enter the person into the database. If more than one person has matching name information, KeepnTrack will ask you to select the correct person or provide additional information. Duplicate members are not allowed to sign in. (see Multiple Sign Ins for more information)
Next, KeepnTrack asks you to select which Activity the person is there to attend; account or facility activities are configurable in Tools ⇒ Activities.
Finally, the person will be verified and officially signed in to the facility; when applicable, a name badge will be printed.
Command Line
This field allows the operator to enter a person's name or ID number through either scanning or typing in the information. This field will accept partial last name entries and bring a dialog box up with possible matches from which a user can choose. Additionally, you can use the Command Line to enter other specialized commands.
The Command Line allows an operator to sign people in for different classifications by typing or scanning in a person's Person ID number.
The Command Line can also be used for quick exit from the facility. If the person has already signed in to an activity entering their name, person ID, or transaction barcode (located on the person badge printed on entry), then operators can quickly sign that person out of their activity.
When your account has been enabled for SMS messaging, typing a message such as “911 Help” in the Kiosk's Command Line will result in the text message “Help” being sent to all authorized recipients.
You can also type “/logout” in the Command Line to return to KeepnTrack's application picker.
Actions Menu
The Options Menu in the upper left corner contains three icons: "Actions", "Language" and "Quick Reports".
Reset Window. This selection, in the event information has been entered incorrectly, allows the user to clear all the information and restart.
Workstation Management. This option will take the user to the Workstation Management.
Log Out — This selection will simply log the user out of the program.
Language
allows the user to select between English and Español.
Reports
Reports are instant reports that provide information about who’s currently at your facility or who’s visited your facility during the course of the day. This can be accessed by the Reports icon "![]() " located in the upper left corner.
" located in the upper left corner.
People Here Now — This report shows you a list of who is currently signed in and visiting your facility. It includes the identification number (if available), person name, time of check in, classification type, and activity type.
People Signed In Today — This report shows you a list of all the people who are currently signed in or those who have signed out from your facility. This reports includes identification number, name, time of check in and check out, classification type, and activity type.
Staff Signed In Today — This report shows you a list of staff members who have signed in to the facility for the current day. This reports includes identification number, name, time of check in and check out, activity type, and duration.
Volunteers Signed In Today — This report shows you a list of the volunteers who have signed in to the facility for the current day. This reports includes identification number, name, time of check in and check out, activity type, and duration.
Early Dismissals — This report shows you a list of staff members who have signed in to the facility for the current day. This reports includes identification number, name, time of check in and check out, activity type, and duration.
Late Arrivals — This report shows you a list of the students who have signed out of the facility for early dismissal for the current day. This reports includes identification number, name, time of check out, and activity type.
Reset
This allows a user to Reset the screen and essentially start over again.
Help
This icon will direct the user to a Help page or pages that specifically relate to the topic currently being viewed.
Alert
This icon allows the Operator to send an immediate emergency text message and email out to all the people listed in their Preferences. Click here to learn more about the Alert Feature.
Footer
Alert Button
The Alert function is found only on the Attended Kiosk and allows an Operator to send an emergency message to everyone listed in their Alerts Preferences.
To trigger an alert, click the ALERT button. The text message and email will be sent as:
[Facility Name] - [Operator First Name] has triggered an ALERT. Please check in at that location immediately.
For example:
Washington High School — Adeana Myers has triggered an ALERT. Please check in at that location immediately.
Once the Alert has been triggered, a green checkmark next to the Alert Button indicates the alert has been sent.
The Kiosk's Visitor option is used for those who infrequently visit your facility (e.g. parents or grandparents). New visitors are enrolled during their initial sign in attempt. New visitors that have enrolled will be saved to KeepnTrack Persons Database permanently. An enrolled visitor is one that is already saved in your KeepnTrack database.
MultiExcerpt named V9020 Attended Kiosk - Visitor SIgn-In Out was not found -- Please check the page name and MultiExcerpt name used in the MultiExcerpt-Include macro
Visitor Sign In
The following steps provide a general overview on how to sign a Visitor in using the Attended Kiosk; additional information can be found in the sections below.
After selecting Visitor and then clicking Sign In, you will be asked to provide information about the visitor.
- If your Workstation Management is set to enable sex offender checks, the visitor is required to provide their birthdate (MM/DD/YYYY).
- If a compatible driver's license scanner is connected to your computer, a Scan ID button appears, allowing you to obtain information from the visitor's driver's license. You can use the ID Issuer drop-down menu to manually select the state that issued the driver's license; however, the Auto Detect default can usually determine the correct state.
- If a compatible web camera is connected to your computer (and your Workstation Management permissions allow), an Activate Camera window appears, allowing you to obtain an image of the visitor using Capture Picture.
Depending on your Workstation Management settings, an automatic sex offender check is performed after you click the Continue button. Please review the Sex Offender Check section for more information.
If your visitor successfully passes the sex offender check, they will be allowed to sign in to one of your available activities.
If you have a compatible badge printer connected to your computer and your settings and preferences allow, a Print Badge option becomes available.
Once you have selected an activity for the visitor, a verification message will appear in the upper left hand portion of the window.
Congratulations! This concludes the general summary of the Visitor Sign In procedure; additional information is available below.
Select Person
By default, every new visitor attempting to gain access to your facility will be “enrolled” during the Visitor Sign In process. This means that their personal, contact, and identification information are saved by KeepnTrack. After enrollment, on return visits, the visitor needs only enter their full name or Person ID into the command line to sign in or out of the facility. Optionally, depending on your Enable Vehicle Tracking preferences, you may be asked to supply the vehicle make, model, color, and license plate number.
During the Select Person step (shown below), you'll want to supply the visitor’s full name (including middle name) in first, middle, last format. If your Workstation Management preferences are set to enable sex offender checks, the visitor is required to provide the date of their birth (MM/DD/YYYY). If your preferences are set to enable vehicle tracking, the visitor should also provide their vehicle make, model, color, and license plate number. Remember, these requirements are optional, depending on your preferences and settings.
Full name and birthdate are required for new visitors when sex offender checks are enabled.
Only the full name is required to proceed when sex offender checks are disabled.
In order to decrease data-entry time and reduce the likelihood of human error, KeepnTrack recommends the use of our optional driver's license scanner. When a compatible scanner is connected to your computer, a Scan ID button appears. You can use the ID Issuer drop-down menu to manually select the state that issued the driver's license; however, the default Auto Detect selection can usually determine the correct state. Personal information and photos taken from the driver's license or identification card are applied to the appropriate fields in the Visitor Information dialog.
For new visitors, clicking Continue after providing their full name and birthdate will open the Visitor Information Visitor - Sign In dialog (shown below). This dialog is used to gather information for the permanent visitor record and forthcoming sex offender check. This dialog requires the same basic information as the previous Visitor Sign In—First, Middle and Last Name, and Birthdate; however, any information that you provided there (or obtained from a compatible driver's license scanner) will be retained so you won't have to enter it twice. This dialog also contains fields for additional information such as the visitor's home and email address, phone numbers, and unique Person ID.
When you have finished providing the requested information, click Continue. If you have automatic sex offender checks enabled in your Workstation Management settings, this may trigger the Registered Sex Offender Matches dialog[1]. The sex offender check will use the information you provided to look for potential matches. However, if you don't have automatic sex offender checks enabled or there are no matching offender records, the Registered Sex Offender Matches dialog will not appear. Instead, KeepnTrack will skip ahead to the Activity selection process.
If the visitor successfully passes the sex offender check (or you have automatic sex offender checks disabled), your available activities will be presented and they will be allowed to sign in to one.
If your visitor is new, clicking Continue will permanently save them into the KeepnTrack database. This way, the next time your visitor enters the facility, they can quickly sign in using their full name and birthdate or by providing their Person ID. If a matching name/birthdate or Person ID is found, the Kiosk moves directly to the Visitor Activity step. If you have an image of the visitor stored in their person record, it will be printed on the visitor badge.
Regardless, click Continue to proceed to the Visitor Activity step or Reset Window to return to the main Attended Kiosk interface.
Select Activity
Next, select the activity for which the visitor is attending. Administrators are able to modify and append the list of available activities in Manage ⇒ Activities.
Some activities have (optional) subcategories called Destinations; for example, if Classroom is the primary activity, Destinations may be the forty-two teachers you have for that activity. When clicking on an activity that has a Destination, instead of forwarding you to the Verify/Print Badge step, you will be directed to the Destinations subcategory.
Be sure that the Print Badge box is checked if you would like to print a visitor badge at the end of the verification process; see the Verify/Print Badge section for more information.
The Approved Volunteer option is for people who volunteer at your facility. Once signed in, all volunteer hours and activities are tracked by the system.
MultiExcerpt named V9021 Attended Kiosk - Volunteer SIgn-In Out was not found -- Please check the page name and MultiExcerpt name used in the MultiExcerpt-Include macro
Classification & Action
Select Volunteer, then select an activity: Sign In or Sign Out
Identification
Enter the volunteer’s first and last name or Person ID. Birthdate is optional.
Click Continue.

If this person is already signed in for a timed activity, KeepnTrack will ask if you want to sign them out so they can be signed in to the new activity.
Activity
Next, select the activity the volunteer is here for. Administrators can to modify the list of available activities in Tools > Activities.
Destinations
Some activities have (optional) subcategories called Destinations. For example, if Classroom is the primary activity, Destinations may be the forty—two teachers you have for that activity. Select a Destination to continue.

Finished
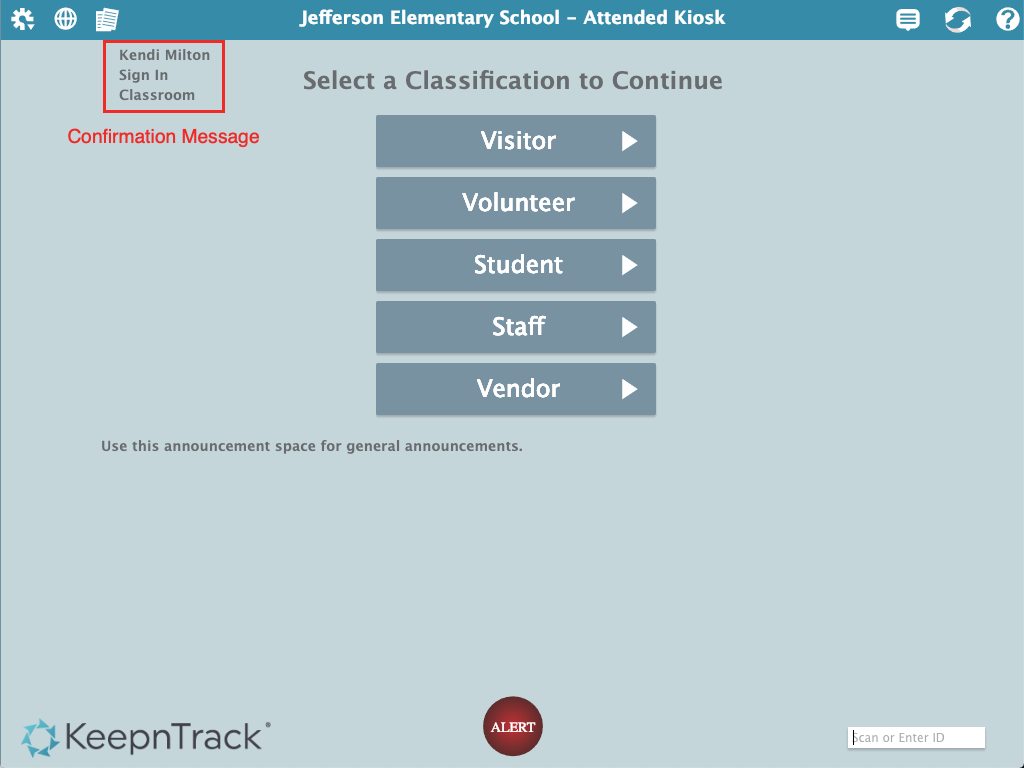
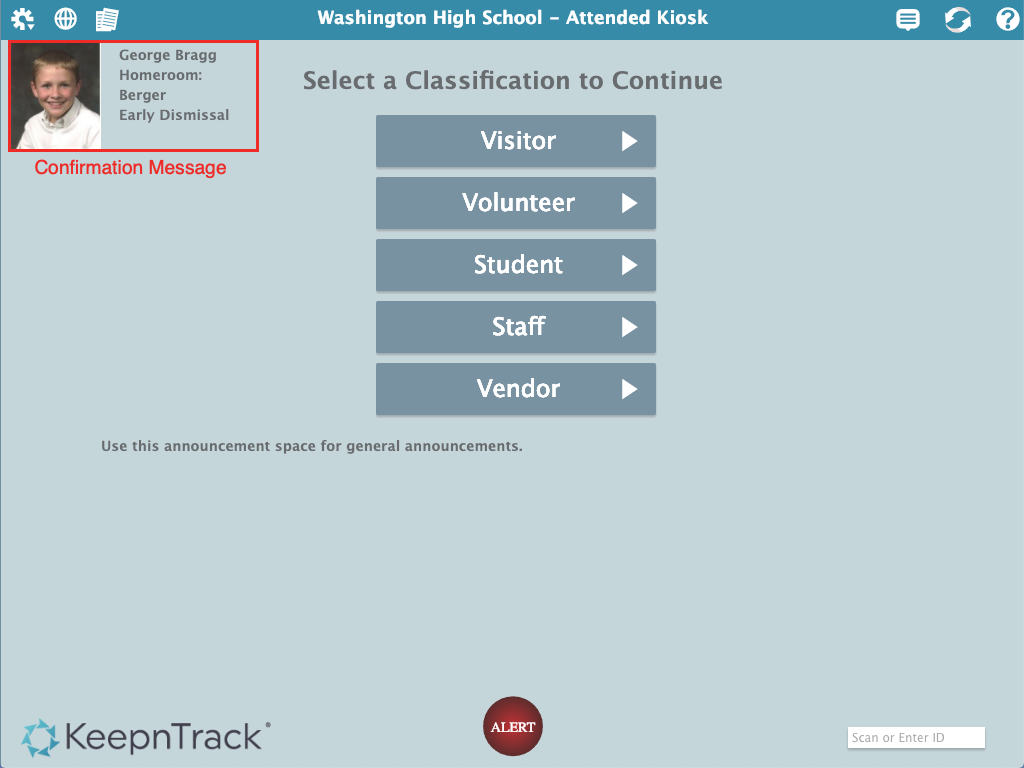
You're done! After selecting an activity, you'll go back to the main Attended Kiosk interface and a confirmation message will be shown in the upper left hand portion of screen with the person's name, action, and activity.
This is for students to sign in/out of an activity or explain why they have an Early Dismissal or Late Arrival. Once signed in, students are easily tracked by the system.
MultiExcerpt named V9023 - Attended Kiosk - Student SIgn-In Out was not found -- Please check the page name and MultiExcerpt name used in the MultiExcerpt-Include macro
Classification & Action
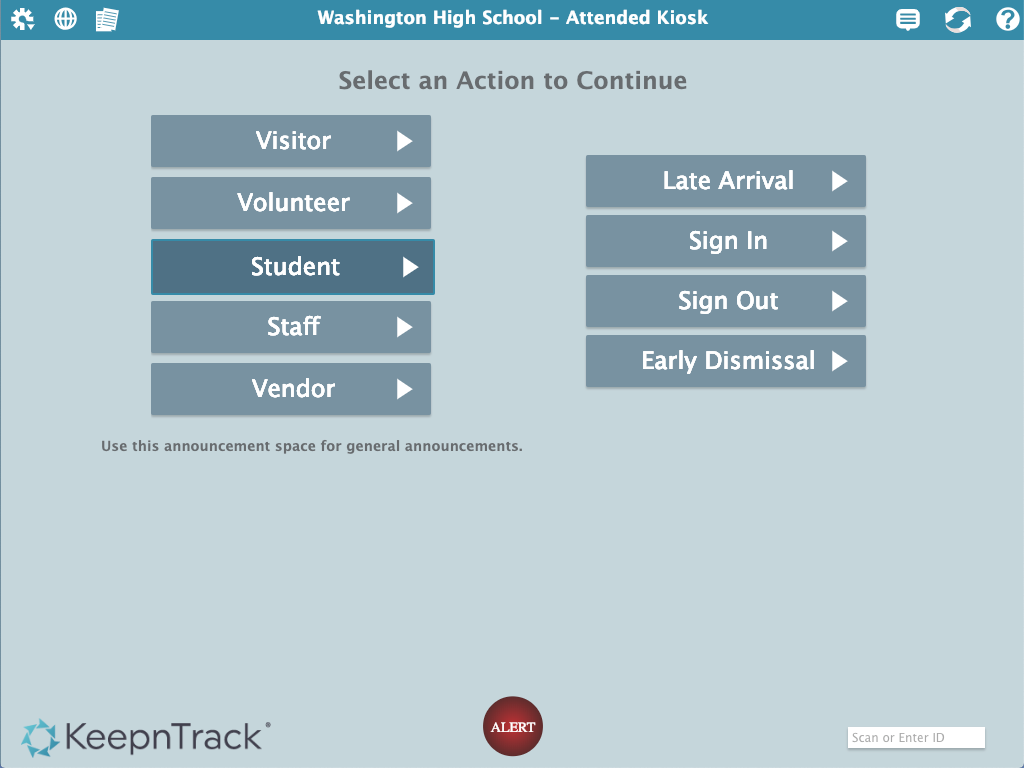
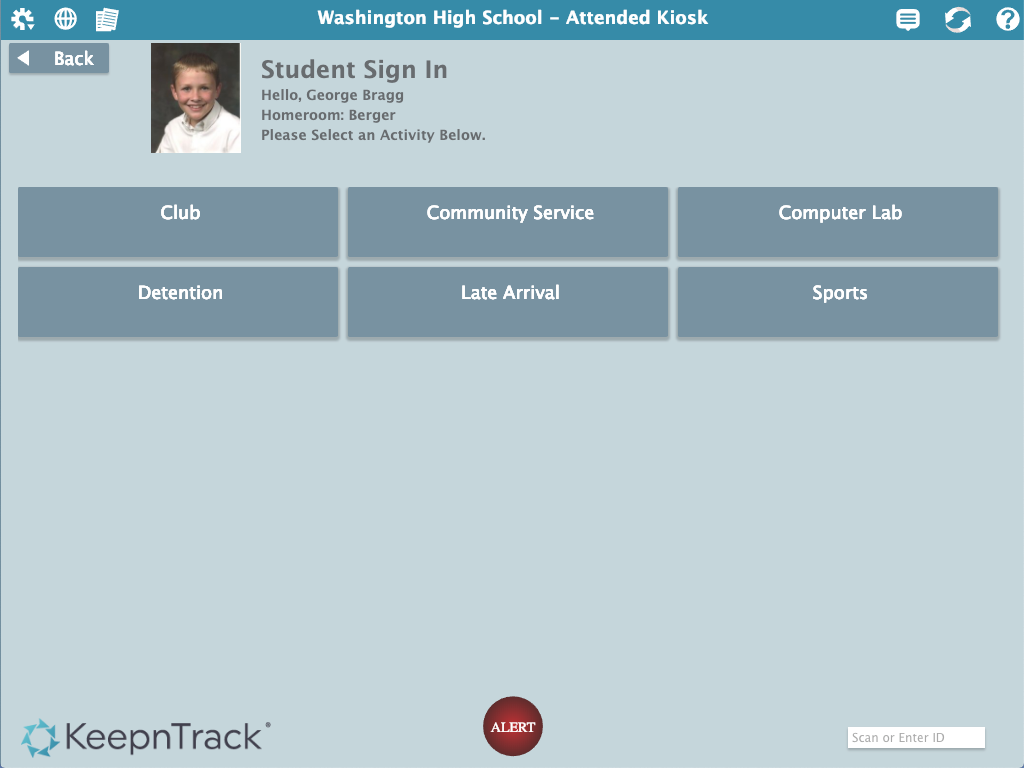
Choose Student, then select an activity: Late Arrival, Sign In, Sign Out, or Early Dismissal.
Name
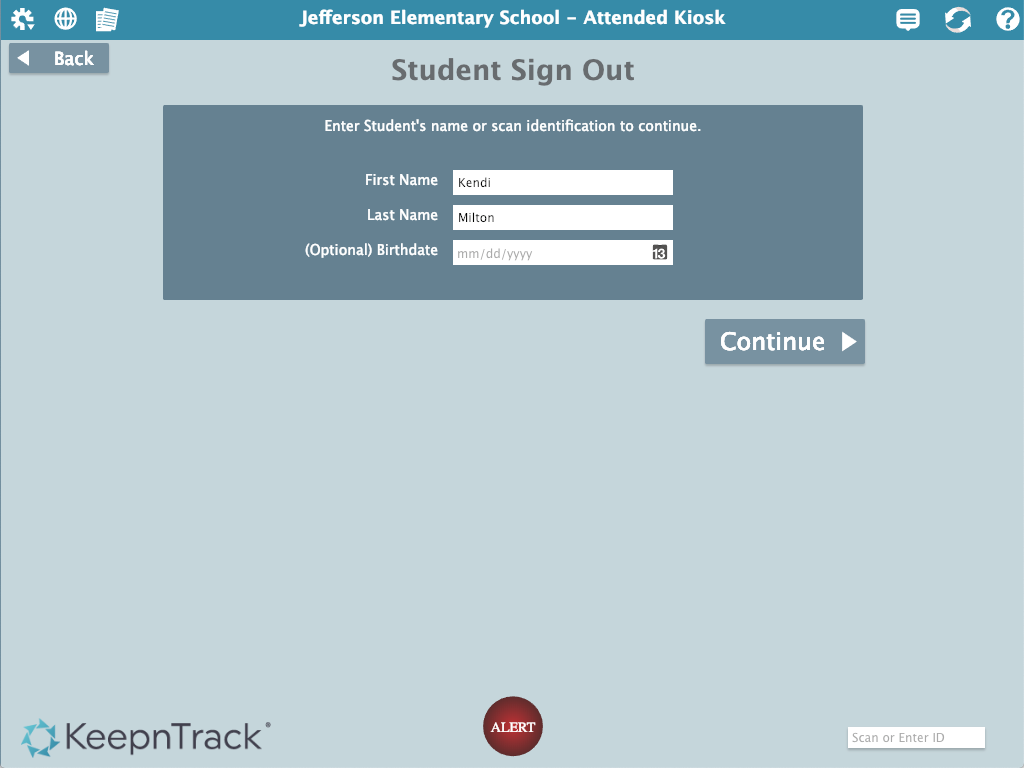
Enter the student's full name or Person ID. Birthdate is optional. If you have a scanner connected, you can scan their ID directly.
Click Continue.
If this person is already signed in for a timed activity, KeepnTrack will ask if you want to sign them out so they can be signed in to the new activity.
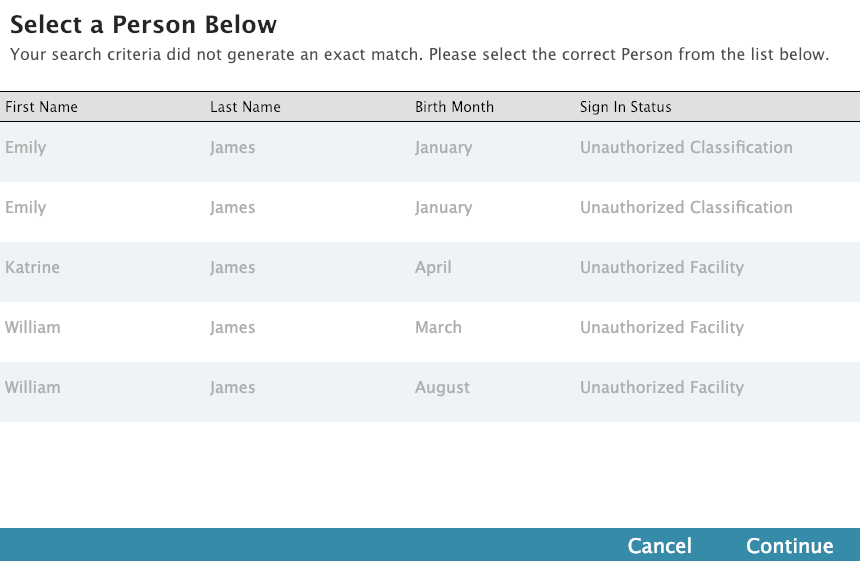
Select a Person
If your search did not generate an exact match, choose the correct person from the list below.
Activity
Next, select the reason (or activity) for which the student is signing in or out. Administrators are able to modify and append the list of available activities in Tools > Activities.
Destinations
Some activities have (optional) subcategories called Destinations. For example, if Family Emergency is the primary activity, Destinations may be the ten most common emergencies you have set for that activity. Select a Destination to continue.
Finished
You're done! After selecting an activity, you'll go back to the main Attended Kiosk interface and a confirmation message will be shown in the upper left hand portion of screen with the person's name and activity.
The Staff option is for people who work at your facility. Once signed in, all employee hours and activities are tracked by the system.
MultiExcerpt named V9022 - Attended Kiosk - Staff SIgn-In Out was not found -- Please check the page name and MultiExcerpt name used in the MultiExcerpt-Include macro
Classification & Action
Select Staff, then select an activity: Sign In or Sign Out
Identification
Enter the employee’s full name (including middle name), and birthdate or Person ID.
Click Continue.

Activity
Next, select the service (or activity) for which the vendor is providing. Administrators are able to modify and append the list of available activities in Tools > Activities.
Destinations
Some activities have (optional) subcategories called Destinations. For example, if Classroom is the primary activity, Destinations may be the forty—two teachers you have for that activity. When clicking on an activity that has a Destination, instead of forwarding you to the Verify/Print Badge step, you will be directed to the Destinations subcategory.

Finished
You're done! After selecting an activity, you'll go back to the main Attended Kiosk interface and a confirmation message will be shown in the upper left hand portion of screen with the person's name, action, and activity.

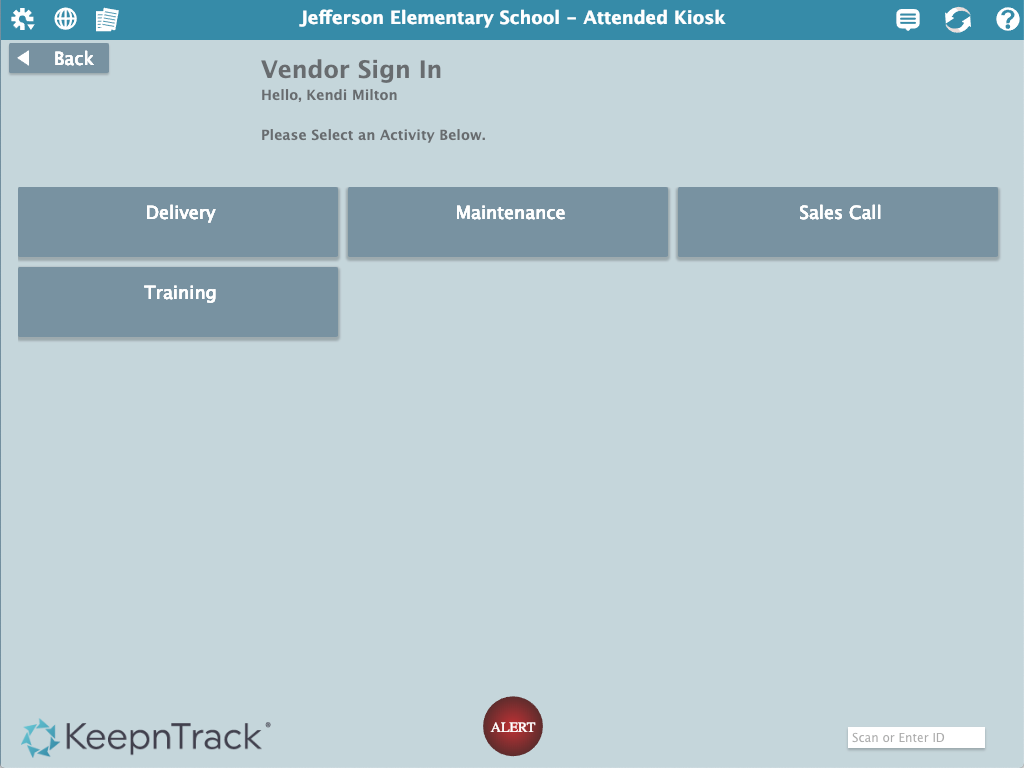
The Vendor option is for people who provide services at your facility. Once signed in, all vendor hours and activities are tracked by the system.
Classification & Action
Choose Vendor, and then select an activity: Sign In or Sign Out.
Identification
Enter the vendor’s full name (including middle name), and birthdate or Person ID.
Click Continue.

If this person is already signed in for a timed activity, KeepnTrack will ask if you want to sign them out so they can be signed in to the new activity.
Activity
Next, select the service (or activity) for which the vendor is providing. Administrators are able to modify and append the list of available activities in Tools > Activities.
Destinations
Some activities have (optional) subcategories called Destinations. For example, if Classroom is the primary activity, Destinations may be the forty—two teachers you have for that activity. When clicking on an activity that has a Destination, instead of forwarding you to the Verify/Print Badge step, you will be directed to the Destinations subcategory.
Finished
You're done! After selecting an activity, you'll go back to the main Attended Kiosk interface and a confirmation message will be shown in the upper left hand portion of screen with the person's name, action, and activity.