 Pardon the mess! The Support Center is undergoing construction.
 ![]()

How helpful was this page?
Related Blog Posts
Blog Posts
-
Say cheese! All about patron pictures
created by
Aug 10, 2022
-
Assigning policies–the complete guide
created by
Mar 23, 2022
-
Update title records with exports & imports? Yes, you can!
created by
Jan 19, 2022
-
Getting equipped: Cataloging items for your library
created by
Jan 13, 2022
-
Saved field mapping—Easy peasy imports
created by
Feb 10, 2021
-
As you like it—Import Headings
created by
Nov 30, 2018
-
Importing MARC Records from a Vendor
created by
Oct 19, 2018
-
New Copies? In Processing
created by
Oct 06, 2014
Import Patrons
Last Updated: $action.dateFormatter.formatDateTime($content.getLastModificationDate())

Import Patron Records
Imported patron data can come from any source that provides a text file in a tab-delimited file format; most word-processing and spreadsheet applications support files in tab-delimited format. In many cases, patron data is available in machine-readable format from your school's office or from the district office. Check with your school or district office to find out how patron data is stored.
For example, you might be able to get patron information from the administrative office student database and import it into Alexandria. When students graduate from elementary to middle school, you can provide patron records that the middle school can import into their system.
Another use for export/import is to modify information in a group of records. Patron information can be exported, opened in another computer program, modified, then returned to Alexandria. Sometimes this is much easier than modifying records (one at a time) in Alexandria.
If you have a student information system that can export patron information in a tab-delimited format, please review the Patrons Management interface to determine what fields you need to have included in the export.
Step-by-Step Instructions
Import Patron Records
- Go to Tools > Import.
- Select Patrons from the Categories pane.
- On the Imports pane, click Choose File.
- Locate the patron import file on your computer, then click Open to select it for import.
- On the Settings tab, configure the following patron import settings:
- Starting Patron Barcode. If a new patron barcode number is required, Alexandria will begin assigning numbers beginning with this value. Alexandria always checks to see if a value is already in use, and if it is, a new number is automatically selected. During import, if Alexandria detects a patron barcode that is less than three alphanumeric digits, it will take the Next Barcode specified in the Patron Defaults tab of your Patrons preferences and assign that barcode to the patron being imported.
- Site. If the patron you're importing doesn't have a school or site defined in their import file, this field will apply a site in their patron record. Default is the union site.
- Patron Policy. If the patron you're importing doesn't have a policy defined in their import file, this policy will be applied as the default. Default is Standard Patron.
- Allow Import to Modify Existing Records. When this radio button is checked, imported data is used to update existing patrons if specific key fields match. When this radio button is not checked, only new records are added. Default is checked.
- Use Barcodes in Import File. When this radio button is checked, barcode numbers found in imported records are used as is during import. When this option is not checked, all barcodes are reassigned using your Starting Patron Barcode number. Default is checked.
- If the patron import file is recognized, Alexandria will automatically sort, organize, and match the information to the correct, specified fields. If the patron import file is missing a header, it will not be recognized; Alexandria will ask you to set your patron field mapping in order to proceed.
- Click the Field Mapping button; when the Field Mapping dialog appears, you may match data in the patron import file to specific Alexandria fields. Data from the import file is shown on the left-hand of the window while Alexandria field names are shown on the right-hand side.
- Patrons will be imported in sequential order; use the white up and down arrows to correctly align the fields of the import file. Click on a field to exclude it from the import. See Patron Field Mapping for more information on the fields that can be imported.
- When you have finished matching Alexandria fields to the information in your file, click Set.
- Click Run to send the patron import to the Operations Management queue. During import, in the Operations Management interface, a progress bar is shown; click Cancel to stop the import.
Special note should be made of the Full Name field during patron import. If you have a patron with a combined first and last name (one that has not been separated by tab delimination), use this field to split the name into First and Last Name on import.
Patron Import Rules
File Types
For patron record imports, Alexandria accepts .txt, .tab, and .tsv file types.
Always Create New Records on Import Setting
If your import file does not have a header, click Field Mapping to map your fields. What happens next depends on your import settings.
The Last Name field is required for Alexandria to create a new record upon import. Alexandria will assign other required fields, such as Barcode and Policy, if they are not specified.
Alexandria v7 is compatible with Alexandria v6, v5, and v3 patron headers.
Allow Import to Modify Existing Records Setting
Alexandria attempts to locate an existing record that matches the newly imported record by comparing fields in the following priority order:
RSN (Record Sequence Number) *
GUID (Globally Unique Identifier) *
Barcode
Government ID (SSN)
Community ID (Student #)
Primary Email, First Name, and Last Name (all 3 are required)
For the import to update existing records, it must include at least one matching field. For example, if Alexandria cannot match records based on the RSN field, it will move on to GUID. If it cannot match records based on GUID, it will move on to Barcode. And so on.
RSN and GUID fields are uncommon for most standard imports. GG4L, Clever, and SIF utilize GUIDs, and RSN may be recommended at the discretion of COMPanion Customer Support for special circumstances. In most cases, Alexandria will attempt matching on Barcode, SSN, Student #, or Primary Email.
Once an existing record is located, Alexandria will stop trying to match on additional fields, and the matching record is updated with the new data.
If an existing record is not located, a new record will be created. New records are assigned barcodes and policies based on the settings you chose in the Settings tab of your import.
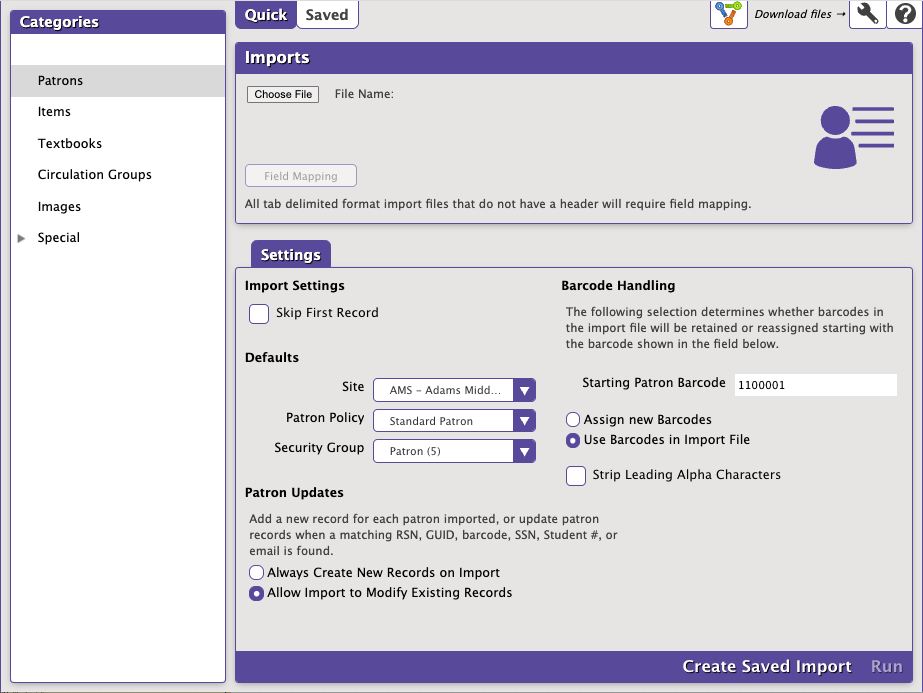
Quick Patrons Import
![]() Tools > Import > Patrons
Tools > Import > Patrons
The Patron Settings tab (in both Quick and Saved) of the Import window allow you to specify information about the patrons that you are importing into your database. This document covers the features of both the Quick and Saved versions of the Patron Settings tab, although some options may appear in one and not the other (e.g. Field Mapping shows at the top for Quick, but would be found in File Source for Saved).
Choose File
For patron imports, Alexandria accepts .txt, .tab, and .tsv file types.
Drag and drop
Drag an import file from your computer and drop it in the Imports pane for a quick and easy import!
Import Settings
- Skip First Record. When checked, Alexandria will not import the first record in the import file; this is generally done when the initial record of your import file contains an unrecognized header. This setting will ignore recognized COMPanion headers so that they are properly imported.
Defaults
- Site. If the patron you're importing doesn't have a site defined in their import file, this field will apply a site in their patron record.
- Patron Policy. If the patron you're importing doesn't have a policy defined in their import file, this policy will be applied as the default. Default is Standard Patron.
- Security Group. If the patron you're importing doesn't have a security group defined in their import file, this security group will be applied as the default. Default is Patron.
Patron Updates
Update the patron record when a matching barcode, SSN, or Student # is found; if not, force a new record to be added for each patron imported.
- Always Create New Records on Import. If selected, existing records are never modified by import. If a barcode being imported matches an existing one, it is reassigned.
- Allow Import to Modify Existing Records. When this box is checked, imported data is used to update existing patrons if specific key fields match. When this box is not checked, only new records are added. Default is checked.
Barcode Handling
The following selection determines whether barcodes in the import file will be retained or reassigned starting with the barcode shown in the field below.
- Starting Patron Barcode. If a new patron barcode number is required, Alexandria will begin assigning numbers beginning with this value. Alexandria always checks to see if a value is already in use, and if it is, a new number is automatically selected.
- Use Barcodes in Import File. When this box is checked, barcode numbers found in imported records are used as is during import. When this option is not checked, all barcodes are reassigned using your Starting Patron Barcode number.
- Assign New Barcodes. When Assign New Barcodes is selected, all patron barcodes are reassigned using the Starting Patron Barcode number (above). You'll want to use this option to force Alexandria to assign new barcode numbers according to the Next Barcode setting in your Patron Defaults preferences.
- Strip Leading Alpha Characters. When checked, any barcodes being imported (or assigned on import) that start with alpha characters (i.e. letters of the alphabet) will have the starting letters removed before barcodes are saved.