 Pardon the mess! The Support Center is undergoing construction.
 ![]()

How helpful was this page?
Related Blog Posts
Blog Posts
-
Winter storms–recompute due dates
created by
Jan 23, 2024
-
Cleaning up the grade table–Authority Control
created by
Apr 26, 2023
-
Make a calendar just for the senior class!
created by
Aug 02, 2022
-
When does an overdue item become lost?
created by
Mar 15, 2022
-
Setting rules–Patron Policy Preferences
created by
Mar 08, 2022
-
Seeing double (barcodes) on patrons and items?
created by
Feb 23, 2022
-
Automatic email notices... What are you waiting for?
created by
Nov 17, 2021
-
Winter (break) is coming! Are your period due dates set?
created by
Oct 20, 2021
-
Unused Barcodes: Reporting for Duty
created by
Sep 15, 2021
-
Introducing... FAQs!
created by
Jul 07, 2021
Patrons Preferences
Last Updated: $action.dateFormatter.formatDateTime($content.getLastModificationDate())

this page has been moved to https://support.goalexandria.com/preferences/patrons-preferences/
Use these preferences to configure some of the default settings applied to new patrons when they are added to Alexandria.
Click the tabs below to expand for more information.
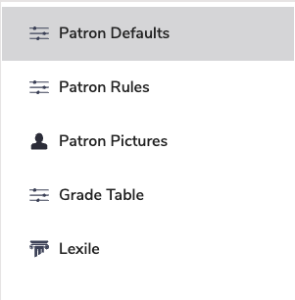
Patron Defaults
SITE-A/TT
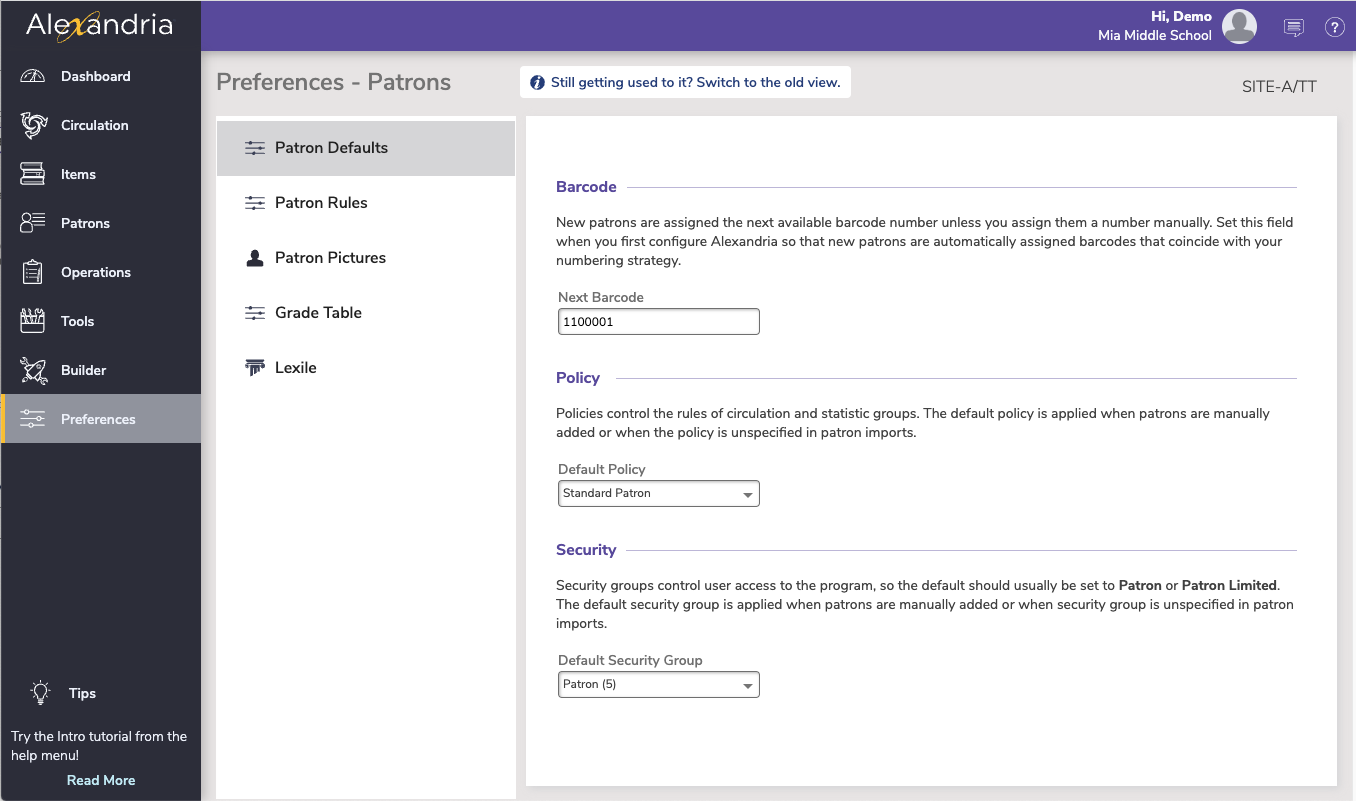
Barcode
- Next Barcode. New patrons are assigned the next available barcode number, unless you assign them a number manually. Setting this field when you first configure Alexandria will ensure new patrons are assigned barcodes that coincide with your numbering strategy. The code will increment automatically as new users are created.
Policy
- Default Policy. Select the default patron policy to use for new patrons. If a user-created patron policy is selected and later removed from your Policies, this preference will revert back to Standard Patron. Review the Policy page for more information about implementing policies for patrons and items.
Security
- Default Security Group. Select the security group you want applied to new patrons by default; ordinarily, this should always be set to Patron or Patron Limited. Review the Security section in Tools for more information about assigning (and removing) access levels for patrons and operators.
Patron Rules
SYSTEM-A/TT
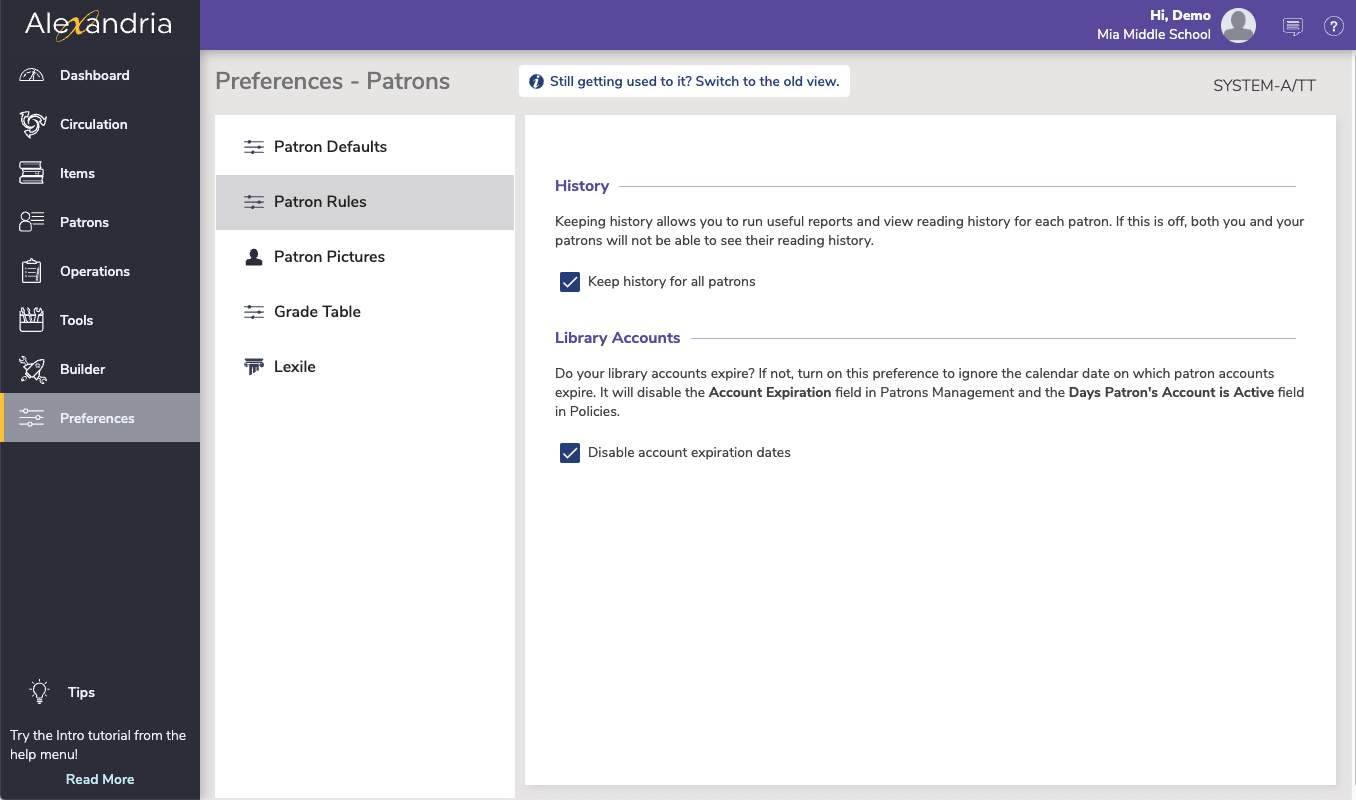
History
Keep history for all patrons. When checked, a complete transaction history will be kept for all the patrons who are added to your library system. This includes the reading history that patrons can see by logging in to Status.
Library Accounts
Disable account expiration dates. Ignores the calendar date when patron accounts expire, and disables the Account Expiration field in Patrons Management and the Days Patron's Account is Active field in Policies.
Patron Pictures
SYSTEM-A/TT
You can apply generic Male, Female, or Unspecified images to patrons if they don't have an individual profile picture attached to their record on the Personal tab of Patrons Management; pictures are assigned based on the gender value selected for each patron.
You can affix nearly any image supported by your browser (commonly accepted formats are JPEG, GIF, PNG, or BMP) into one of the three gender-based patron picture fields. If you don't have individual patron portraits assigned on the Personal tab of Patrons Management, these pictures will be used instead. Optimal image size for patron pictures is 155 pixels wide by 200 high.

Grade Table Preferences
SYSTEM-A/TT
Grades (or, "Levels") in Alexandria can be used to search and sort patrons, run reports and utilities by specific grades, and more.
Note that the Grade Table is where you keep all official grades. Patrons can still be imported/added with other grade terms (e.g. "2nd Grade" instead of "2"), and you'll want to periodically review Authority Control to clean up the grades.
Here in the Grade Table, enter the grade levels relevant to your district in the order they should be sorted and incremented. The first entry in the Grade Table will be your first grade level, the second will be the next grade level, etc. The Grade and Description entries in the table are fully customizable, allowing you to use whatever terminology you desire. Grades must be advanced manually at the end of each school year by using the Advance all grades now button or the Advance Patron Grade utility. Using one of these utilities, you can advance your patrons to the next grade level until they reach the Last Grade level (e.g. Graduated); patrons will never advance past the Last Grade level.
Users often set up their Policies to match Grades—remember to update your patrons' policies when you advance grades!
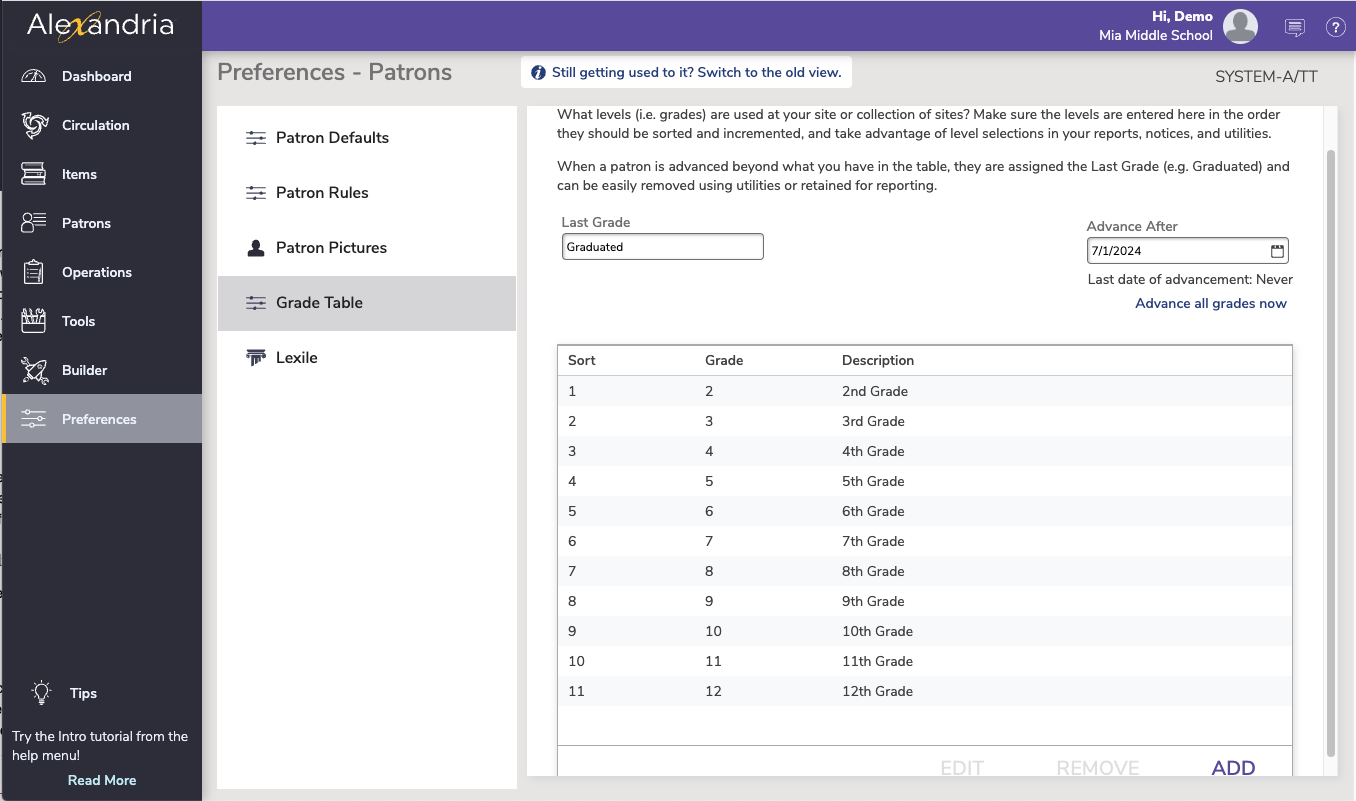
Last Grade
This user-defined field defines your patron's highest (and final) level of advancement. This level will be assigned to patrons who go beyond the levels defined in the Grade Table. Patrons will not be advanced out of this level when grades are advanced. Default is Graduated and the field must contain a value—it cannot be left blank.
Advance After
The Advance After is the date (set manually) after which grades will be automatically advanced.
To avoid automatically advancing grades, set the date to a year in the past.
Beneath you can see when the latest Advance All Grades operation was performed on the account. You can also click on "Advance all grades now" to pull up a dialog that will allow you to choose which sites are advancing.
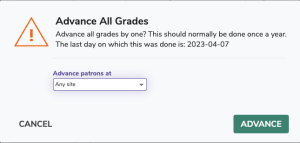
Advance all grades now
Click this to add one grade level to each of your patrons that already has a grade level (from the grade table). Any patron of the last level in your table will then advance to the 'last grade' value as described above. For example, a patron with the grade level of 6 will advance to 7. Patrons whose grade/level is either not found or not defined in the Grade Table will not have their grade level advanced.
Advance All Grades Troubleshooting
For the Advance All Grades utility to work, grades in the Grade Table need to exactly match the Grade field entry in Patron Management records. Examples include:
Patron record grades padded with “0”s.
A grade field using “5th” when “5” is the standard defined in the Grade Table preferences.
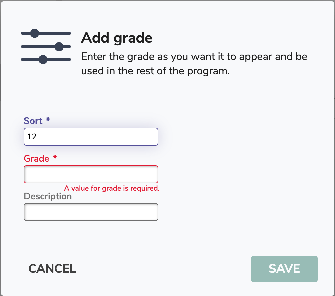
Add a New Grade Level
- Click Add to add a new level to the grade table. In the dialog, enter the following information:
- Sort. Enter the sort order for the grade.
- The sort value you provide changes where the grade appears in the Grade Table and how grades are advanced.
- For example, if the earliest grade level you support is kindergarten, then “1” should be your Kindergarten Sort value. If, at a future date, you incorporate a new preschool level and that becomes your new “1”, then your Kindergarten Sort value will be automatically bumped to “2”.
- Grade. Enter a simple grade name.
- This title will be added to the Grade drop-down menu in Patrons Management, Patron Details, Patron Reports, etc.
- Description. This is a more common or explanatory version of the grade name.
- For example, your description for grade “7” could be “7th Grade”.
- Sort. Enter the sort order for the grade.
- Click Save to close the dialog.
- Finally, click Save to keep your new grade level or Revert to discard it.
Edit a Grade Level
- Select the grade you would like to modify and click Edit.
- In the dialog, edit information in the Sort, Grade, and Description fields. If you modify the Sort order, the grades in the table will be adjusted automatically.
- When you're finished making changes, click Save to close the dialog.
- Finally, click Save to keep your changes or Revert to discard them.
Remove a Grade Level
- Select the grade and click Remove.
- When you are finished, click Save to keep your changes or Revert to discard them.

Patron Lexile Preferences
SYSYEM-A
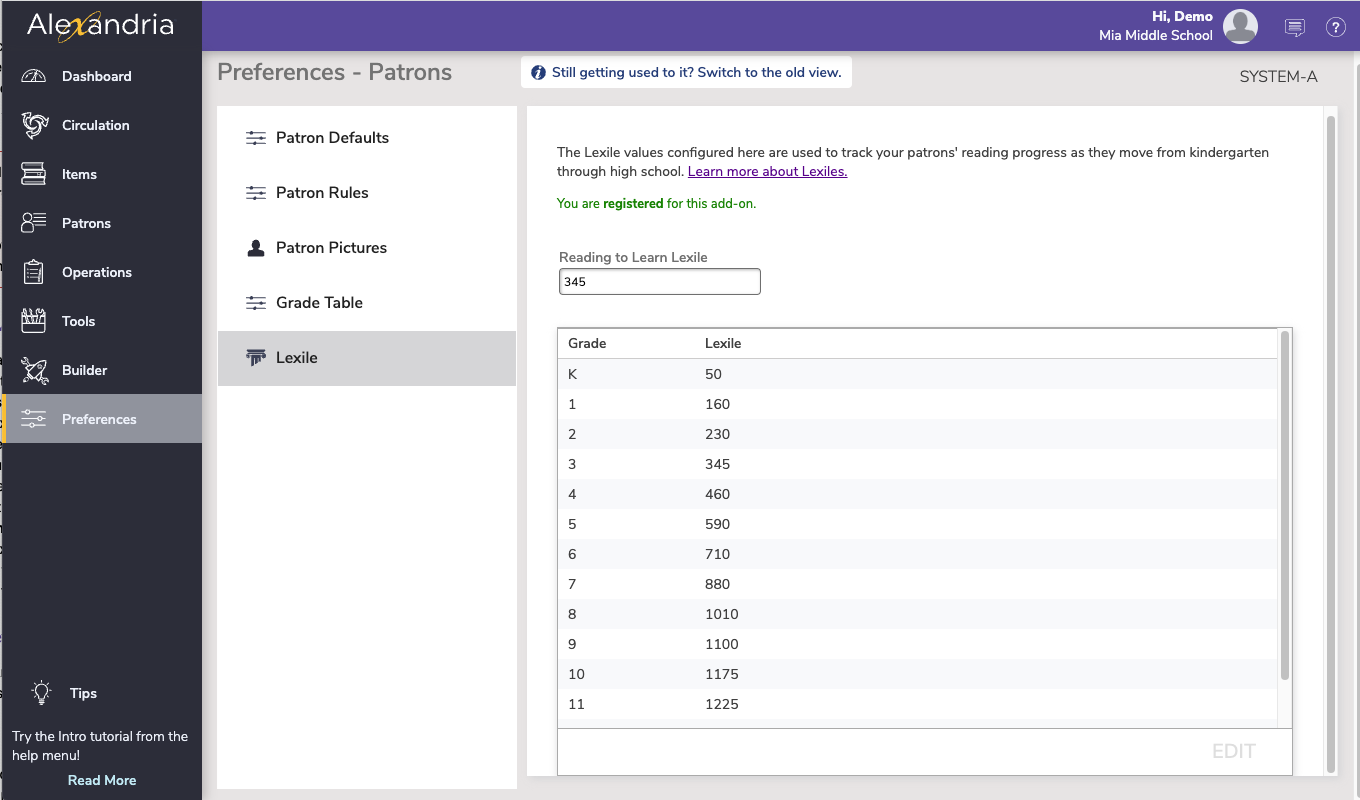
Lexile values are used to track your patron's reading progress as they move from kindergarten through high school. For more information on the importance and increasing performance of lexile scoring, Learn more about patron Lexiles.
Settings
- Reading to Learn Lexile. The lexile value at which a patron has moved from Learning to Read to Reading to Learn. The transition from Learning to Read to Reading to Learn usually occurs between the third and fourth grade; therefore, the default Reading to Learn Lexile value is commonly set somewhere between 345 and 460. This value shows on the patron Lexile graph.