The Support Center has moved!! See the new website https://support.goalexandria.com/  


You are viewing an old version of this page. View the current version.

Compare with Current View Page History

« Previous Version 103 Next »

Library

The root page ALIB:Library could not be found in space Alexandria Library.

Alex Steps Items

Items

Title Editors

  1. Unlock the record by clicking the padlock icon.
  2. Click the pencil icon in the Title field.
  3. Select the 245 field and click Edit.

  4. Make any necessary changes to the 245_a field, and then click OK.

  5. On the title Editor window, click Close.

  6. In the top right corner of the Items window, click Save.

  7. Lock record by clicking the padlock icon.

The Title tag can not be removed.

Subject Editors

  1. Unlock the record by clicking the padlock icon
  2. Click on the Subjects tab
  3. Click the Add button
  4. Enter Subject information in the 650 tag
  5. Click OK
  6. Click the Save button
  7. Lock record by clicking the padlock icon

  1. Unlock the record by clicking the padlock icon
  2. Click on the Subjects tab
  3. Click the Edit button
  4. Edit the 650 tag
  5. Click OK
  6. Click the Save button
  7. Lock record by clicking the padlock icon

  1. Click the padlock icon to unlock the record.
  2. Select the subject you wish to remove.
  3. Click Remove.
  4. Click Save.
  5. Lock record by clicking the padlock icon again.

Author Editors

  1. Click the padlock icon to unlock the record.
  2. Click the pencil icon in the Author field.
  3. Select the 100 field.
  4. Click Edit.

  5. Edit the 100_a sub field.

  6. Click OK.

  7. Close the Title Editor window.

  8. Click Save.

  9. Lock record by clicking the padlock icon again.

  1. Click the padlock icon to unlock the record.
  2. Click on the pencil icon in the Author field.
  3. Click Add.
  4. Choose the MARC field you wish to add (110, 111, 700, 710 or 711).
  5. Enter MARC information in the corresponding fields.

  6. Click OK.

  7. Close the Title Editor window.

  8. Click Save.

  9. Lock record by clicking the padlock icon again.

  1. Click the padlock icon to unlock the record.
  2. Click the pencil icon in the Author field.
  3. Select the tag you wish to remove.
  4. Click Remove.
  5. Close the Author Editor window.
  6. Click Save.
  7. Lock record by clicking the padlock icon again.

Titles

To add a new title record to your database:

  1. Log in to the Items module by adding /items to the end of your Alexandria URL.
  2. Make sure that the Titles tab is selected at the top of the control strip.
  3. Next, click Add Title located near the bottom of the Records List pane to open the Title Assistant.
  4. Once you've selected a matching record from the Title Assistant (or chosen to Enter [one] Manually), the Items management module will be cleared of all but your default values, some of which are required in order to save your new title.
  5. Move between the Publication, Subjects, Terms, Notes, Other, and Study Programs subtabs, providing information, configuring options, and making changes to the title record as needed.
  6. At the very least, Title, Medium, and Policy are required to save your new title. Of these fields, all but Title are defaulted.
  7. Click Save to add your new title record, or click Revert to discard it.
  8. Titles records are added without copies. After saving the new title record, Alexandria will ask if you'd like to add some copies.
  9. Clicking Add in this dialog is the same as selecting Add Copy from the Actions > Copies menu at the top of the Items Management control strip. If you choose to add copies, the Copies tab at the top of the control strip will be selected and the Copies subtabs, cleared of all but your default values, will be available.

Items that have been discarded, given to other libraries, sold, or permanently lost should be routinely removed from your database to keep reports and searches from becoming cluttered with obsolete information. However, be absolutely certain that the titles you are about to remove are to be permanently expunged from your collection. Only remove titles that you know will never return to your collection.

  1. Log in to the Items module by adding "/items" to the end of your Alexandria URL. 
  2. Make sure that the Titles tab is selected at the top of the control strip.
  3. Select Remove Title from the Actions: Titles menu to permanently remove the current title and all its copies.
  4. When a title is removed, all associated information is also removed. A title that has a copy checked out to a patron can not be removed.

Removing a title record is permanent and cannot be undone. If you remove a title in error, you will have to re-enter the information or recover it from an archive of your data.

To use the Item Lookup dialog to locate a specific title record in your database:

  1. Log in to the Items module by adding "/items" to the end of your Alexandria URL. 
  2. At the bottom of the Records list pane, click the Find icon.
  3. Using the Item Lookup dialog, you can provide search criteria other than Title (default); for instance, you can also search by Title/Copy Call Number, Author, Site, Location, or Shelving.
  4. If you check the Add to current results box, any titles or copies found during your search will be added to that which already exists in the item Records List pane. If you do not check this box, then the Records List pane will be cleared of everything except your most recent search results.
  5. Click Search to locate records or the Cancel button to stop the Item Lookup operation and return to the last selected title record.
  6. When an Item Lookup returns results, they will be sorted according to the View selection at the top of the item Records List pane.
  7. If no records matching your search criteria can be located, you will be asked to Cancel or Try Again.

Copies

To add a new copy to the title record:

  1. Log in to the Items module by adding /items to the end of your Alexandria URL. 
  2. Click at the bottom of the Records List pane to open the Item Lookup dialog.
  3. Make sure that the Copies tab is selected at the top of the control strip. Remember, copies are an extension of the title record; a copy cannot be selected unless the main title record exists or is saved.
  4. To add a new copy record to your title, click near the bottom of the items Records List pane, or go to the Actions menu and select Add Copy.
  5. The Items management module will be cleared of all but your default values, some of which are required in order to save your new copy.
  6. In the Copy Information and Copy Notes subtabs, enter new information, configure options, and make changes to the copy record as needed.
    1. Barcode and Call Number are required to save your new copy. However, if you decide not to provide this information, it will be defaulted.
  7. When you have added all the necessary information for this, click the Save button to add your new copy to the title record, or click Revert to discard it.
  8. To add additional copies, go the Actions menu and select Duplicate Copy.

To remove copies:

  1. Log in to the Items module by adding /items to the end of your Alexandria URL. 
  2. The Items management module will appear.
  3. Make sure that the Copies tab is selected at the top of the control strip.
  4. Go to Actions > Copies and select Remove Copy to permanently remove the selected record, regardless if its status is lost or available. 
    1. Remove Copy is only available when there are copies for the title record.
  5. Copies that are checked out to the Lost, Discarded, On Repair, On Order, Archived, or Unknown System Patrons can be removed.


Removing a copy record is permanent and cannot be undone. If you remove a copy in error, you will have to re-enter the information or recover it from an archive of your data. If you need to report on copies that are Lost or Discarded for the year, you should check those copies out to the corresponding System Patrons. Run all necessary reports (such as Super Summary or Special Item lists) before removing these copies. Once they are removed, they are unavailable for any future reports.

eBooks

eReaders

Add eReaders to your available catalog by following the steps below:

  1. Go to the Items module.
  2. Select the Titles tab at the top of the window.
  3. In the bottom left of the Item Records List pane, click to add a new title.
  4. In the Title field of the SmartMARC Title Assistant window, enter a title for the eReader(s) (e.g. “Kindle Reader Group 1”) and click Search.
  5. Because you're creating a new eReader record, you shouldn't find any real results for your title. Click Enter Manually.
  6. On the right side of the Publication tab, enter an item Call Number.
    1. For example, you might want your call number to be “KRG 1” (short for “Kindle Reader Group 1”).
  7. From the Policy dropdown menu, select the Policy that you previously established to use with your eReaders.
  8. Go to the Notes tab, and then double-click Content Note (or select Content Note and click Edit at the bottom of the pane).
  9. Enter the title of each eBook that is loaded on that eReader, separated by “--” (minus the quotation marks).
  10. Click OK.
  11. Now click Save in the upper-right corner of the Items screen.
  12. When asked if you'd like to add some copies, click Yes. Now you should be in Copies.
  13. In the Information tab, adjust the barcode number(s), if you don't want to use those that Alexandria provides.
  14. Next, we recommend that you include the Copy ID as part of the copy's Call # (e.g. “KRG 1-1”, “KRG 1-2”, etc.).
  15. In the Notes tab, enter your eReader policies and procedures in the Alert Notes field.
  16. When you're done, click Save in the upper-right corner of the window.
  17. With the Copies tab still selected at the top of your screen, go to the Actions menu and select Duplicate Copy.
  18. Make sure the Beginning barcode is what you want it to be. By default, the number is based on the value you provided in Preferences > Items > Item Defaults > Next Barcode.
  19. Next, enter the number of copies you'd like to add to this title record, then click Duplicate.
  20. When it's done, click OK on the Operation Complete dialog.

That's it!

Checking in an e-Reader is the same as returning any other item:

  1. Go to Circulation.
  2. Select Bookdrop (B) mode from the Command Line dropdown menu.
  3. Scan the eReader's barcode.
  4. If any alert notes created when the eReader was first cataloged, they'll remind you of your library's Check Out and Bookdrop polices and procedures.

Thoroughly examine all returned eReaders for damage and to make sure nothing has been added or deleted.

Your patrons can search for eBooks by title:

  1. Have your patron log in to Researcher.
  2. Search for an eBook using the Title or Subject filters.
  3. Locate the book in your search results.
    1. In the example shown below, you can see that it's an eBook because it's availability says “ONLINE” and the cover art depicting a dog-eared left corner revealing the Capstone Interactive logo.
  4. Click on the blue title (e.g. Air) to open the Item Details.
  5. If you created a subject heading for this eBook, click on the associated eReader group listed in the Subjects section. This will cause the eReader record you created to open and allow the patron to Place Hold on one of the eReaders belonging to that “group”.


  1. Log in to the Circulation module.
  2. In the Command Line, type “Y” followed by an optional override date or usage count, and then press <enter>.
  3. Ask your patron which title on the eReader they want to read.
  4. Scan the barcode number associated with that eBook title to add a usage statistic on that eBook in your Copy Barcode Labels report.
  5. To exit Statistics mode, type a period (.) and press <enter>.

  1. Go to Items and select the eBook record.
  2. Click the Subjects tab.
  3. Go to Actions > Toggle MARC View to open the MARC View editor.
  4. From the list of MARC tags that appears, scroll down to the 650 tag.
  5. Use the MARC View editor to select an appropriate subject heading tag.
    1. For example, you can select 650 - Subject Added Entry - Topical Term and then enter Kindle Group 1 into the 650_a subfield, since this is the title of the record for the eReader(s) on which this particular eBook is installed.
  6. When you're finished, click Save to keep your subject heading changes.

Import eBooks

Enable Capstone Interactive:

  1. Go to Tools > Preferences > Extras.
  2. Select Capstone Interactive from the list on the left.
  3. On the Preferences and Tools tab to the right, check the Enable Capstone Interactive box, and make sure you have a valid Vendor URL.
  4. If you made any changes, click Save.
  5. Click Show All in the top left corner of your window to return to Preferences.
  6. Next, go to Preferences > Policies.
  7. You should already have an eBook Item Policy. However, if you don't (or you would like to modify it), you can do so here.
    1. Read Item Policies to find out how to add or modify item policies.
    2. As a general rule, eBook policies should have No Loan Period and allow no holds, reservations, or fine amounts.
  8. If you made any changes, click Save.

  1. Go to Tools > Import > Items.
  2. From the Imports pane, click Choose File to open a finder/explorer window.
  3. On your computer, locate the MicroLIF file you want to import, and then click Open.
  4. Make the appropriate selections on the Settings tab: 
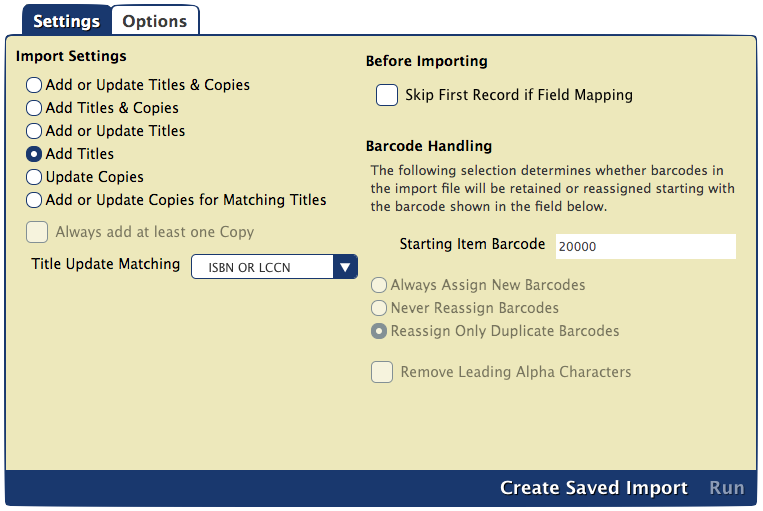
    1. Items import Settings tab (selections for importing eBooks)

      Import Settings
      • Add Titles. Selected. Adding title records only.

      • Always add at least one Copy. N/A. Copy settings are ignored.
      • Title Update Matching. N/A. This setting is ignored.

      Before Importing
      • Skip First Record if Field Mapping. This option should be checked if you have included a header row in your spreadsheet. Leave it unchecked if there is no header row identifying the column contents.

      Barcode Handling
      • Starting Item Barcode. N/A. Copy settings are ignored.

      • Reassign Only Duplicate Barcodes. N/A. Copy settings are ignored.

      • Remove Leading Alpha Characters. N/A. Copy settings are ignored.


  5. Make the appropriate selections on the Options > Titles tab: 
    1. Title Data Defaults
      • Title Policy / Use Call Number Policy Mapping. Select the policy for any new titles, which would be the eBook or electronic resource policy for your library. Or, turn on Use Call Number Policy Mapping to let the system determine policies based on call number; only use this selection if Policy Mapping has been configured AND your file contains call numbers.

      • Replace MARC Records on Title Match. N/A. This setting is ignored; leave it unchecked.

      Copy settings will be ignored, so there's no need to make any selections on the Options > Copy tab.

  6. Click Run at the bottom of the Import interface to queue the selected import.

  1. Go to https://www.goalexandria.com/resources/partner-files/ and scroll down to the partner files.
  2. Click Capstone MicroLIF File to download the ZIP file to your computer.
  3. Next, click 24 Capstone Interactive Library Book Covers link and guide your default browser to the location where you would like to have the CILcovers.zip file saved.

  1. Go to Researcher > Search or Explore.
  2. In the Search field, type the exact name of one of your Capstone Interactive Library titles (e.g. “The Moon”).
  3. If a matching title is available, the requested eBook should appear in your Researcher's search Results (note the “ONLINE” status):
  4. Next, click on the large Capstone Interactive graphic to begin reading.
  5. Your internet browser will open the eBook in a new browser window.
  6. If, for some reason, your eBook doesn't appear, make sure that your firewall is configured to allow access to the URLs in question and that you don't have browser-integrated popup blocking inadvertently closing your eBooks.

Other

  1. Go to Tools > Reports > Copies > Labels.
  2. Select Copy Labels (3x10) – Barcode Labels, Envelope Labels, Info Labels.
  3. Configure the Selections tab as shown below:

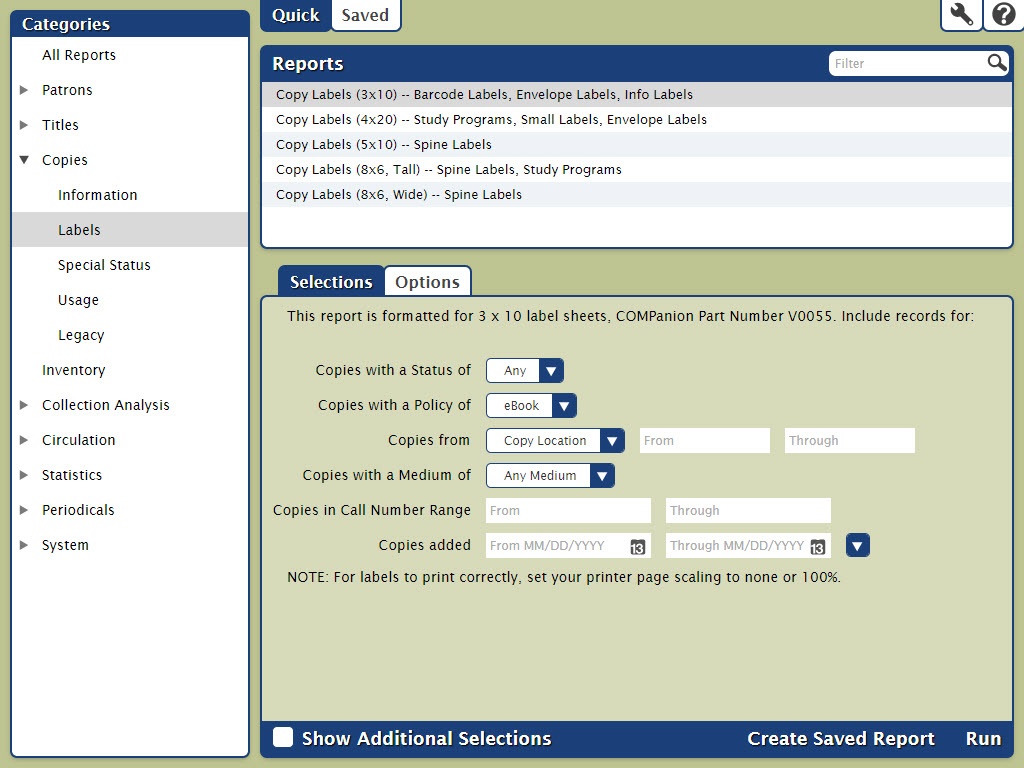
    • Copies with a Status of: Any

    • Copies with a Policy of: eBook
    • Copies from: Copy Location
    • Copies with a Medium of: Any—though you can choose a more specific option from the dropdown menu.

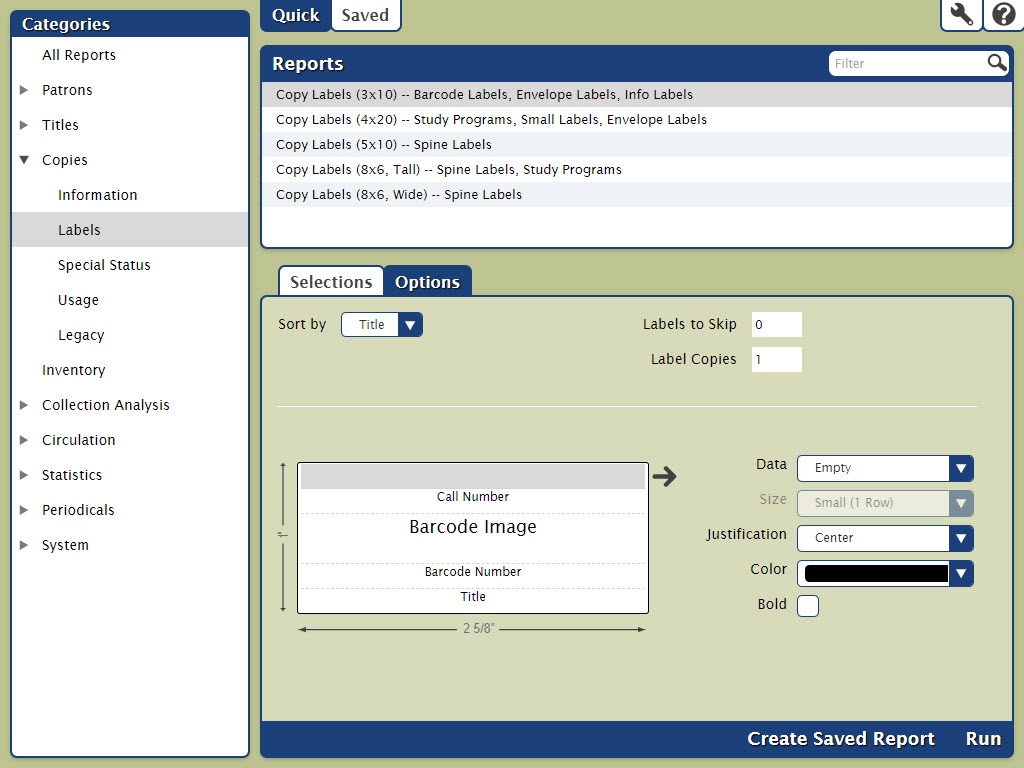
  4. Click on the Options tab. Click the Sort By dropdown menu and select Title.

  5. Click the Run button at the bottom of the window.

  6. Next, click the Operations icon in the top right of your window. 

  7. Locate your report, which should be at the top of the list, and then click the PDF icon to download it to your device.

    1. If your library is self-hosted, your PDF will be saved to your Alexandria Support directory in the Operation Files folder.

  8. Print the PDF and keep a hard copy at your circulation desk so it is readily accessible for reference.

Make this a Saved report and mark it as a Favorite (Favorites Icon.png) so you don't have to remember how to set it up again the next time you add more eBook titles.

Item Policies

Many school libraries or public libraries create policies based on medium type or call number range. Alexandria will not automatically change or set any item's policy just because a policy matches the medium type or call number range. The librarian must set the item's policy either during an item import, running the Change Copy Policy utility or manually in the Items management window.

  1. Go to Tools > Preferences > Policies.
  2. Click Add in the lower-left hand side of the Item Policy section.
  3. Enter the new item Policy Name and Policy Short Code and optional Statistics Group in the fields provided.
  4. Make a selection from the Defaults from drop-down menu and click OK; the new policy will take its defaults from whatever is selected from this drop-down menu.
  5. Next, tab through the various Policies (Check Out, Overdue, and Other) providing appropriate values to the fields, drop-down menus, and check boxes in order to create your policy.
  6. When you have completed your new policy, click on the Save button.
  7. Repeat this process until you have made all your new item policies.

  1. Go to Tools > Preferences > Policies.
  2. Next, select the item policy to be modified from the drop-down menu on the right.
  3. Make the appropriate changes to the value(s) in the Item Policy fields, drop-down menus, and checkboxes.
  4. When you've finished modifying the policy, click Save.

Modifying an Item Policy will not affect past transactions. For example, the only way to change the fine rate on a book that is currently checked out is to check the book in, forgive the fine, and then check the book back out to the same patron for the original due date (using a manual override date).

Duplicate an item policy when the policy values are exactly the same as or there are only minor variations from an existing item policy.

  1. Go to Tools > Preferences > Policies.
  2. Click Add in the lower-left hand side of the Item Policy section.
  3. Enter the new item Policy Name and Policy Short Code and select an optional Statistics Group in the fields provided.
  4. Make a selection from the Defaults from drop-down menu and then press <enter> or click OK; the new policy will duplicate the values of whatever is selected from this drop-down menu.
  5. Make the appropriate changes to the value(s) in the Item Policy fields, drop-down menus, and checkboxes.
  6. When you have finished modifying your duplicated Item Policy, click the Save button to keep your changes; otherwise, click Revert to discard them.
  7. Repeat this process until you have finished making all your new item policies.

  1. Go to Tools > Preferences.
  2. Click on the Policies icon in the Management section of the Preferences interface.
  3. Select the policy that you would like to remove from the Item Policy drop-down menu.
  4. Click Remove in the lower-left hand side of the Item Policy section.
  5. Click Remove on the confirmation window when it asks if you are sure you want to remove the item policy.
    • If you're removing an item policy that is in use, you'll be given an option to update the affected records to the policy of your choice.

Standard, System, and Textbook policies cannot be removed.

  1. Go to the Items module.
  2. Search for the title you want to assign a policy to.
  3. Click the padlock icon to unlock the record for editing.
  4. Click on the Policy dropdown menu, located under the book cover, and select the policy for this title.
  5. Click Save at the top-right of the window.

  1. Go to the Items module.
  2. Search for the title you want to assign a policy to.
  3. Click the Copies tab at the top of the Items Management window.
  4. Click the  padlock icon to unlock the record for editing.
  5. In the list on the left, locate the individual copy you want to assign a policy to. 
    1. You can use the data in the Information tab to the right (Barcode, Call #, Accession Date, etc.) to help you differentiate one copy from another.
  6. In the Information tab to the right, click the Policy dropdown menu, and then select the policy you wish to assign to this copy.
  7. Click Save at the top-right of the window.


If the Title Policy is the same as any of its copies' policies, then changing the main Title Policy will also change the matching Copy Policy—as they are in sync. However, if any of the copies' policies are different than the main Title Policy, then changing the main Tile Policy will not affect these copy policies.