The Support Center has moved!! See the new website https://support.goalexandria.com/ ![]()
Go to start of metadata
- Created by Ashley, last modified on Apr 05, 2018
You are viewing an old version of this page. View the current version.
Compare with Current View Page History
« Previous Version 88 Next »
Library
The root page ALIB:Library could not be found in space Alexandria Library.
Alex Steps Tools
Administration
- Go to your Controller's Administration settings.
- Click Email.
- To successfully use an external SMTP, you must provide both a valid Site Email Address and a valid Email Address for one of your Administrator-level operators.
- Enter your SMTP Server information, Port, and, if Use Authentication is needed, check that box and provide your Log In and Password. Also check Use SSL if needed.
- Click Save in the upper-right corner of the window.
The Alexandria Controller has the ability to Start and Stop Selected Data Stations that it manages. When you Add a new or existing Data Station, they will initially appear as Stopped in the monitor list.
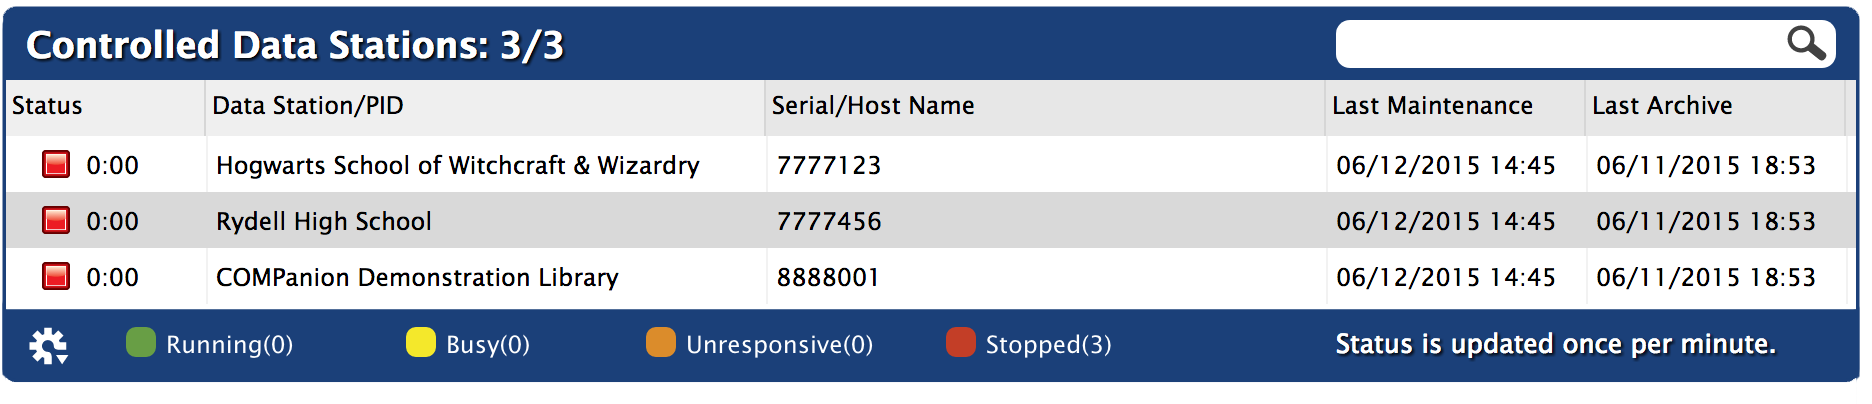
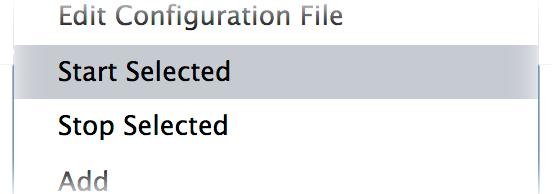
- Select the Data Station(s) you would like to activate from the list and choose Start Selected from the Actions menu.
- You can activate more than one Data Station at a time. When Alexandria Controller is shut down and restarted, all of the individual Data Stations automatically activate. If a Data Stations fails to auto-start on launch, an “unable to start” error message will be recorded to the log.
- The green-colored Running icon box located in the Status column of the managed list indicates the Data Station is active.
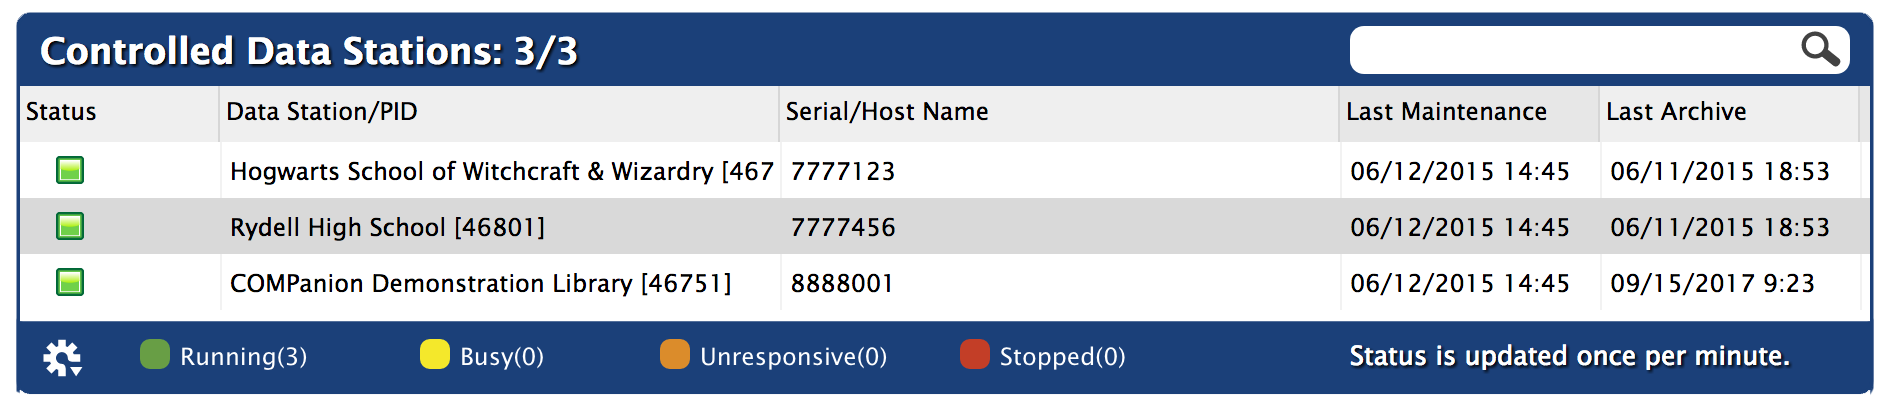
At this point, activated Data Stations are broadcasting—awaiting connections on their default Port ID.
A Gmail account can be used as a portable SMTP server if your library's network does not already have one. Before you configure Alexandria to use Gmail, you need to set your Gmail preferences to Allow Less Secure Apps.
- Access Tools > Administration.
- Click Email on the left.
- Enter smtp.gmail.com as the SMTP Server Address.
- Enter 587 as the port.
- Check the box if you want to allow non-secure connections. (optional)
- Enter the login and password for your Gmail account.
- Click Save in the upper-right corner of the window.
- Click Test Server to ensure the Gmail account is acting as a server.
- Repeat steps 1-8 if you want to configure a back up server for Server 2.
Bulletins
To create a new board:
- Go to Researcher > Bulletins, or type /bulletins at the end of your Alexandria login URL.
- If the Bulletin Board Management window is empty, you will have the option to Create a Bulletin Board.
- If you already have existing boards, select Add Board from the Bulletin Board Management window Actions menu.
- A blank board will appear in the Boards section of the Bulletin Board Management window.
- Board name. Enter a name that describes the general content this board will contain.
- For example: After School Programs or February Event Calendar
- If desired, you can enter an optional expiration date using the Show Board From fields; if you provide an ending date, the board will expire from public view on that date.
- You may also provide additional (optional) Notes about this board for operators or library administrators.
- When finished, click on Save to create your new board or Revert to discard it.
- Your new bulletin board will appear in the list on the left—all it needs now are some bulletins!
To modify an existing board:
- Go to Researcher > Bulletins, or type /bulletins at the end of your Alexandria login URL.
- From the Bulletin Boards list, select (i.e. highlight) the existing board you want to modify.
- The contents of the board will appear in the Boards section of the Bulletin Board Management window.
- Adjust the name of the board in the Board Name field; you may also modify the Show Board From dates or board Notes as desired.
- When finished, click Save to keep your changes or Revert to discard them.
To remove an existing board and its associated bulletins:
- Go to Researcher > Bulletins, or type /bulletins at the end of your Alexandria login URL.
- From the Bulletin Boards list, select (i.e. highlight) the board that you would like to remove.
- Next, select Remove Board from the Bulletin Board Management window's Actions menu.
- You will be asked to confirm the removal of your board and all the bulletins contained within; click OK to continue or Cancel to abort.
- When finished, click on Save to permanently delete your board(s) or Revert to restore them.
When you delete a board, all the bulletins for that board are deleted as well. We can't restore deleted bulletins or boards, so be careful
To duplicate an existing board:
- Go to Researcher > Bulletins, or type /bulletins at the end of your Alexandria login URL.
- From the Bulletin Boards list, select (i.e. highlight) the board you want duplicated.
- Next, select Duplicate Board from the Bulletin Board Management window's Actions menu.
- Your duplicate board will appear in the Boards section of the Bulletin Board Management window; the duplicated Board Name will be prefaced with “Copy of...” text. Any information from the original Show Board From and/or Notes fields will also be duplicated.
- Adjust the name of the new board in the Board Name field.
- If desired, you may also modify the Show Board From dates or board Notes.
- When finished, click on Save to create your new board or Revert to discard it.
- Your new board will appear in the Bulletin Boards list on the left—all it needs now are some bulletins!
To view posted bulletins from the Alexandria Researcher:
- Go to Researcher > Bulletins, or type /bulletins at the end of your Alexandria login URL.
- Select Bulletins icon from the default Researcher pane.
- It is possible that this icon has been removed from your Researcher pane. If so, ask your Librarian or Librarian Administrator to add it back using Explore Builder.
- Your site's public Bulletins interface will open in a new browser window.
- If you are a Centralized Catalog, the Select a Data Station window will appear each time you access public Bulletins. This allows you to select the site whose bulletins you would like to view. The union site record does not appear in the Select a Data Station list.
- If the selected (or union) site has multiple boards, you will be asked to Select a Bulletin Board to View. If the selected site doesn't have any bulletin boards, you will see Site Information instead.
- After selecting a board, you may return to the Select a Bulletin Board to View list at any time by clicking the back arrow icon located to the left of the board name. To the right of the Site name is a magnifying glass icon that will return you to the Researcher interface selection window.