| Content Column |
|---|
| tabbed-blocks | expanders |
|---|
| width | 100.00002% |
|---|
| id | 309452487 |
|---|
| | Content Block |
|---|
| not-tabbed | true |
|---|
| name | Overview |
|---|
| id | 309452486 |
|---|
| Use Patrons Management to create, view, modify, and remove patron and operator record data.  Image Added Image Added
Patrons Management includes a few important and distinct areas: - The Patron toolbar on top,
- the Records List on the left,
- and the Current Record pane on the right.
Search for and open a patron record, then click the padlock at the top of the window to unlock the record for editing. The current record open in the Patrons module will also be the current patron in the Circulation module, and vice versa.Image Removed Add Patrons When unlocked, select the plus in the top right to add patrons, or if no record is currently pulled up, you can select the Add patrons card on the Patrons landing page. | | Content Block |
|---|
| Image RemovedLock/UnlockClick the padlock icon to unlock the patron record for editing. Image Removed Actions- Show History. Download a PDF of this patron's history. It's essentially the same as running an individual Patron History report.
- Preferences > Patrons > Patron Pictures.
- Patron History. Runs an individual Patron History report, which shows recent payments, credits, renewals, lost items, refunds, Lexile history, and returned items. The PDF will automatically download to your device. You can also run this report in Circulation via the actions menu for the Current Patron pane.
- Patron Details. Show Details. View or print the details for the current patron.
Image Modified Operations ManagementGo to Operations Management to view and download your finished exports. Image Removed SupportHaving trouble? This will open support documentation for this topic in another tabSee Patron Tabs for more information about the Patron records. |
| Content Block |
|---|
| name | Patron Records ListManaging Patrons |
|---|
| id | 309472188 | 954686764 |
|---|
| Adding patron records to Textbook Tracker is easy! You can either add records manually (see steps below) or import hundreds of records at once. | Note |
|---|
Operators (Library Administrator, Librarian, Student Aide, etc.) are still considered patrons. Their records are created and managed in Patrons Management, and the Security Group field is what determines their program access. See Adding Operators for more information. |
Step-by-Step Instructions Add Patron Record- Log in to Patrons Management.
- Click the Lock icon, then select the Add Patron button
 Image Added in the top right corner. Image Added in the top right corner. - A new record will appear to the right. Each field will be blank except for a few preset defaults. These defaults can be changed in the Patron Defaults tab of Patron Preferences.
- Move between the Patrons Tabs to enter information, configure options, and make changes to the patron record as needed.
- At the very least, Last Name, Barcode, and a Security Group are required to save your new patron. However, we suggest you also provide a unique Username, Password, and Email address during the creation of your patron.
- Next, if you intend to give your new patron any operator privileges (e.g. Librarian or Student Aide), select the correct Security Group from the drop-down menu. You will also need to use the Site Access selection to mark the sites that your patron is permitted to access. Otherwise, leave these selections alone.
- Click Save to add your new patron record or Revert to discard it.
| Tip |
|---|
While filling out a patron record, you can <tab> to move to the next field, or <shift-tab> to move to the previous field. |
Usernames and Passwords- Usernames must be unique. If the username you've selected is already in use, Alexandria will ask you to choose another.
- A patron's default password is their last name.
- Passwords are not case-sensitive.
- Patrons are saved to the database by username and barcode, so they can have duplicate first/last names and security groups.
Other- Textbook Tracker automatically assigns a barcode number based on the value you've provided in the Next Barcode field of the Patron Defaults preferences.
- We suggest administering a user-defined Policy and Status. Assigning the correct patron policy is important when certain patron groups need to stand apart in statistical reporting.
- You can quickly import hundreds of patrons if you have their data in a tab-delimited format.
You can edit patron information directly from Patrons Management. Before records can be changed, they must be unlocked by clicking on the Lock button  Image Added. Image Added. This method for modifying information is best when editing an individual patron record. If you want to modify information for a group of patrons, use Patron Utilities. Step-by-Step Instructions Modify Patron Records- Log in to Patrons Management.
- Use quick search or Advanced Search to look up a patron.
- Enter information about the patron (e.g. Last Name, Barcode, etc.) and press <return> or <enter>.
- Select the patron you'd like to modify.
- Unlock the patron's record by clicking the Lock button Image Added.
- Now you may move between the Patron Tabs, making changes to the patron record as needed.
- Keyboard: To move to the next blank data entry field, press the <tab> key. To move to the previous blank data entry field, press <shift-tab> or <-tab>. To select a particular data entry field to edit, click in the field. To select from a drop-down menu, <tab> until the drop-down menu you desire is highlighted and use the <up> and <down> arrow keys to make your selection.
- If needed, use the Password and Confirm Password fields to change the patron's password. You can make passwords more secure by mixing different types of characters, numbers, and even special characters such as “&” or “%”. Alexandria passwords are not case sensitive, so using upper and lower case letters is unnecessary.
- Once you have modified all the necessary information for this patron, click the Save button in the upper-right corner. If you want to ignore the information you have entered, click the Revert button. You won't be able to select another patron record until you Revert or Save your changes.
- If you try to save a patron record with a Username or Barcode that is already in use (e.g., eanderson or 1001), an error message will appear, prohibiting the change.
|
| Content Block |
|---|
| name | Adding Operators |
|---|
| id | 1815961401 |
|---|
| Operators are patrons with permissions to access the management side of Textbook Tracker. Their records are created and managed in Patrons Management just like regular patrons. Program access is determined by a patron's Security Group, which is designated on the Access tab of a patron record. Security GroupsSecurity Groups determine what actions operators or patrons are permitted to perform. By default, newly created patrons are assigned to the Patron (5) Security Group. This level doesn't allow any access to the Librarian side of the program. Change their Security Group by editing the Access tab of their patron record. To determine the specific permissions each Security Group has, go to Security. By default, Administrator-level access (1) are the only security groups that allow you to make modifications. All Operators- Any operator with access to Preferences will only be able to modify Security Groups below their own. For example, an operator with Librarian-level security access (2) can modify preferences; however, they are unable to change the Librarian, Library Administrator, or District Administrator Security Groups.
- Most patrons won't need to have their Site Access indicated. However, if you intend to give your new patron any sort of operator or library management privileges (e.g. Student Aide or Librarian), use the Librarian Site Access selection on the Access tab to mark the sites that your patron is permitted to access.
- When creating a new patron with security equal or greater than Library Aide, the patron's assigned site is automatically added to their Site Access list when the record is saved, if it has not already been added.
- When creating operator accounts, remember to add usernames and secure passwords. We also strongly recommend each operator has an email that can be used to reset their password.
- We recommend that each operator have their own account. Sharing an account is a security and privacy risk, and you might find yourself locked out if someone else deletes that account! (A potential exception to this is for Student Aides/Self-Service.)
- High level operators are required to enter an email, and we strongly recommend that every user enter a valid email. See Password Management Best Practices for more information.
District Administrators- Your first operator must be a District Administrator with equivalent Security Group access. If you're brand new to Textbook Tracker, you'll be prompted to create a District Administrator account the first time you access the program. However, if you're coming from a previous version of Textbook Tracker, you can log in with your old account.
- The District Administrator security group is only meaningful for Centralized Catalog, multi-library collection licenses; for all other licenses, the District Administrator security group is analogous to the Library Administrator.
- The District Administrator security group has full access to all areas of the program. For that reason, it can't be modified or deleted.
- Remember that only District Administrators can make other patrons District Administrators. If you get a new District Administrator but forgot to have the existing one grant those permissions before they left, contact our Support team at 1-800-347-4942. They will confirm the new District Administrator's identity and grant those permissions.
- To avoid losing access to Textbook Tracker, be sure all administrators have an email that can be used to reset their password.
|
| Content Block |
|---|
| name | Patron Search |
|---|
| id | 954595384 |
|---|
| Go to Patrons and click into the search box. The basic search allows you to narrow results by Name, Barcode, Homeroom, Recently Modified, and Recently Created. Basic searches only apply to the site you are logged into. Advanced SearchFor more specific, narrowed searches, use any of the Advanced Search options, including Basics, Access, Dates, Contact, and More. Select the Combine with current results box to add your new search to any existing search results. 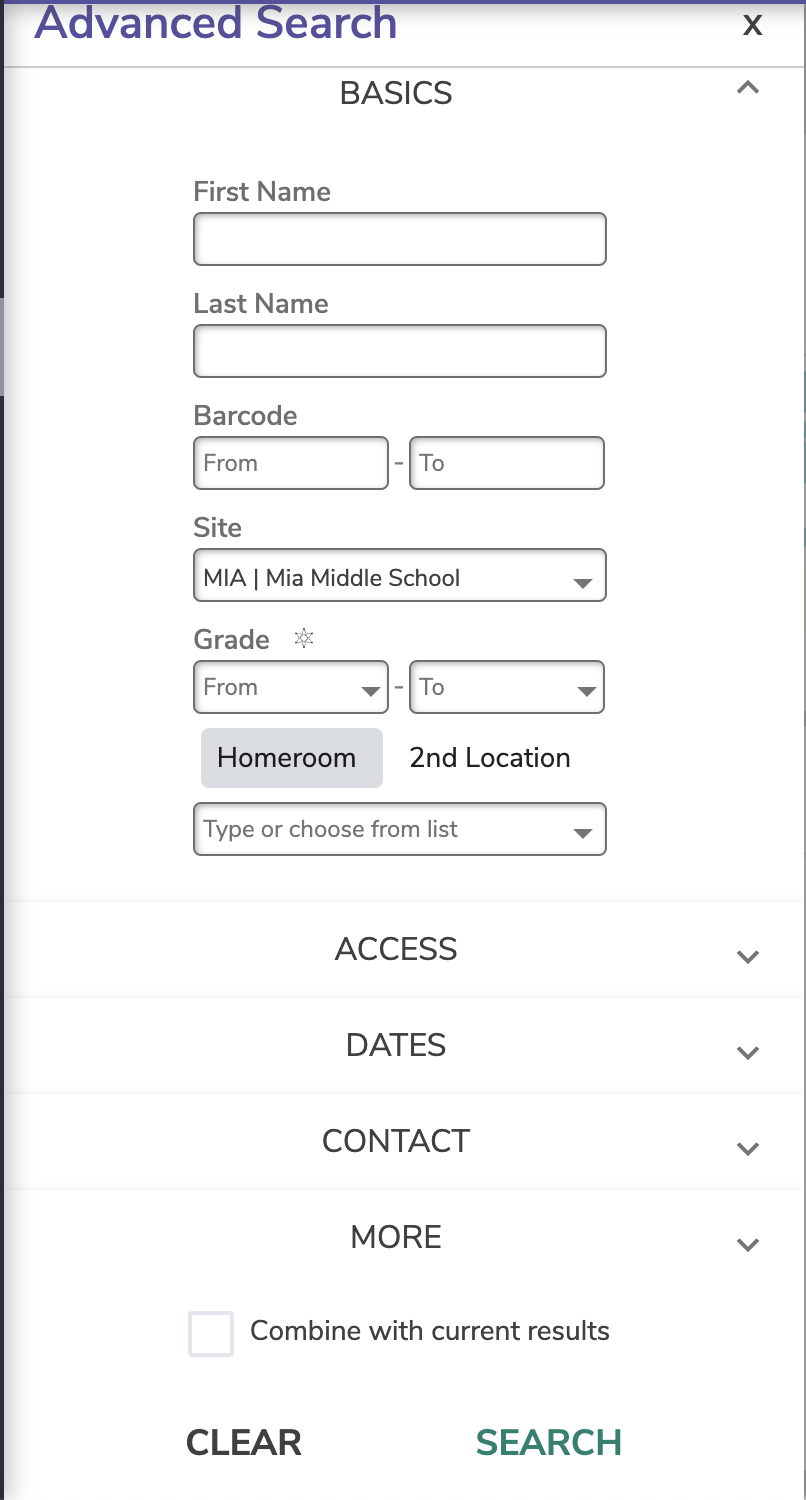 Image Added Image Added
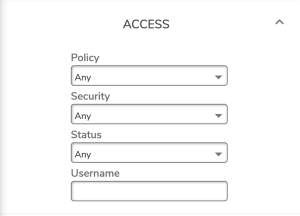 Image Added Image Added
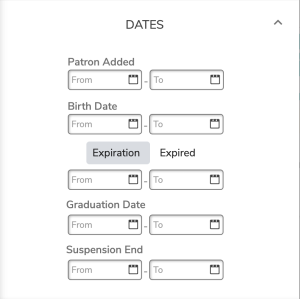 Image Added Image Added
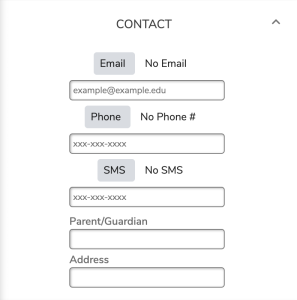 Image Added Image Added
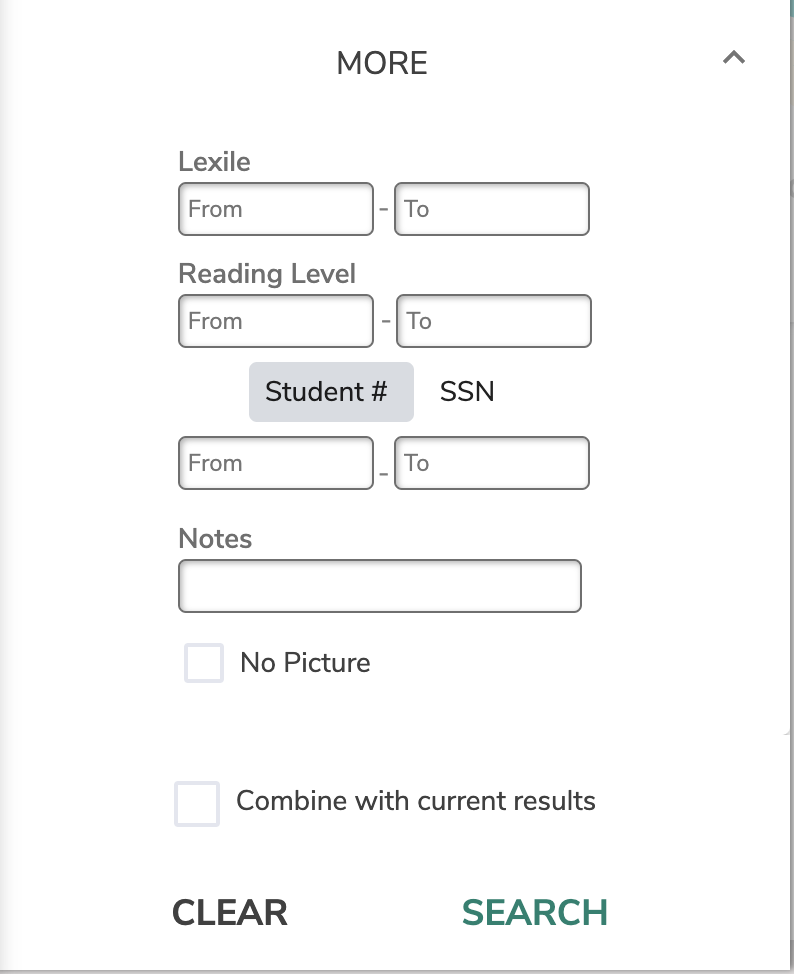 Image Added Image Added
Only Show Operators in the Patron Records List There are times you may need to search for Operators only. Use the Policy and Security dropdowns under Access in Advanced Search | The Patron Records List is where all of the patron and operator records matching your Find criteria are listed. Use the Quick Search or Find tools to search for patrons and operators, then select a patron from the Patron Records List to view the record in the Current Record pane to the right. If you have a patron open in Circulation, that patron record will also be open in Patrons Management, and vice versa. | Section |
|---|
| Column |
|---|
Sort ByHow do you want to sort your patrons? - Name
- Barcode
- Student #
- Homeroom
- Modification Date
- Creation Date
AddAdd a new patron or operator record to your database. Quick SearchWhich patrons are you looking for? Use these simple, predefined search options. - Recently Modified
- Recently Created
FindRun a full search in the Patron Lookup dialog. Read more about this below. |
| Column |
|---|
Image Removed |
|
| | Content Block |
|---|
| name | Patron Lookup |
|---|
| id | 309490311 |
|---|
| Patron LookupTo search for a patron record, click  Image Removed at the bottom of the Records List, or click Search on the blank screen when you first open Patrons Management. The Lookup dialog allows you to locate patrons or operators in your database that meet your criteria. For example, if you search for an operator with the last name of Anderson, every patron record matching that last name will be included in your results. Image Removed at the bottom of the Records List, or click Search on the blank screen when you first open Patrons Management. The Lookup dialog allows you to locate patrons or operators in your database that meet your criteria. For example, if you search for an operator with the last name of Anderson, every patron record matching that last name will be included in your results. Image Removed Search Field Variables- First and Last Names
- Barcode, Student #, Grade
- Lexile, Reading Level
- Patrons Added, Birthdate, Graduation Date, Suspension End Date
- Policy, Security Group, Status
- Homeroom, 2nd Location
- Username, Email, No Picture, No Email, Sex
- Site
- Add to current results box
- When checked, add any patrons or operators found during this search will be added to the list of patrons already open in the Records List. When unchecked, the Records List will be cleared of everything except your most recent search results.
Use the From and Through fields to limit your search to a specific range. - If you enter only a From value, your results will include all records that begin with the entered text. Using Grade as an example, a solitary From value of GR1 would select grades GR100, GR10 and GR1B37. We recommend entering a value in both the From and Through fields, even if you are only searching for one value (e.g. Barcode From: 2005, Through: 2005).
Date Ranges can also narrow your search. Dates must be entered in the format specified in Preferences > Localization > Dates & Currency. You can click the calendar icon to select a date, or enter the date manually. - If you enter only a From (start) date, Textbook Tracker will calculate a date in the "far future" (30 years from today) as your Through date.
- If you enter only a Through (ending) date, Textbook Tracker will calculate a date in the "far past" (01 Jan 1904) as your From date.
- If you don't enter any dates, From is set to one year in the past.
If no records matching your search criteria can be located, you will be asked to Cancel or Try Again. |
|
|
