![]()

Contents
Beginning-of-Year Procedures
Here are some answers to common questions and tips for beginning your school year with KeepnTrack. Prepare for the new school year with KeepnTrack
1. Remove old records
(Remove Person Records utility) - How can you clear out old, unused people records in KeepnTrack to keep them from clogging up your lists and slowing down your processes?
Some people delete ALL their visitors (period!) during the summer, to get rid of extraneous records. In the Remove Person Records utility Selections, check the box for “Exact classification Selection” and UNCHECK all the classification types. That means, implicitly, it will select people who are Visitors only (because you don’t want to delete your visitor volunteers!).
You can select by Status and remove all your Inactive people.
If you use Expiration dates, you can select by expired people and remove those.
(note we talked about possibly removing graduated students, but there is no way to select by that; we also talked about setting everyone to status Inactive and importing new people as Active then removing all Inactive… but there’s no Change Information utility so we can’t. So we’ll just not mention these things.)
2. Import new records
If you get exports from your student information system (SIS) you’ll want to import those records into KeepnTrack. How do you import records in KeepnTrack? Refresh your memory by reading over our Imports article. http://support.companioncorp.com/display/KnT/Import
3. Process volunteer applications
Get those volunteers ready for the new year! Unless you automatically approve/reject volunteer applications, you’ll need to use the Volunteer Application Management window to screen your applicants. Read up on how it works http://support.companioncorp.com/display/KnT/Volunteer+Applications ;
4. Check your preferences
Things change, people move around. In your KeepnTrack Preferences, go to Alerts and double check that the phone numbers and emails listed are the current ones for people who need to be notified. (If you are alerting campus security, you might double-check with them also, so they remember where these alerts are coming from!)
5. Check your hardware
Test that your printers and scanners are working, so you don’t get caught up in that when the first people walk through the door and can’t get their badges.
6. Check your kiosks
For all your kiosks (each separate machine), review your Workstation settings(http://support.companioncorp.com/display/KnT/Workstation+Management) to ensure sign-in processes run how you expect them to. Sometimes if browser data is cleared, it will clear your workstation settings, so… check it.
Before running any of the data-changing utilities described in the steps above, create an archive so you have a restore point if something unexpected happens.
Import patron records
![]() Skip if your patrons are synced with SIF or Clever.
Skip if your patrons are synced with SIF or Clever.
Patrons will transfer in and out of your school. You'll want to clear out patrons who have left, add new patrons to Alexandria, and update existing patron information. You can do this all through imports.
Patron information can come from any source that provides a text file in a tab-delimited file format; most word-processing and spreadsheet applications support files in tab-delimited format. In most cases, patron data is readily available in a machine-readable format from your school’s front or district office. Others schools automatically import updated patron information from a Student Information System (SIS). Since all libraries import patron information a little differently, check with your school or district office to find out how patron data is maintained.
Before you import new student records, the following steps can help you determine which patrons are no longer enrolled at your school and should be removed from the database. Run the Change Patron Location utility to change the Homeroom for all active, currently-enrolled students to "Gone".
Change Patron Location utility
If your tab-delimited import file includes patron Homeroom, change the Homeroom for all of your currently-enrolled students to the same value. This example will replace the Homeroom for all of your currently enrolled students to “Gone”.
- Go to Tools > Utilities.
- Select the Patrons > General category.
- Choose the Change Patron Homeroom utility on the right.
- In the Selections tab, choose the options needed to select a group of student patron records. For example, you may want to select a student-only policy and/or security group — you don't want to accidentally update Operators and/or Staff records.
- Patrons with a Status of: Active
- Patrons in Security Group: Patron
- Patrons with a Policy of: (Student)
- Patrons from: Homeroom
- Leave the From and Through fields blank if you want to update them all.
- In the Options tab, type “Gone” in the Change Location to field.
- Run the utility.
The Homeroom field for all of the patrons matching your selections will be changed to "Gone". Next, import your new student records from your SIS.
Import Patrons
A new import at this point will update the Homeroom for all patrons who are returning for the school year. Those who are not returning will retain the Homeroom "Gone".
- Go to Tools > Import.
- Select the Patrons category on the left.
- In the Imports pane, click Choose File. Locate the import file on your computer.
- In the Settings tab, make the following selections:
- Skip First Record: Check if the first record in your import file is an unrecognized header.
- Patron Updates: Allow Import to Modify Existing Records
- Run the import.
The Homeroom for all returning patrons will be updated. The next step is to remove the other patrons, the ones with the Homeroom "Gone".
Remove Patrons utility
Now that your student records have been updated, run the Remove Patrons utility to remove those patrons who aren't returning.
- Go to Tools > Utilities.
- Select the Patrons > General category on the left.
- Choose the Remove Patrons utility on the right.
- In the Selections tab, choose the criteria for the patrons whose records should be removed. Make sure Patrons from Homeroom is set to "Gone".
- Patrons at Site:
- Patrons with a Status of:
- Patrons in Security Group:
- Patrons with a Policy of:
- Patrons from Homeroom: Gone
- In the Options tab, choose if you want to remove patrons matching your criteria who still have items checked out or outstanding financial items. (Optional)
- Run the utility.
And that's it! You may need to run this utility a few times, depending on your selection criteria.
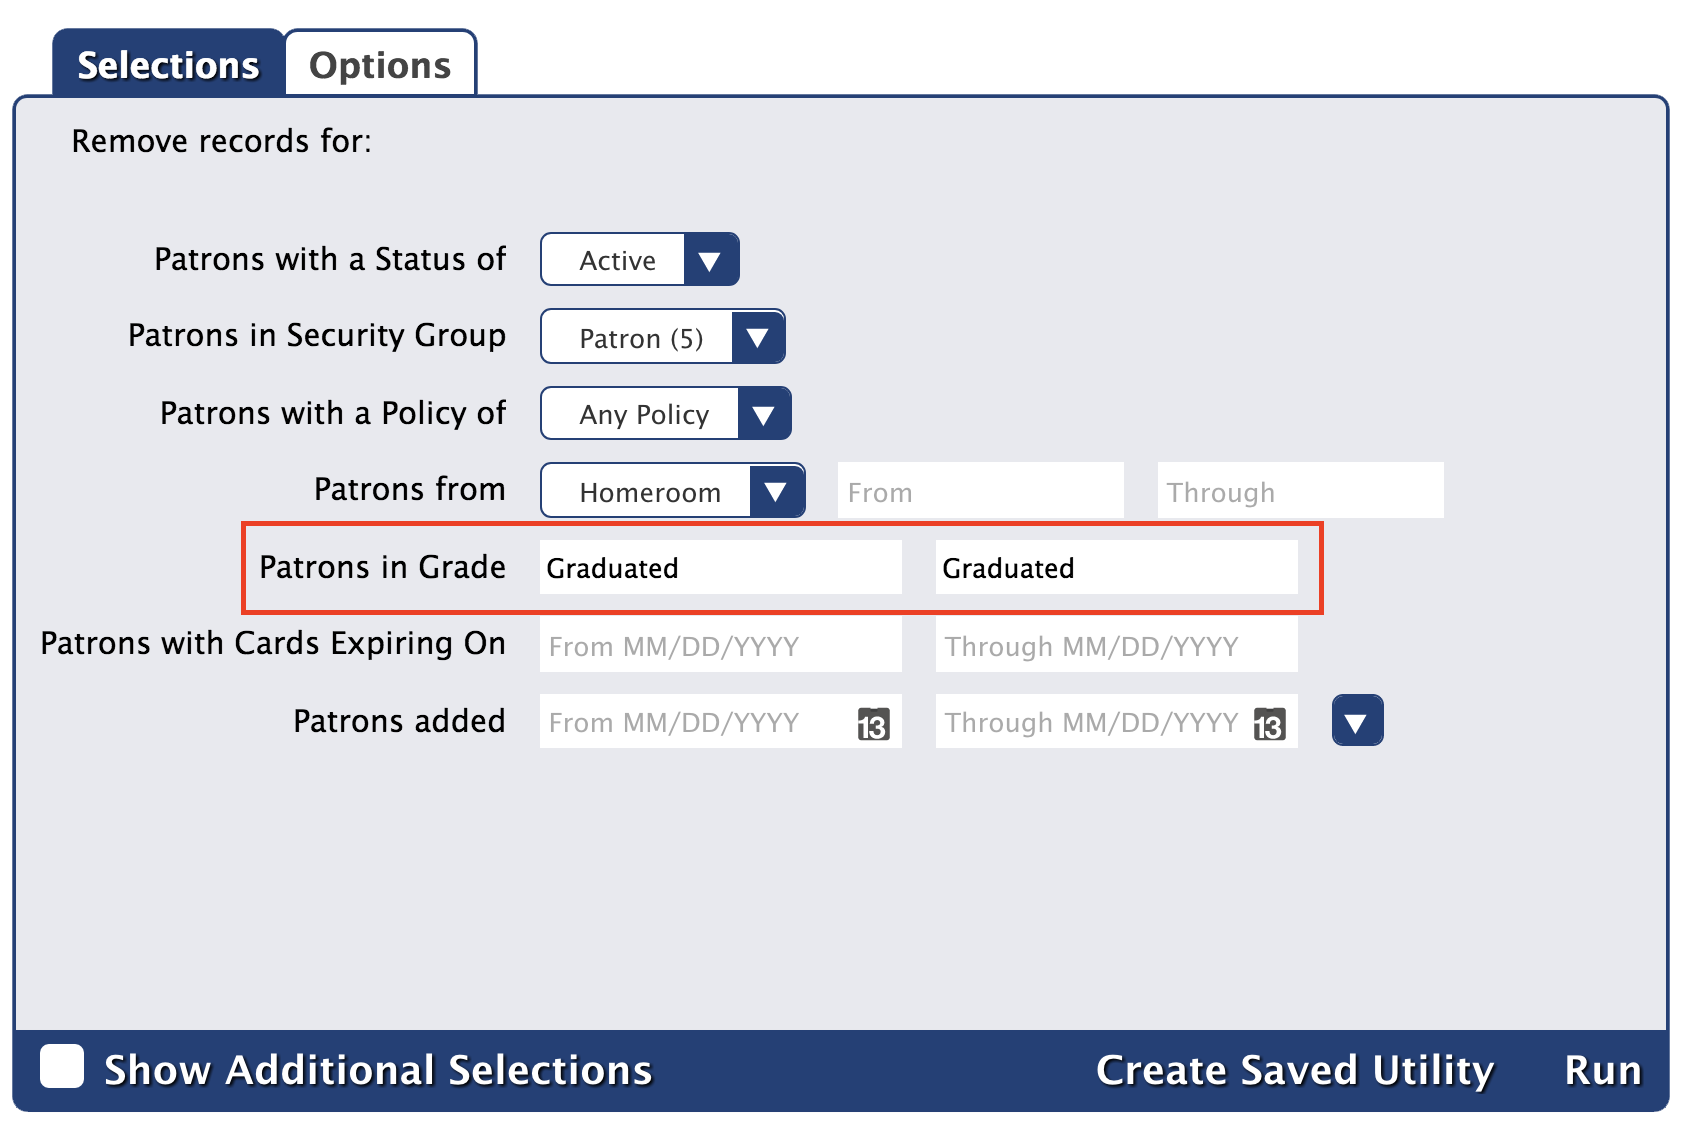
Remove graduated patrons
![]() Beginning or End of Year
Beginning or End of Year
![]() Skip this step if you keep records for graduated patrons.
Skip this step if you keep records for graduated patrons.
Run the Remove Patrons utility to remove graduated students from the database. You may need to run it multiple times with different selections, depending on your needs.
- Go to Tools > Utilities.
- Select the Patrons > General category.
- Choose the Remove Patrons utility on the right.
- In the Selections tab, enter the criteria needed to select the individual patrons or groups of patrons you intend to remove.
- Patrons with a Status of: Limit the operation to a single status, like Active or Transferred, or choose Any to include them all.
- Patrons in Grade: Enter the user-defined value for Last Grade (most commonly "Graduated"), as defined in Grade Table preferences.
- In the Options tab, choose if you want patrons to be removed even if they have items checked out or outstanding charges.
- Click Run.
Do you manage patrons with SIF or Clever?
When patron data is synced with Alexandria via SIF or Clever, patrons who have an active record in Alexandria but are no longer included in the synced data will be marked as Transferred. Those patron records will need to be removed manually. Run this utility to remove patrons with a status of Transferred.
Update Expired Cards
![]() Skip if card expiration dates are disabled.
Skip if card expiration dates are disabled.
Do you use expiration dates for patron library cards? Run the Renew Patron Cards utility to update the expiration dates for the new year. It will reset and update the Card Exp. Date for all matching patrons to a date X number of days from when the utility is run, as specified in their Patron Policy.
For example, if the patron's policy has Days Patron's Card is Active set to 365 and the utility is run on May 30, 2019, the patron's new expiration date would be May 29, 2020.
Update Expired Patron Cards (1:22) 
Do some of your patrons have cards that are expired or expiring soon? Use a utility to renew their cards.
Download (17 MB) | Script (PDF)
In 20.7, the term "card expiration" was renamed "account expiration" throughout Alexandria. Other than the renaming of some preferences and fields, nothing has changed.
- Go to Tools > Utilities.
- Select the General > Patrons category on the left.
- Choose the Renew Patron Cards utility on the right.
- In the Selections tab, enter the criteria for the patrons whose cards you want to renew. To renew ALL expired patron cards, leave the default settings.
- Run the utility.
Backups
![]() Self Hosted, only. Skip if your library is Cloud Hosted.
Self Hosted, only. Skip if your library is Cloud Hosted.
Finally, create a complete backup of your Alexandria Data folder. Unlike an archive, backups are considered a "last resort" in case everything else fails.
Don't store your backups on the same device as your library data station. We recommend storing your backups with a file hosting or cloud storage service, like Dropbox or CrashPlan, which are specifically designed to backup to other machines or off-site servers. If you use an external hard drive, we suggest storing it in a fire-resistant safe in an off-site location. It may seem extreme, but you never know what will happen, and we want you to be prepared for the worst.
This is also a great time to review and possibly revise your backup strategy. Read Back Up Your Data to learn more.