![]()

Contents
Exporting is the process of moving information out of KeepnTrack and preparing it for use in other software applications. With our general templates, you choose the information you want to export, whether it be for all-or a specified group-of people or more. Exporting person records does not affect the data that exists in your KeepnTrack database. Only a copy of that information is exported; the original record remains intact.
KeepnTrack exports information in a tab-delimited file format. Although there are other valid file formats, extensions, and associations, some of them—like PDFs—can be difficult to work with when converting data from one program to another. This is where exporting data in a tab-delimited text file comes in handy. You may lose color and formatting, but you will have the proper data arranged in columns and rows that make it easier to manipulate in other programs or software utilities.
The Exports interface was designed with simplicity in mind-placing everything in an easily navigable window that allows you to quickly find, customize, and perform exports.
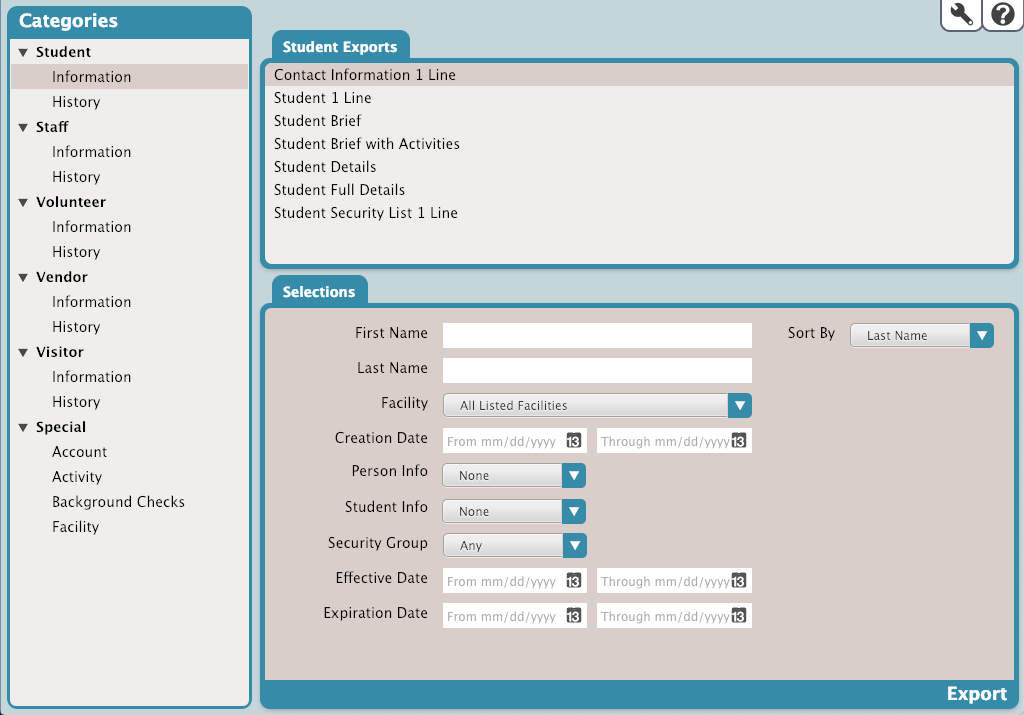
The Exports interface uses the familiar three-panel layout found in most KeepnTrack management interfaces.
The left-hand side of the interface is home to the Categories pane, containing a list of all existing export categories (e.g. Student) and subcategories (e.g. Information). Selections from this pane act as filters, allowing you to narrow your focus and display only relevant exports.
The upper-right section contains the Export Selection pane, which allows you to select the specific export you would like to perform; the Selected Export pane adapts to exports selected from this list.
The Selected Export pane-the bottom-right area of the interface-contains settings and options for the selected export.
Export Categories
The first step in performing an export is picking the proper category. The Categories pane on the left-hand side of the interface is a collection of categories and subcategories that can reduce the number of results that appear in the Export Selection pane on the right; take some time to explore them.
Expand or contract associated subcategory sections by clicking the icon located to the left of the main category name. Selecting one of the subcategory names will show all of the exports available for that subcategory in the Export Selection pane to the right. For example, if you want to export Student Details, you can’t do it with the Special category selected—they're Student (category) exports that you’ll find under the Information subcategory.
Export Selection
The larger, right-side of the Exports interface is dedicated to the currently selected export and contains all of the export's configurable settings and options; this pane dynamically changes depending on the category (or subcategory) you have selected in the Categories pane. For example, if you select Volunteer from the export Categories pane, the Export Selection pane will only display Volunteer exports; if you select a Volunteer subcategory (e.g. Information or History), your results will be further refined.
Selecting a export type from the Export Selection pane automatically populates the bottom portion of the interface (i.e. the Selected Export pane) which contains settings that are essential to how your information is exported.
Selected Export
The Selected Export pane, located at the lower-right of the Exports interface, is dynamic; the available tabs, fields, and options change depending on the export you currently have selected in the Export Selection pane. The Selections tab contains essential options that allow you to specify how your information is exported.
Enter the specified information and choose your selections to build your export, and when you're ready, click Export. The export will sent to the Operations Management queue where you can download it to your computer.