| Content Column |
|---|
| | Content Block |
|---|
| To access the MARC View editor, go to Items > Actions > Toggle MARC View. With this selection, you can toggle between the normal item view and the more advanced MARC View (as shown below). The MARC View editor is designed to allow MARC-savvy librarians the ability to modify information in the MARC record. You can edit, add or remove tags, indicators, and subfield data. The MARC editor confirms that any changes you make are syntactically correct (i.e. that they are still in a valid MARC format) . Although Alexandria will allow you to enter any data you like, only specific MARC data is used by Alexandria. Any additional information is retained for reference or future purposes only. | Note |
|---|
Changes to the MARC record are only saved if you press the Save button at the top of the window. If you select Revert, all changes are discarded and the record reverts to its previous state. |
Manage Your Records- Click the
 Image Modified padlock icon to unlock the record. Image Modified padlock icon to unlock the record. Image Added Image Added - Scroll through the list to find the record you wish to modify.
- Use the controls at the bottom of the window to make your changes.
- Remove an existing record.
- Edit an existing record.
- Add a new record.
- When you're done, click Save.
Adding and Editing MARC Fields- To add a new MARC field, click Add to bring up a drop-down menu of possible MARC fields. Select the tag you want to add, fill it out, and then click OK.
| Note |
|---|
If you need to add a special field, select Other. |
If the tag you wish to add is not listed, you will need to use Tools > Import to add it. - To edit an existing MARC field, select the field and click Edit.
How to use the editor when editing and adding fields: - Indicators are shown in the second column. Click on the field to highlight the indicator in question and type a new value over the existing. If there is no indicator, a dash appears.
- Subfields are shown in the third column and are limited to a single letter or number. Click in the subfields area and click on Add Subfield to add a new subfield.
- To remove a subfield, click the Remove Subfield icon on the right.
- All pertinent data for the subfield can be edited or entered in the fourth column.
- If the information you entered turns red, it is invalid for the tag type and cannot be saved. Click the Read About This Tag link to troubleshoot your entry.
Removing MARC FieldsTo remove a MARC field, select the field and click Remove. Important- Tags between 001 and 009 have no indicators or subfields. They can be edited as a stream of characters. A special editor is available for the 008 tag.
- To edit the 008 tag, click on it. If the record type is "a" then the following editor is available to make syntactically correct changes.
- If the MARC record type is not specified as Language Material, then this alternative 008 editor is displayed. You may change MARC Leader information by clicking on the 000 or LDR field in the MARC.
| Expand |
|---|
| title | Click to view the old interface |
|---|
| MARC View Editor
 Image Added Image Added
With the MARC button, you can toggle between the normal item view and the more advanced MARC View (as shown below). The MARC View editor is designed to allow MARC-savvy librarians the ability to modify information in the MARC record. You can edit, add or remove tags, indicators, and subfield data. The MARC editor confirms that any changes you make are syntactically correct (i.e. that they are still in a valid MARC format) |
. However, the editor provides no checking for MARC standards in the data you enter. Although Alexandria will allow you to enter any data you like, only specific MARC data is used by Alexandria. Any additional information is retained for reference or future purposes only. |
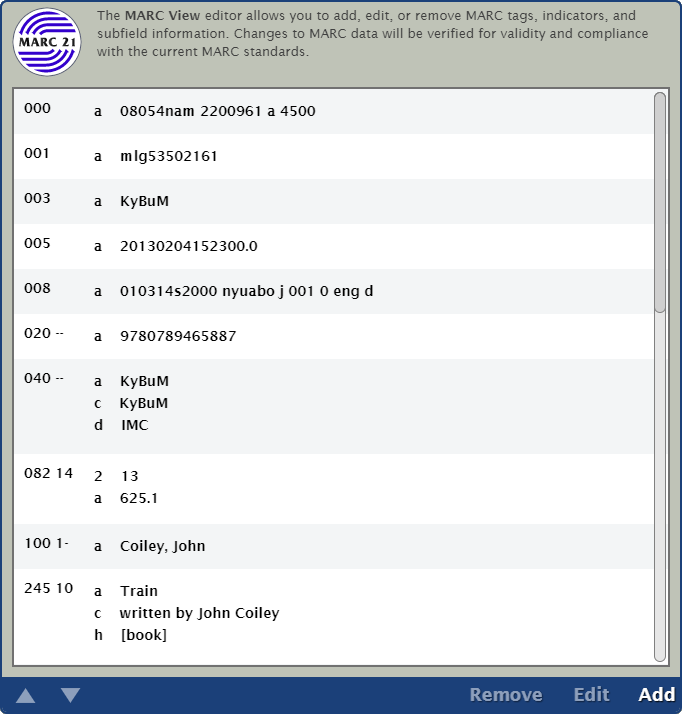 Image Added Image Added
|
Before you can make changes , you'll have to manually unlock it by clicking the Unlock icon in the control strip.Back to Top Add Title or CopyIn the list pane on the left, click the + Add icon to open the Title Assistant. are only saved if you press the Save button at the top of the window. If you select Revert, all changes are discarded and the record reverts to its previous state. |
Manage Your Records- Select the Title tab or Copies tab.
- If the Titles tab is selected, click this to open the Title Assistant dialog, allowing you to add a new title record to your database.
- If the Copies tab is selected, click this
|
will - is add a new copy to the currently selected title record.
|
To add a new tag + Add Title icon located -
 Image Added padlock icon to unlock the record. Image Added padlock icon to unlock the record. - Scroll through the list to find the record you wish to modify.
- Use the controls at the bottom
|
of the Current Record Pane MARC View window.Using the drop-down menu, select the MARC tag you would like to add to the item record. When you are satisfied that you have selected the correct record, click on OK.
- If you are unsure, click Cancel. In this example, a new 246 tag would be created, if the user were to click OK.
To remove an existing tag, select (highlight) the tag number from the MARC field and then click on the red "minus" remove button. You will be asked if you are sure you would like to remove the tag. If you choose Yes, the tag will be removed- window to make your changes.
- Remove an existing record.
- Edit an existing record.
- Add a new record.
- When you're done, click Save.
Adding and Editing MARC Fields- To add a new MARC field, click Add to bring up a drop-down menu of possible MARC fields. Select the tag you want to add, fill it out, and then click OK.
- If the tag you wish to add is not listed, you will need to use Tools > Import to add it.
- To edit an existing MARC field, select the field and click Edit.
How to use the editor when editing and adding fields: - Indicators are shown in the second column. Click on the field to highlight the indicator in question and type a new value over the existing. If there is no indicator, a dash appears.
- Subfields are shown in the third column and are limited to a single letter or number.
|
Use the blue “ a” button at the top of the MARC View window - Click in the subfields area and click on New Subfield to add a new subfield.
|
A window similar to the following will appear:- To remove a subfield, select the subfield and click Remove Subfield
|
Using the drop-down menu, select the MARC field you would like to add to the item record. When you are satisfied that you have the correct subfield, click on OK. If you are unsure, click Cancel. In this example, a new 6—Linkage subfield would be created if the user were to click OK- All pertinent data for the subfield
|
is shown and - can be edited or entered in the fourth column.
|
To edit a tag's indicator, click on an indicator from the indicator column (second column from the left in the MARC View window). This will highlight the indicator in question and allow you to type a new value over the existing.- If the information you entered turns red, it is invalid for the tag type and cannot be saved. Click the Read About This Tag link to troubleshoot your entry.
Removing MARC FieldsTo remove a MARC field, select the field and click Remove. Important- Tags between 001 and 009 have no indicators or subfields. They can be edited as a stream of characters. A special editor is available for the 008 tag.
- To edit the 008 tag, click on it. If the record type is "a" then the following editor is available to make syntactically correct changes.
- If the MARC record type is not specified as Language Material, then this alternative 008 editor is displayed. You may change MARC Leader information by clicking on the 000 or LDR field in the MARC.
|
Back to Top |
|
|
