| Content Column |
|---|
| tabbed-blocks | tabs |
|---|
| id | 1014125593 |
|---|
| | Content Block |
|---|
| name | Item Policies |
|---|
| id | 1014125591 |
|---|
| Whenever the rules differ for an item group, you need to create a new item policy and assign it to the affected items. Follow the steps below to manage the item policies for your library. | Multiexcerpt include |
|---|
| SpaceWithExcerpt | ALIB |
|---|
| MultiExcerptName | Item Policies Note |
|---|
| PageWithExcerpt | ALIB:Alex Steps Preferences |
|---|
|
| Note |
|---|
Many school libraries or public libraries create policies based on medium type or call number range. Alexandria will not automatically change or set any item's policy just because a policy matches the medium type or call number range. The librarian must set the item's policy either during an item import, running the Change Copy Policy utility or manually in the Items management window. |
Step-by-Step Instructions Create a New Item Policy
| Multiexcerpt include |
|---|
| SpaceWithExcerpt | ALIB |
|---|
| MultiExcerptName | Create a New Item Policy |
|---|
| PageWithExcerpt | ALIB:Alex Steps Preferences |
|---|
|
Modify an Item Policy- Go to Tools > Preferences > Policies.
- Click Add in the lower-left hand side of the Item Policy section.
- Enter the new item Policy Name and Policy Short Code and optional Statistics Group in the fields provided.
- Make a selection from the Defaults from drop-down menu and click OK; the new policy will take its defaults from whatever is selected from this drop-down menu.
- Next, tab through the various Policies (Check Out, Overdue, and Other) providing appropriate values to the fields, drop-down menus, and check boxes in order to create your policy.
- When you have completed your new policy, click on the Save button.
- Repeat this process until you have made all your new item policies.
| Multiexcerpt include |
|---|
| SpaceWithExcerpt | ALIB |
|---|
MultiExcerptName
Modify an Item Policy
| PageWithExcerpt | ALIB:Alex Steps Preferences |
|---|
- Go to Tools > Preferences > Policies.
- Next, select the item policy to be modified from the drop-down menu on the right.
- Make the appropriate changes to the value(s) in the Item Policy fields, drop-down menus, and checkboxes.
- When you've finished modifying the policy, click Save.
| Note |
|---|
| Modifying an Item Policy will not affect past transactions. For example, the only way to change the fine rate on a book that is currently checked out is to check the book in, forgive the fine, and then check the book back out to the same patron for the original due date (using a manual override date). |
Duplicate an Item Policy| Multiexcerpt include |
|---|
| SpaceWithExcerpt | ALIB |
|---|
MultiExcerptName Duplicate an Item Policy| PageWithExcerpt | ALIB:Alex Steps Preferences |
|---|
Remove an Item Policy| Multiexcerpt include |
|---|
| SpaceWithExcerpt | ALIB |
|---|
| MultiExcerptName | Remove an Item Policy |
|---|
| PageWithExcerpt | ALIB:Alex Steps Preferences |
|---|
|
Assign an Item Policy to a Title| Multiexcerpt include |
|---|
| SpaceWithExcerpt | ALIB |
|---|
MultiExcerptNameDuplicate an item policy when the policy values are exactly the same as or there are only minor variations from an existing item policy. - Go to Tools > Preferences > Policies.
- Click Add in the lower-left hand side of the Item Policy section.
- Enter the new item Policy Name and Policy Short Code and select an optional Statistics Group in the fields provided.
- Make a selection from the Defaults from drop-down menu and then press <enter> or click OK; the new policy will duplicate the values of whatever is selected from this drop-down menu.
- Make the appropriate changes to the value(s) in the Item Policy fields, drop-down menus, and checkboxes.
- When you have finished modifying your duplicated Item Policy, click the Save button to keep your changes; otherwise, click Revert to discard them.
- Repeat this process until you have finished making all your new item policies.
Remove an Item Policy- Go to Tools > Preferences.
- Click on the Policies icon in the Management section of the Preferences interface.
- Select the policy that you would like to remove from the Item Policy drop-down menu.
- Click Remove in the lower-left hand side of the Item Policy section.
- Click Remove on the confirmation window when it asks if you are sure you want to remove the item policy.
| Note |
|---|
Standard, System, and Textbook policies cannot be removed. |
Assign an Item Policy to a Title
PageWithExcerpt | ALIB:Alex Steps Preferences- Go to the Items module.
- Search for the title you want to assign a policy to.
- Click the
 Image Added padlock icon to unlock the record for editing. Image Added padlock icon to unlock the record for editing. - Click on the Policy dropdown menu, located under the book cover, and select the policy for this title.
- Click Save at the top-right of the window.
Assign an Item Policy to a Copy
| Multiexcerpt include |
|---|
| SpaceWithExcerpt | ALIB |
|---|
| MultiExcerptName | Assign an Item Policy to a Copy |
|---|
PageWithExcerpt | ALIB:Alex Steps Preferences- Go to the Items module.
- Search for the title you want to assign a policy to.
- Click the Copies tab at the top of the Items Management window.
- Click the Image Added padlock icon to unlock the record for editing.
- In the list on the left, locate the individual copy you want to assign a policy to.
- You can use the data in the Information tab to the right (Barcode, Call #, Accession Date, etc.) to help you differentiate one copy from another.
- In the Information tab to the right, click the Policy dropdown menu, and then select the policy you wish to assign to this copy.
- Click Save at the top-right of the window.
| Note |
|---|
If the Title Policy is the same as any of its copies' policies, then changing the main Title Policy will also change the matching Copy Policy—as they are in sync. However, if any of the copies' policies are different than the main Title Policy, then changing the main Tile Policy will not affect these copy policies. |
|
| Content Block |
|---|
| name | Check Out |
|---|
| id | 1014125583 |
|---|
|  Image Removed Image Removed
 Image Added Preferences > Policies > Item Policy Image Added Preferences > Policies > Item Policy
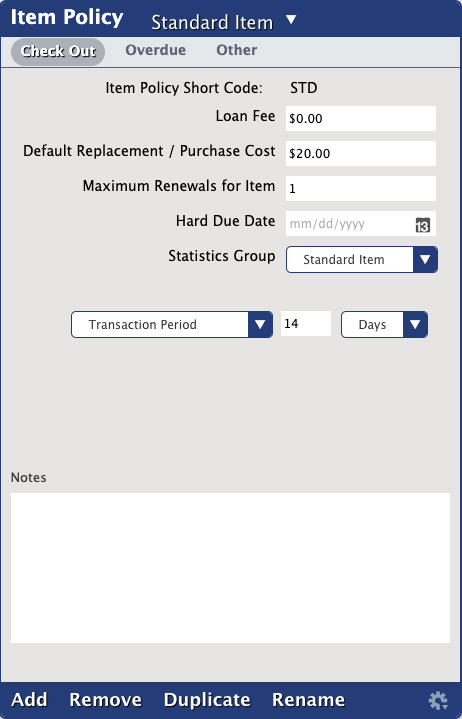 Image Added Image Added
| Multiexcerpt |
|---|
| MultiExcerptName | Item Policies Check Out |
|---|
| SettingsItem Policy Short CodeThis is the item Policy Short Code you provided when adding the patron policy; for example, if the Policy Name is “Fiction”, you might provide “FIC” as the Policy Short Code name. Look for this item Policy Short Code on reports such as the Super Summary for statistics on items of this policy. Loan FeeIf your library charges your patrons a fee for checking out an item type (i.e. renting), this is the field where you specify the fee amount for items using this policy. This fee is charged automatically when the item is checked out. The fee is recorded as “Loan Fee for {item title}”. Default is $0.00. For example, a public library may “rent” a DVD or Blu-ray player; their policy might have a set loan fee amount of $10.00 so that anyone checking out a DVD player is charged $10.00 automatically. Default Replacement / Purchase CostSet the default (average) replacement and purchase cost for items using this policy. This is the amount charged to a patron when an item is lost, never returned, or irrecoverably damaged and the item doesn't have an individual Purchase Cost and/or Replacement Cost specified in the Copy Information preferences (where these amounts can be modified at any time). Your Fines limited by item cost policy preference (see Overdue preferences) determines whether Overdue fines are allowed to exceed the Default Replacement / Purchase Cost value. This policy saves time by automatically supplying a default Purchase and Replacement Cost when adding an item (either manually or by import) to your collection; these values are automatically entered so that certain collection reports will provide some worth for your items. Default is $20.00. Maximum Renewals for ItemSet the number of times that the same item, under this policy, can be renewed. If you don't allow items to be renewed, set the number to 0. If a patron tries to renew an item that has already been renewed the maximum number of times, a warning message will appear on the Circulation window indicating that the patron has exceeded the policy limit for renewals. An operator with the appropriate security level can override the resulting alert window and allow checkout regardless. Hard Due DateUsing this policy, you can set a fixed due date on which all items (i.e. everything) are required back to your school or library, regardless of the number of days an item can be loaned. Generally, this date is set for equipment checked out to classrooms, test preparation materials (e.g. ACT, SAT, AP), textbooks, the end of a school year or semester, or quarter changes. If the date entered here is after today's date, it is used as your due date. Otherwise, Alexandria computes a due date according to other policy settings. When you enter any type of specially-formatted information such as dates you can enter values in a wide range of formats. For example, you can enter the date December 1, 2010 as: “Dec 1, 2010” or “12/1/10” or “12.1.10” or “12 1 10”. If using the current year, you can just enter “12/1”. If the current month is December, you can just enter “1”. Statistics GroupProvides an alternate statistic and/or way to track groups of item policies; for example, when policies are created, the Fiction option (e.g. 7th Grade) can be applied and later be reported and/or searched. Transaction PeriodThis field (and corresponding drop-down menus) allows you to specify the number of minutes, hours, days, or weeks (under this policy) that items can be loaned; i.e. the number of calendar days used to calculate a due date. For example, if you would like a loan period of two weeks, enter either 14 Days or 2 Weeks. A setting of 0 means that items can never be checked out or taken from the library; essentially a No Loan Period. Also, you have the option of easily setting the loan period as Same Day Check Out, meaning that items are due back the same day that they were checked out. Items, however, will never be due on a Closed date. If the library is closed and there is not a Period Due date specified in the near future, the due date will be advanced to the next open date. |
| Content Block |
|---|
| Image Added Preferences > Policies > Item Policy
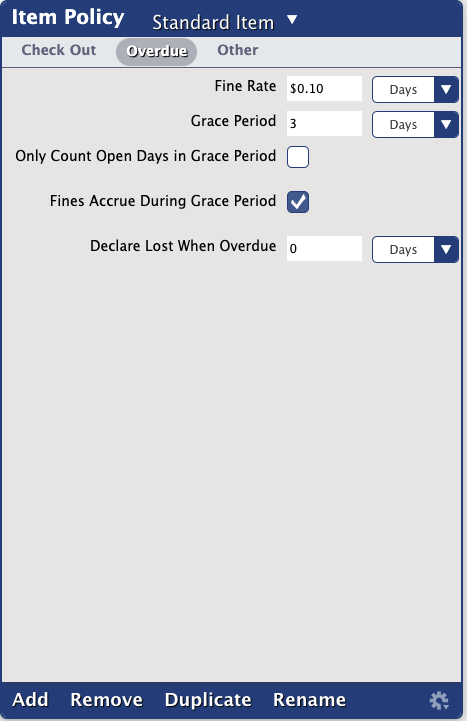 Image Added Image Added
Image Removed | Multiexcerpt |
|---|
MultiExcerptName | OverdueSettingsFine Rate (Days)Set the fine rate that is charged to the patron for every day that the item is overdue (under this policy). The fine rate is computed daily. If you don't charge fines, enter $0.00. Grace Period (Days)Specify the number of days this item type can be borrowed past its loan period before fines begin to accrue. For example, if you set the grace period for two days, patrons are not charged fines until the third calendar day an item is overdue. At this point, they are charged fines for three overdue days. Unless Only Count Open Days is checked, it doesn't matter if the library is open or closed on those days, the grace period is only computed on calendar days. For easy check-in, set the grace period one day longer than your commonly closed periods. For example, if you are commonly closed on Saturday and Sunday, set the grace period for three days. Therefore, if the book is due on Friday, and it's turned in through the bookdrop on Saturday, when you check it in on Monday, no fines will be charged. Only Count Open Days in Grace PeriodBy default, days on which the library is closed do not count against the Grace Period. Use this preference to reverse that policy. Fines Accrue During Grace PeriodBy default, we do not charge fines for overdue items during the Grace Period. Use this preference to reverse that policy. Declare Lost When Overdue (Days)If an item has been overdue for a significant amount of time, the odds are that it will not be coming back. This preference allows an operator to set the number of days that an item can be overdue before it's automatically declared lost. Daily Operations, reports, and utilities will be adjusted and the offending patron will be assessed the appropriate charges without an operator having to do anything.
If you do NOT want items to automatically be declared lost, leave this set to 0.
| Note |
|---|
Once the grace period is over, patrons will be charged for each day the item is overdue. Adjust the Only count open days in Grace Period and Fines Accrue During Grace Period settings to customize whether you charge fees past the grace period on open days or on all days. |
|
| Content Block |
|---|
| Image Removed Image Added Preferences > Policies > Item Policy
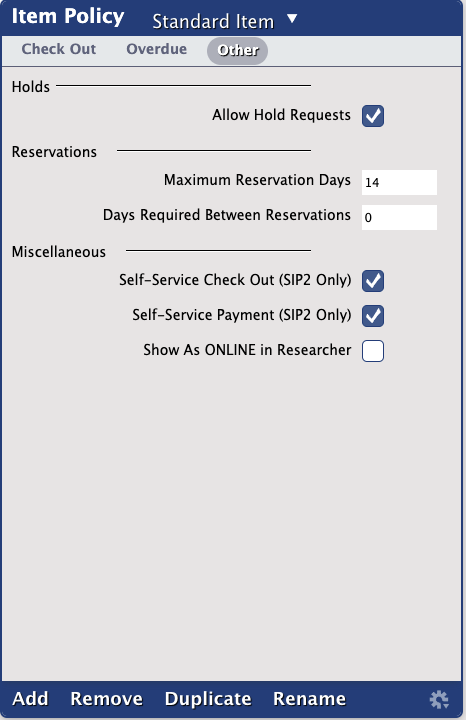 Image Added Image Added
| Multiexcerpt |
|---|
| HoldsAllow Hold RequestsThis box must be checked in order to allow patrons to place a hold request on an item (under this policy) without getting an error message every time. If you don't check this box, patrons cannot place hold requests on items under this policy. An operator with the appropriate security level can override the resulting alert window and allow checkout regardless. Default is ON. ReservationsMaximum Reservation DaysSet the maximum number of days that a reservation may be placed on a specific item copy (under this policy). If items aren't allowed for reservation, set the period to 0 days. If none of the copies allow reservations, the Reservation window will not open and a note will be made to the transaction log. If some copies allow reservations and some don't, the Reservation tab of the Circulation window will open, but only copies that allow reservations are shown in the copies drop-down menu. Reservations may exceed (or may be shorter than) the number of days an item may be checked out. Days Required Between ReservationsGenerally used by a central distribution agency; this policy creates a buffer period of open days allotted for delivery, processing, and pickup before a reservation so that items are ready to distribute to the next patron in waiting. If a patron tries to check out a book whose reservation period coincides with their loan period, a warning message will appear and that patron's loan period will be cut short. Also, if your library requires time to process an item that has been returned, this setting will enforce the processing time between reservations. For example, certain equipment may need to be calibrated after each use. If the calibration time takes two days, and you enter the value “2” in this preference, Alexandria will make sure that reservations are separated by at least two days. MiscellaneousSelf-Service Check Out (SIP2 Only)When checked, SIP2 self-service check out will be allowed at SIP2 stations for items under this policy. Default is checked. Self-Service Payment (SIP2 Only)When checked, self-service renewal will be allowed for this item type at SIP2 stations. Default is checked. Show AS ONLINE in ResearcherChecking this box modifies the results in the Details list in the Researcher with respect to availability and allows more convenient access to the electronic resource (i.e. eBook). How helpful did you find this page? Tell us what we can improve.
|
|
|
