| Content Column |
|---|
| width | 25.000002% |
|---|
| id | 50268211 |
|---|
| | Content Block |
|---|
| | Page Tree |
|---|
| root | Administration |
|---|
| spaces | ALEX |
|---|
|
|
| Content Block |
|---|
| How helpful was this page? |
| Content Block |
|---|
| background-color | transparent |
|---|
| border-width | 0px |
|---|
| id | 639559334 |
|---|
| | HTML |
|---|
<center>
<div
id="google_translate_element"></div><script
type="text/javascript">

function googleTranslateElementInit() {

  new
google.translate.TranslateElement({pageLanguage: 'en', includedLanguages:
'en,es,fr'}, 'google_translate_element');

}

</script><script type="text/javascript"
src="//translate.google.com/translate_a/element.js?cb=googleTranslateElementInit"></script> </center> |
|
|
| Content Column |
|---|
| tabbed-blocks | expanders |
|---|
| width | 75.0% | tabbed-blocks | tabs |
|---|
| id | 1281497174 |
|---|
| | Content Block |
|---|
| not-tabbed | true |
|---|
| background-image-theme | Alex KBI Banner.png |
|---|
| background-position | top right -30px |
|---|
| id | 49631985 |
|---|
| height | 120px |
|---|
| |
| Content Block |
|---|
| background-color | transparent |
|---|
| padding | 10px 10px 23px 10px |
|---|
| margin | 10px 10px 10px 10px |
|---|
| not-tabbed | true |
|---|
| border-width | 0 |
|---|
| id | 1252799445 |
|---|
| height | 30px |
|---|
| | Note |
|---|
Admin is only used for controller hosting and can be accessed at /admin. |
|
| Content Block |
|---|
| not-tabbed | true |
|---|
| name | Overview |
|---|
| id | 1281497173 |
|---|
| | Warning |
|---|
If you are self-hosted, see Self Hosted for the information you need. This page will NOT be migrated to the new Alexandria Support Center and will instead be archived. |
 Image Added /admin Image Added /admin
Administration settings are high-level preferences intended for network administrators or IT support departments when hosting an Alexandria Controller. See Controller Administration.
Old Administration| Expand |
|---|
The Administration settings |
What are administration settings?The Administration settings are high-level preferences intended for network administrators, IT support departments, or operators with administrator-level permissions |
; in . In other words, they're advanced settings used to configure your main Data Station once and then be forgotten. While every operator with the proper security permissions can access the Administration module, it contains settings that most operators won't be able to configure without help. An operator's access to these settings is governed by |
Alexandria's their security preferences. Your library's administrator can manage these settings in |
Tools > Preferences > Security.  Image Added Image Added
| Status | These settings allow you to perform maintenance on your library catalog and update your Alexandria program. |  Image Added Image Added
| Web | These settings allow Alexandria and Textbook Tracker to communicate online. |  Image Added Image Added
| Database | These settings allow you to set up automatic archives and database maintenance. | Image Added | Email | These settings allow you to designate an SMTP server to use for sending emails, such as Item Overdue Notices, to patrons and/or staff. |
|
MenuThis menu appears on each interface of the administrative settings in the upper left corner. These options allow you to update to latest version, send your library data to COMPanion, log out of the program or quit the data station remotely. Check for Updates |
If there are any updates available, it will be listed here. You simply click on the version number to initiate the upgrade. |
Image Removed. If a Customer Support Representative needs your library data for troubleshooting you can easily send it to us by selecting this option and entering the Authorization Code you are provided. Log Out |
. This button will log you out of Alexandria, despite if you have multiple windows open. |
. This option will stop the Data Station from running and log out any active operators. |
Navigation BarImage RemovedWhat does the status interface do?| Column |
|---|
| Image Removed |
These settings allow you to perform maintenance on your library catalog and update your Alexandria program. | Image Removed | Web | These settings allow Alexandria to communicate over the internet. | Image Removed | Database | These settings allow you to set up automatic archives and database maintenance. | Image Removed | Email | These settings allow you to designate an SMTP server to use for sending emails, such as Item Overdue Notices, to patrons and/or staff. | Image Removed | LDAP | These settings allow you to authenticate operator and patron program access. | Image Removed | Checkpoint | If your library utilizes the Checkpoint ILS security system use these setting to enhance your SIP2 protocol. | | | Content Block |
|---|
| It's where an operator can easily access their Alexandria This is where you can access your registration information, perform database maintenance, run or restore from archives, and update to the latest version. It's the default interface when accessing administration settings. |
Database Maintenance You have the ability to preserve and maintain your library catalog data by utilizing the following options through the status interface. Image Removed  Image Added Image Added
Restore From Archive |
. Use this option to replace your current data folder with a previously created archive. This is useful if you need to undo a completed process such as imports or utilities. |
| Expand |
|---|
| title | Steps to restore from an archive. |
|---|
| - Click Restore From Archive, this will trigger a roll-down menu.
From the list of Available Archives, select the archive date/time you would like to restore to; dates/times are listed as yyyy/mm/dd 24:00 - Click the Restore button to proceed. If you no longer want to restore simply click Cancel to abort the process. By clicking Restore your current data will be replaced by that contained in the selected archive folder.
- Check the Delete the archived data after restoring box to remove the selected archive from your archive directory upon successful restoration. (optional)
|
|
. Selecting Selecting this button performs an immediate, manual archive of your database. An archive |
is a is a complete copy of your library data file. However, archives are not backups. The difference between a backup and an archive is that backups are made on removable media and physically stored offsite or in cloud-based storage. Archives are entirely useless in the event of a hard drive failure hence keeping an offsite or cloud backup is highly recommended. While the archive is running all services on the data station are temporarily disabled. We recommend running an archive before making any large-scale changes to your database, such as imports, updates, utilities, or machine upgrades. Restart |
. Selecting this button will restart the Data Station remotely. During the restart duration, Alexandria services and modules will be unavailable to all operators.
Database Maintenance |
. Selecting this button will examine your database files and perform patron, |
item circulation verification circulation verification routines. If database damage is detected, it's automatically fixed. |
While While maintenance is being performed the Data Station will be inaccessible. We recommend performing |
this maintenance this maintenance at least once a month to keep your data in good, working order |
. This process can also be scheduled to perform regularly. | | Content Block |
|---|
| . DatabaseScheduled Archives and Database Maintenance are allocated in Database settings. These settings allow you to specify if and when automatic archives and/or database maintenance is performed. You are also able to configure the location where local archives are stored. For a Centralized or Distributed catalog these settings will apply to all sites.Cloud-Hosted customers don't have the database settings in the administration module because their hosted subscription includes automatic nightly archives and regular database maintenance. Related Link: Archive Your Data 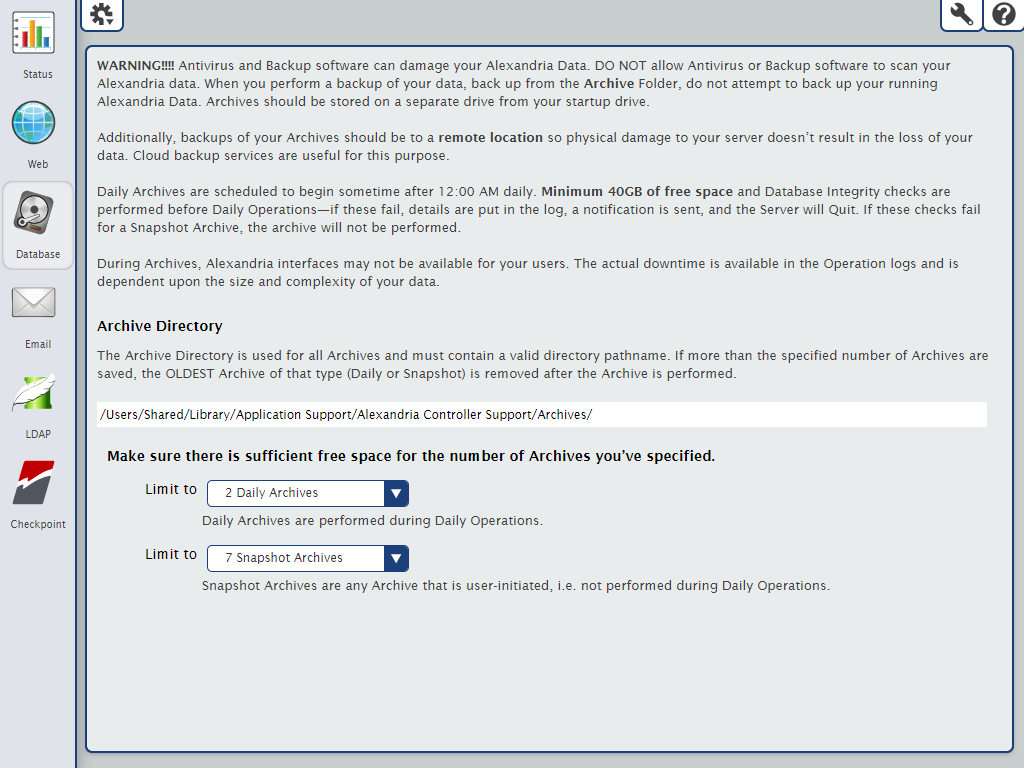 Image Added Image Added
| Tip |
|---|
We strongly advise you to review these settings regularly to ensure that your archive directory is up to date and the number of archives stored is properly configured based on your needs and available disk space. |
Web Settings |
Web settings allow Alexandria to communicate with the outside world. Self-Hosted customers will need to configure these setting before using the web modules of the program. For a Centralized |
or catalog will A A Cloud-Hosted customer doesn't have the web settings interface in the administration module because their data is hosted on a designated COMPanion server. Alexandria uses Transport Layer Security (TLS) for secure web communications. |
These These settings allow you to configure the certificates, ports, and server domain names that Alexandria uses to communicate with web browsers. When you save changes to this window, the Data Station will apply your new settings and restart web services. 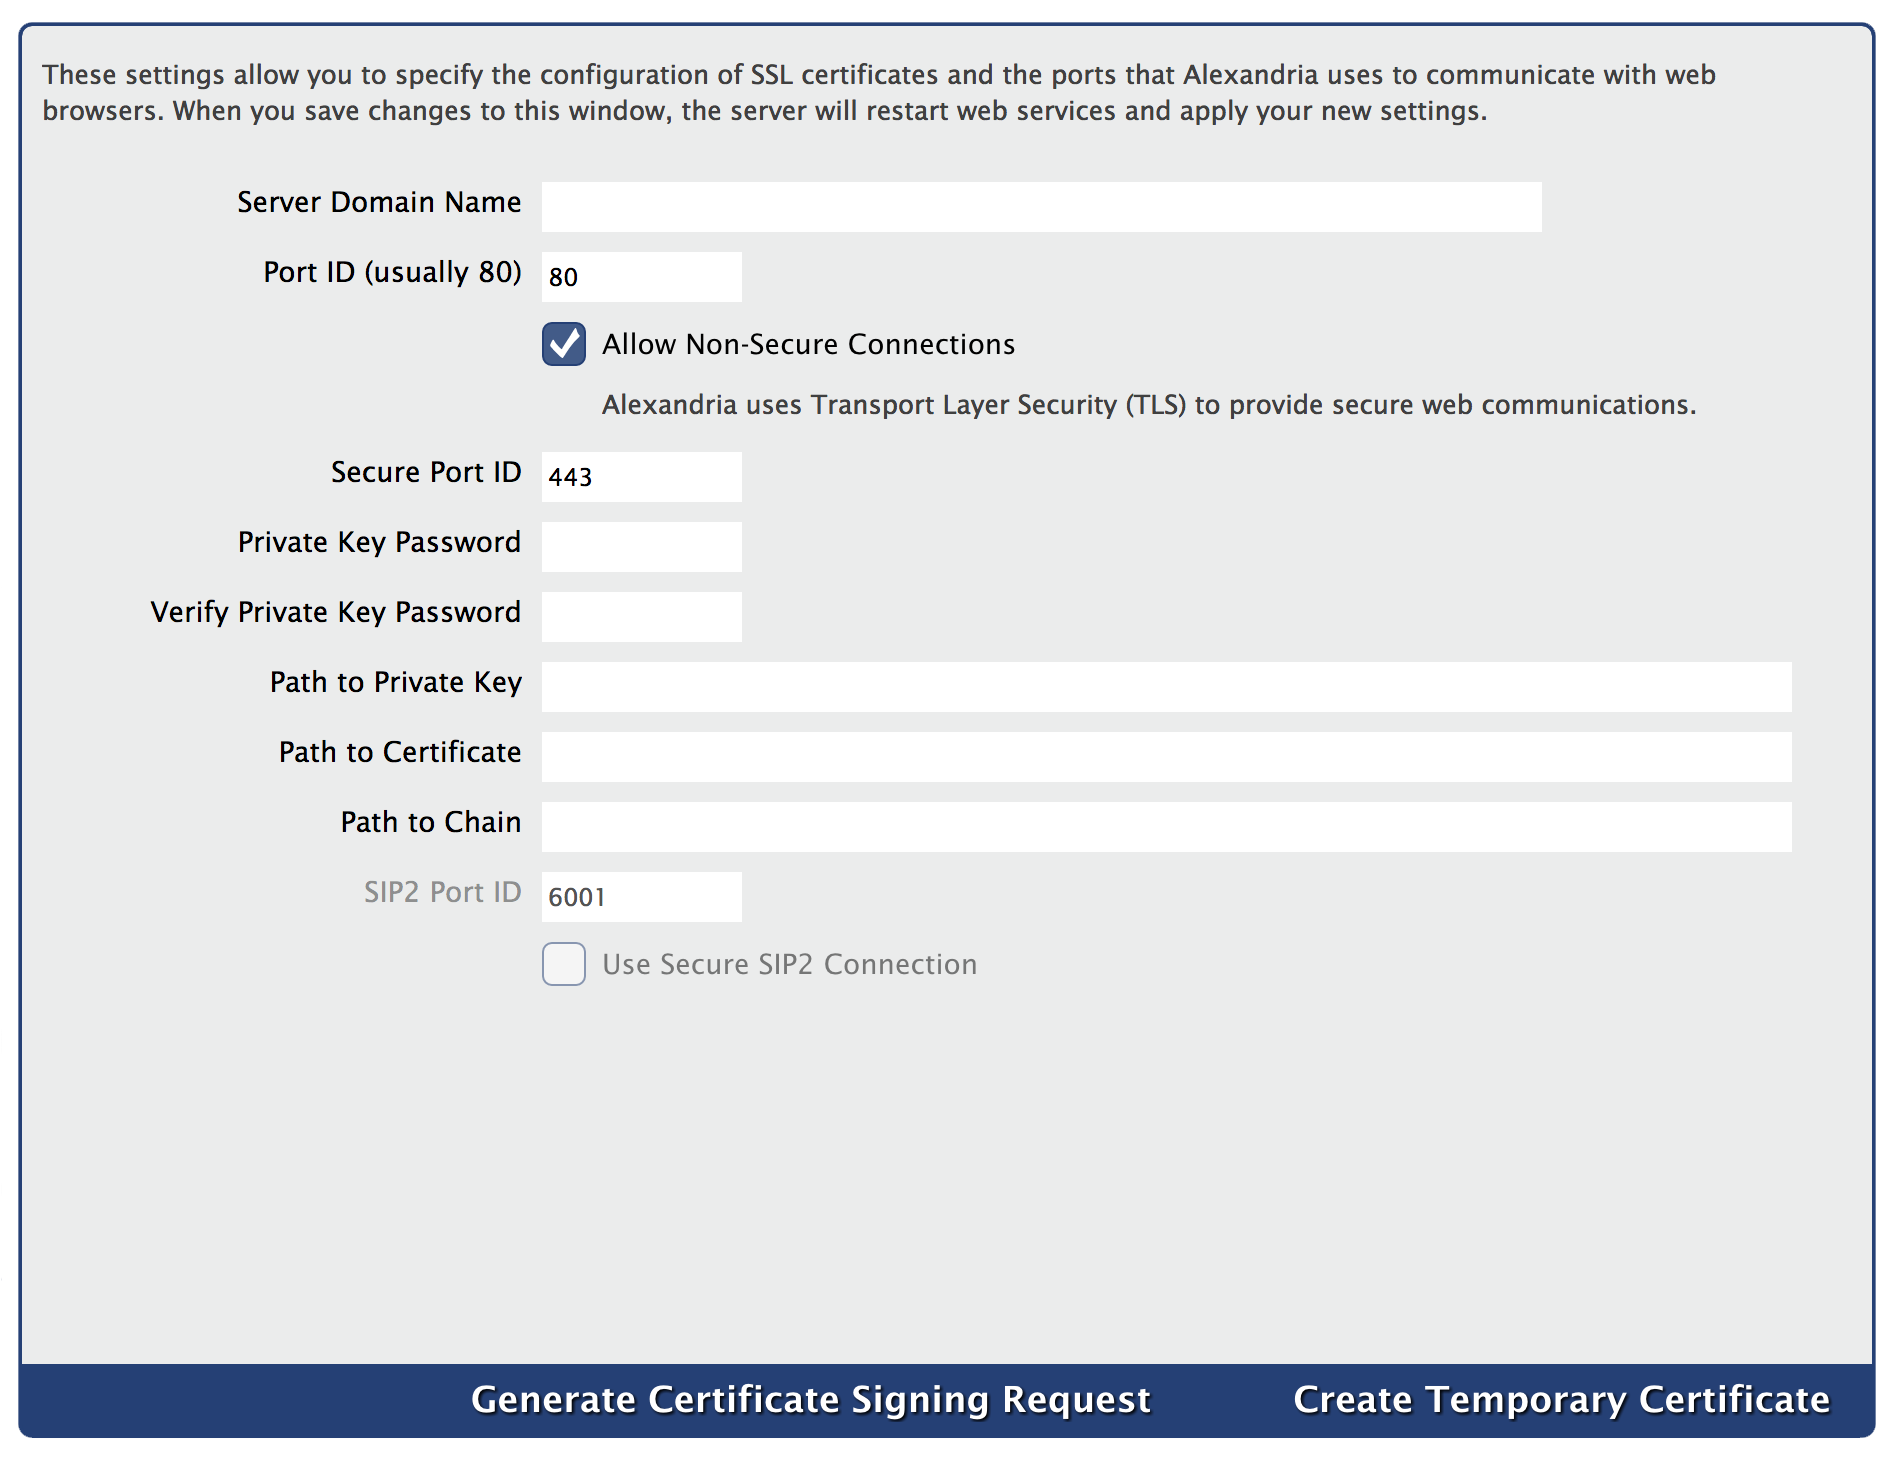 Image Added Image Added
SettingsAlexandria uses Transport Layer Security (TLS) for secure web communications. | Tip |
|---|
When it comes to TLS certificates, “file specifications” stand for the correct (and required) directory location, file name, and file extension (e.g. |
|
C:\Program Data\Alexandria Support\SSL\*.pem) of your keys/certificates on the Data Station. Accurate file specifications must be provided in order for the key/certificates to be accessed.
|
Server Domain Name |
Configuring Web SettingsEnter the domain name or IP address that connects to your Data Station |
in the Server Domain Name filed. . Port IDEnter the port number that Alexandria uses to access the web service |
in the Port ID filed. This is typically port 80 or 8080. |
Uncheck the box for Connections ConnectionsUncheck this box if you want to maintain secure web communications. (optional) Secure Port IDEnter the port number used for the secure web interface |
in the Secure Port ID field. The default is 443. Private KeyEnter the private key password |
in the Private Key field , if required. (optional) |
Image RemovedVerify Private Key PasswordEnter the private password again |
in the Verify Private Key Password field to verify it. (optional) Path to Private KeyEnter the file name and location of the Data Station’s private key |
in the Path to Private Key field. . (optional) The file name and location may be entered or changed manually on a connected Web or Librarian Workstation, but it must follow the correct file specifications. Only certificates in PEM format are recognized. (optional)
Path to CertificateEnter the file name and location of the Data Station’s public certificate |
in the Path to Certificate field. . The file name and location may be entered or changed manually on a connected Web or Librarian Workstation, but it must follow the correct file specifications. Only certificates in PEM format are recognized. (optional)
Path to ChainEnter the file name and location of the Data Station’s chain file |
in the Path to Chain field (optional)
| Warning |
|---|
| | Expand |
|---|
- The file name and location may be entered or changed manually on a connected Web or Librarian Workstation, but it must follow the correct file specifications.
|
title- Only certificates in PEM format are recognized.
|
The PEM (Privacy Enhanced Mail) is an early standard for securing electronic email. This format is not widely adapted as an internet mail standard. SIP2 Port IDEnter the port number used for the SIP2 communications |
in the SIP2 Port ID fieldCheck the box for Use Secure SIP2 ConnectionEnable this setting if you |
are 're using a Secure SIP2 Connection |
. (optional)Click Save in the upper right of the window.
| Info |
|---|
| The PEM format (Privacy Enhanced Mail), an early standard for securing electronic email; the PEM format is not widely adopted as an internet mail standard. |
Generate |
Generating CertificatesCreate Temporary Certificate |
. This creates a temporary private key and public certificate from Alexandria’s registration information then saved to to the SSL folder in the Alexandria Support folder, even if the Path to Certificate that you entered is different than the SSL folder. They expire 365 days after creation. Generate Certificate Signing Request |
. | Select the User ID from the dropdown menu. This is the LDAP login name; for an Open Directory, this is typically uid (i.e. “uid=yourlogin"). For an Active Directory this is typically cn, sAMAccountName, or userPrincipalName.Enter the LDAP database username that contains the patron username or patron barcode in Alexandria in the Local ID field. This must be one of the users' LDAP attributes; common attribute names include uid, uidNumber, givenName, cn, and others.Enter the Test Login. Enter the password for the test login in Test Password field.Click Test. This button initiates an attempt to log into the LDAP server using the settings and credentials you've entered. Click Save in the upper right corner of the window.
More testing on LDAPIf configured correctly, your users should be able to log into Alexandria using the same login credentials as configured on the directory server for their account. However, sometimes difficulty arises. In these cases, verify your preferences settings and test whether the Base DN and other information you have specified is accurate to your configuration. We have found that Active Directory configurations seem to prefer binds using the user's CN while OSXs Open Directory prefers the uid (i.e. user identification). The use of ldapsearch tool is suggested. Alternately, ldp.exe can be utilized for testing in a Windows environment. | Info |
|---|
| title | Non Secure Connection Testing |
|---|
| The -ZZ parameter requires successful connection utilizing StartTLS over port 389. If you have selected to Allow Non-Secure Connections, omit this in your testing with ldapsearch as well. |
| Content Block |
|---|
| name | Checkpoint |
|---|
| id | 1284022790 |
|---|
| | Warning |
|---|
| Checkpoint ILS settings are available to those running a Centralized Catalog or a Distributed Catalog, regardless if it’s under a Controller or an independently operated Data Station. These settings also appear for those benefiting from our Cloud-Hosted services. Note: In a Centralized Catalog, these settings will apply to all sites. Configure these settings if you are using the Checkpoint ILS (Intelligent Library System) security system to enhance your SIP2 protocol. Remember, this should only be enabled if Checkpoint's SIP2 hardware is in use (SIP2 hardware is not interchangeable between manufacturers). The technician installing your Checkpoint system should be able to configure these settings for you. Make sure all SIP2 settings are correct and that you have an FTP server running on the same machine as your Alexandria Data Station. The ILS server will place an inventory file on your Data Station. If you are not running an FTP server on your Data Station, the inventory file will need to be placed manually. Image Removed Enable Checkpoint ILS. This box should only be enabled if Checkpoint's SIP2 hardware is in use.Inventory File. The directory that the ILS server places the inventory file it creates. If the ILS server has not yet created an inventory file, an empty file (of the same name and path) should be created.Synchronization Folder. As part of the Checkpoint ILS system Alexandria creates a “synchronization file” that contains a list of barcodes for each item that is currently outside of the library (checked out). This “synchronization file” (named co_cache.txt) is placed inside the synchronization folder that is user-specified in this field.ILS Server Address. This is the web address of the ILS FTP server you'd like to connect with. An FTP address looks a lot like an HTTP (website) or IP address, except it uses the prefix ftp:// instead of http:// and can be any combination of letters and numbers.ILS FTP Path. This is the directory path (on the ILS FTP server) where Alexandria will send its data. Having the wrong FTP path is one of the most common connection errors. If you get an error message when trying to connect, be sure to check your FTP path. Default is “ / ”.FTP Username. The login user name used to access the ILS FTP server.FTP User Password. The login password used to access the ILS FTP server.This creates a request for a certificate. This request can be sent to a certificate authority.
| Warning |
|---|
| The Microsoft Certificate Server is not supported |
; you have need to use a code signing authority such as GoDaddy™, Comodo ©, or VeriSign™. |
|
| | Content Block |
|---|
| Scheduled Archives and Database Maintenance are allocated in Database settings.These settings allow you to specify if and when automatic archives and/or database maintenance is performed. You are also able to configure the location where local archives are stored. For a Centralized or Distributed catalog these settings will apply to all sites. A Cloud-Hosted customer doesn't have the database settings interface in the administration module because their hosted subscription includes automatic nightly archives and regular database maintenance. Image Removed Enable Automatic Archives. When enabled an archive is automatically performed before the program's Daily Chores which occur between 10:00pm and 12:00am (midnight). During an archive, all other Data Station operations are temporarily suspended. | Warning |
|---|
Manual archives should be performed before making any large-scale changes to your database, such as imports, updates, utilities, or machine upgrades. |
Limit Data Stations to. You can limit how many archives are stored in the Archive Directory. The default is 5 Archives. Archive Directory. This is the directory on your main Data Station where all your archived data is stored; typically the shared Alexandria Support folder. A total of ten archives can be stored in the Archive Directory, including manual archives such as those created when pressing the Archive button in the Administration Status settings. When an eleventh archive is requested, the program will first create the new archive before removing the oldest. If you would like to recover data from a previous archive, the Restore From Archive button can be located in the Administration Status settings. Automatically Perform Database Maintenance. This maintenance examines your database files and indexes and then performs Patron, Item, and Circulation verification routines. If database damage is detected, it's automatically fixed. The maintenance should be performed at least once a month to keep your data in good, working order. Database maintenance is performed between 12:01am (midnight) and 5:00am. Choose between: - Weekly—Between midnight at 5:00am on: (Sunday through Saturday).
- Monthly—Between midnight and 5:00am on the first: (Sunday through Saturday).
| Content Block |
|---|
| Send your patrons email notificationsTo send email reminders, such as the Overdue Items Notice, you will need to configure how Alexandria communicates with your library's email server. Alexandria's email system is designed to potentially cope with hundreds of emails being sent (or resent) over many machines at the same time. | Info |
|---|
| Expand |
|---|
| title | What happens if an email fails to send? |
|---|
| If a send fails, the next resend time is generated by adding a random value between 3 and 9 minutes, spreading out the resend times so all the undelivered email still in the “short range” period isn't sent at the same time. If a send hasn't succeeded by the end of the “short range” period, the program will generate new send times using random values between 60 and 90 minutes. If a send still hasn't succeeded after 100 hours the email is discarded and a “return-to-sender” email will be sent. |
|
Email Settings The Server 1 and Server 2 sections are used for out-bound email. Server 1 is the primary server and Server 2 can function as a back up server should server 1 fail. You only need one SMTP server to use the email functionality; for networks with a single SMTP server configure the setting in the Server 1 section. Image Removed SMTP Server 1 and 2. This is the TCP/IP or DNS address of your library's mail server. Typically, this will be “ mail.” followed by your domain name. Port. Enter the port number that your email server uses. Allow Non-Secure Connections. Alexandria uses Transport Layer Security (TLS) for secure web communications, when this setting is enabled the system will use non-TLS connections if it cannot make an TLS connection. Log In. Enter the login for your email server. Password. Enter the password for your email server. Test Server. Test the SMTP Server settings by sending a test email. This email is sent to the email address listed in the Sites module. Last Tested On. This field displays the last date/time that the server test was performed. Last Test Results. This field displays whether the test was successful or not. Setting Up Your SMTP Server Before setting up your SMTP server you will need to enter a valid email address in the sites management settings of Alexandria. - Click on Tools to the left of your Circulation window.
- Click on Sites under the Management header.
- Enter the name of your site contact (typically this will be the District or Library Administrator of Alexandria), their title, their email and their phone/fax numbers.
- Click Save in the upper right corner.
Once you have saved this information you are ready to set up the SMTP server. Access Tools > Administration.Click Email on the left.Enter your SMTP server address and port in the available fields. Check the box if you want to allow non-secure connections. (optional)Enter the login and password for your SMTP server. Click Save in the upper-right corner of the window.Repeat steps 1-6 if you want to configure a back up server for Server 2.
Using Gmail as your SMTP ServerA Gmail account can be used as a portable SMTP server if your library's network does not already have one. Before you configure Alexandria to use Gmail, you will need to set your Gmail preferences to Allow Less Secure Apps. | Info |
|---|
| Expand |
|---|
| title | Allow Less Secure Apps |
|---|
| In order for the program to make contact with your Google SMTP, it's necessary that Alexandria (the App) retrieves your sign in credentials from Google. As such you must set your Google Account settings for Access for Less Secure Apps from No to Yes. This can be done by going to Account Settings or by clicking here, then apps with account access (you may need to sign in to see these settings). COMPanion Corp stores your credentials only for the purpose of utilizing Google's SMTP email service and it's stored using the most up-to-date security. It is not used by COMPanion for any other purpose. For more information about allowing less secure apps you may review Google's support page here. |
|
- Access Tools > Administration.
- Click Email on the left.
- Enter smtp.gmail.com as the SMTP Server Address.
- Enter 587 as the port.
- Check the box if you want to allow non-secure connections. (optional)
- Enter the login and password for your Gmail account.
- Click Save in the upper-right corner of the window.
- Click Test Server to ensure the Gmail account is acting as a server.
- Repeat steps 1-8 if you want to configure a back up server for Server 2.
| Content Block |
|---|
| LDAP supports user-authentication for open or active directoriesLightweight Directory Access Protocol (LDAP) is an application protocol for querying and modifying directory services running over TCP/IP. Alexandria supports user-authentication using existing log-on credentials maintained on a separate directory server. With LDAP enabled, administrators can now choose to manage these credentials on a central LDAP server as these credentials may change frequently and often need to be standardized across many different systems. A permanent record must exist locally in the Alexandria database for all patrons and operators that use the system however their log-on credentials can be managed outside of Alexandria on your LDAP server directly. | Warning |
|---|
| Operator usernames and barcodes must be unique. Please make sure your Alexandria patrons do not have the same barcode as an operator. |
How does it work?
The COMPanion software will send the credentials the user enters in any log-in dialog to the specified LDAP server in the form of a BIND. If the BIND is successful, the software will locate the user's record within the local database by searching the information returned in the specified Local ID field from the LDAP server. Once the record is found, the user will be logged in. Alexandria will test the credentials against the local data base if the login attempt fails. Configuring LDAP SettingsIf you are a Centralized Catalog these setting will apply to all sites within your controller. Navigate to Tools > Administration > LDAP.Check Enable LDAP.Enter the name of you LDAP domain, i.e. “yourdomain.com” in the LDAP Domain field. The domain name is used in conjunction with sAMAccountName to produce a complete userPrincipalName.Enter the full name of the LDAP server, i.e. “ldap.yourdomain.com” in the LDAP Server field. This will be the host address of the LDAP server for network communication.Check Allow Non-Secure Connections if you would like Alexandria to use non-TLS connections when it cannot make an TLS connection. (optional) | Info |
|---|
| Expand |
|---|
| We highly recommended that you secure communications with the LDAP server by requiring TLS. TLS configuration is performed at the system level. When these settings are correctly configured for secure communications with your LDAP server, Alexandria will be able to communicate with the LDAP server securely. |
|
Enter a DN that matches all the users, i.e. “cn=users,dc=ldap,dc=yourdomain,dc=com” in the Base DN for all LDAP users field. Multiple Base DNs can be specified if separated by semicolons i.e. “cn=staff,ou=COMPanion,dc=demo,dc=goalexandria,dc=com;cn=student,ou=COMPanion,dc=demo,dc=goalexandria,dc=com”.
Image Removed
|
|
|
