| Content Column |
|---|
| tabbed-blocks | expanders |
|---|
| id | 750601822 |
|---|
| | Content Block |
|---|
| not-tabbed | true |
|---|
| name | About |
|---|
| id | 751037530 |
|---|
| Item Editors allow you to customize the MARC record for an item without having to select the MARC view. You can edit the Title, Author, Series, and Subjects for any item in your library, and the new information will then be reflected on the item's MARC recordwithout going to the MARC editor. You may review the Library of Congress website for for additional information about MARC record standards. 
To access the Our item editors :come in these main forms: - For very basic but essential information like Publisher, we use a regular form field that you can just type into.
- Authority controlled fields are marked with a star [image] and will have a drop down that you can use instead of typing to ensure data conformity.
- For information where one MARC tag will be referred to the most but quick access to additional tags may help improve search results, you can type in the field or click on the pencil icon to deep dive in a mini editor (title, author, series, and genre).
- And finally we have entire tabs for important information like Subjects or Links so you can focus on all the associated tags at once and make the changes you need.
Mini editors are available for the following tabs/data. Before you can make any changes, click the Image Addedpadlock icon to Image Addedpadlock icon to Image Added unlock the record. Then when you're done, click the icon again to lock the record. Image Added unlock the record. Then when you're done, click the icon again to lock the record. Edit a Tag- In the desired field, click the Image Added pencil icon to open the editor.
- Select the tag you wish to change.
Click Edit. Make any necessary changes to the tag, then click Save.
Add a Tag- In the field, click the pencil icon to open the editor.
- Click Add.
- Choose the MARC tag you wish to add.
Enter MARC information in the corresponding fields and click Save.
Remove a Tag- Click the pencil icon in the desired field.
- Select the tag you wish to remove.
- Click Remove.
- Close the Editor window.
- Click Save.
Note you can not remove the Title tag - Go to the Items module.
- Search for and select the title you want to edit.
- Click the padlock icon at the top right of the window to unlock the item for editing.
Now you're ready to go. | Expand |
|---|
| title | Click to view the old interface |
|---|
| Item EditorsItem Editors allow you to customize the MARC record for an item without having to Toggle MARC view. You can edit the Title, Author, and Subjects for any item in your library, and the new information will then be reflected on the item's MARC record. You will need to be on the Title tab of the item record in order to make these changes. You may review the Library of Congress webpage for additional information about MARC record standards. 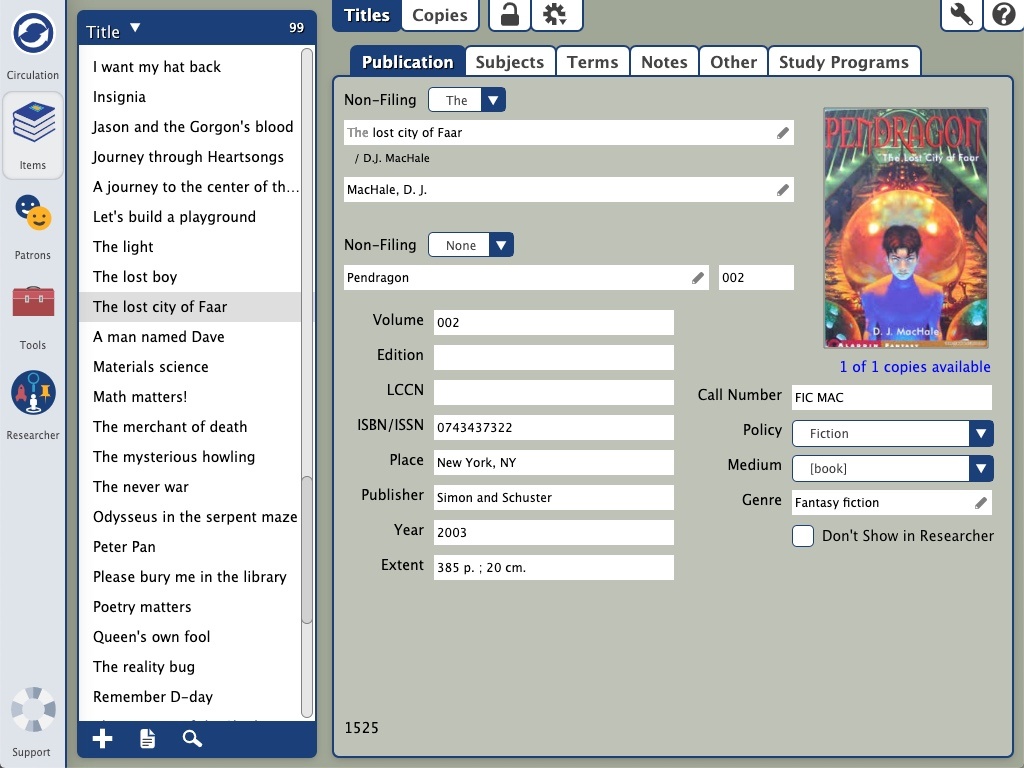
To access the item editors: - Go to the Items module.
- Select the Titles tab at the top of the window.
- Look up the title you want to edit.
- Click the padlock icon at the top of the window to unlock the item for editing.
Now you're ready to go. |
| | Content Block |
|---|
name | Title Title EditorThe Title Editor | | id | 1262730401 |
|---|
Unlock the record by clicking the padlock icon.Click the pencil icon in the Title field.Select the 245 field and click The tag editor allows you to |
view and edit the 245 Title Statement tag. Image Removed Image Removed add, edit, or remove tags, indicators, and subfield information. Select a field to edit it, or click Add to add a new one. When you're done, click OK to go back to tag view. - Edit. Open the editor for the selected tag.
- Remove. Delete the selected tag.
- Arrows. Use the up and down arrows to change the order of the MARC record in the list.
Edit an Author Tag- In the Author field, click the
 Image Added pencil icon to open the editor. Image Added pencil icon to open the editor. - Select the tag you wish to change.
Click
|
Edit. Make any necessary changes to the
|
245_a field, and then click Save.On the title Editor window, click Close. Lock record by clicking the padlock icon. tag, then click Save.
Add an Author Tag- In the Author field, click the pencil icon to open the editor.
- Click Add.
- Choose the MARC tag you wish to add.
Enter MARC information in the corresponding fields and click Save.
Remove an Author Tag- Click the pencil icon in the Author field.
- Select the tag you wish to remove.
- Click Remove.
- Close the Author Editor window.
- Click Save.
|
|
| Content Block |
|---|
| name | Title Editor |
|---|
| id | 1262730401 |
|---|
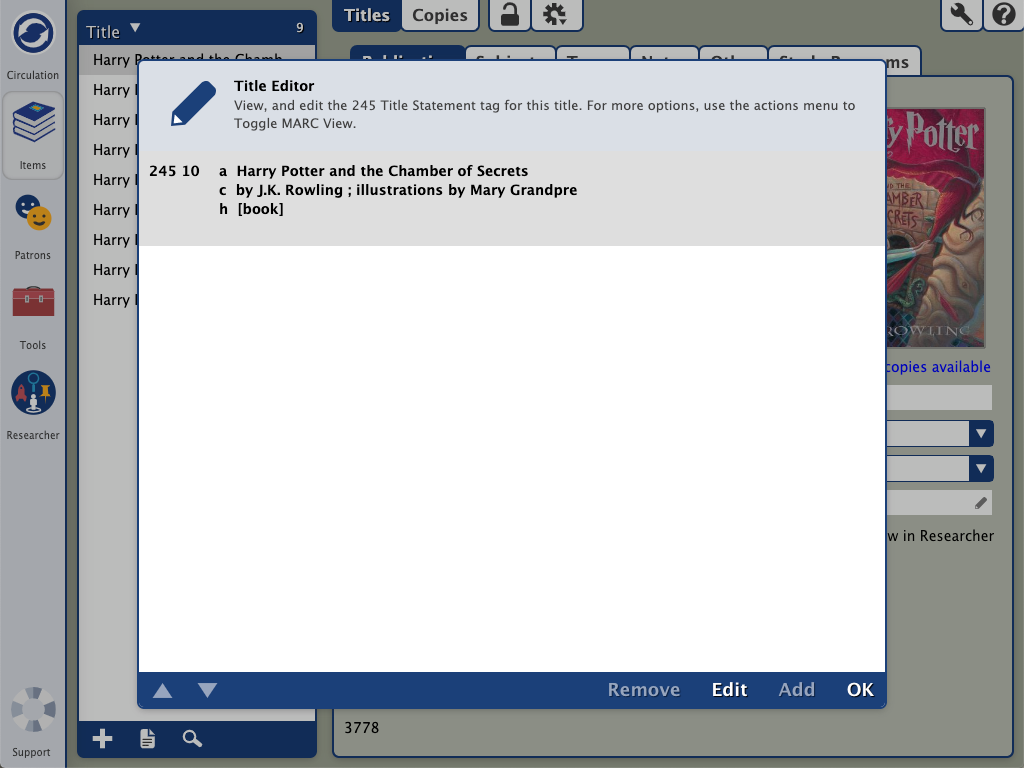
| Title EditorThe Title Editor allows you to view and edit the 245 Title Statement tag. Image Added Image Added | Note |
|---|
The Title tag can not be removed. |
| Expand |
|---|
| title | Click to view the old interface |
|---|
| Title EditorThe Title Editor allows you to view and edit the 245 Title Statement tag. 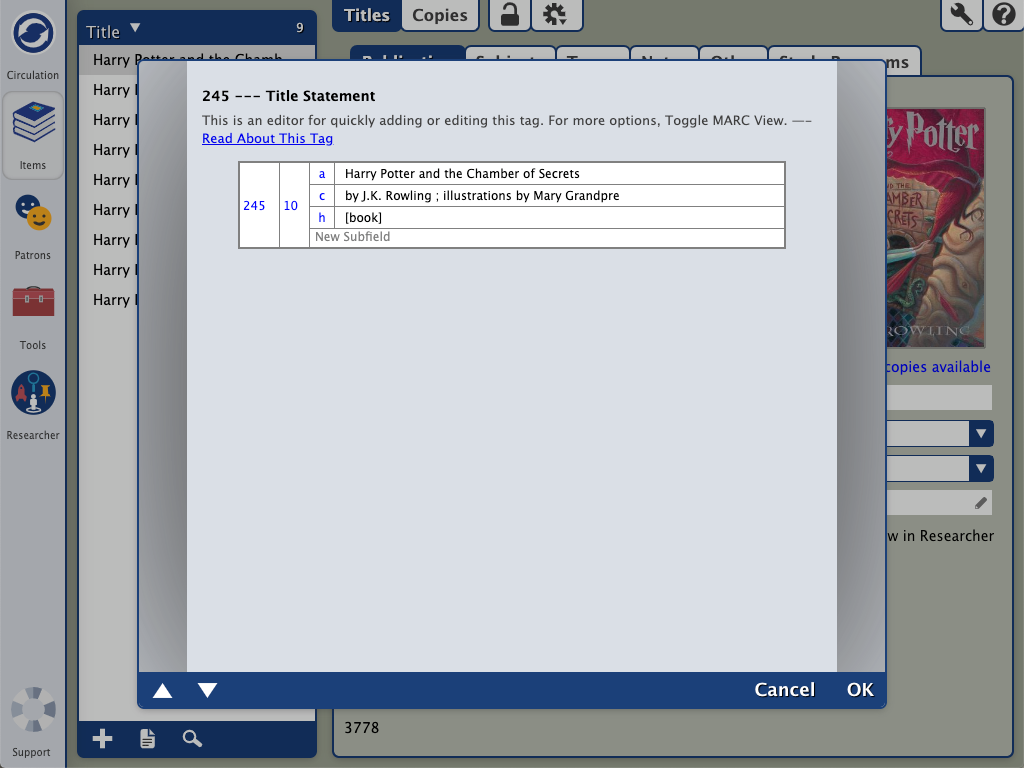
- Unlock the record by clicking the padlock icon.
- Click the pencil icon in the Title field.
Select the 245 field and click Edit. Make any necessary changes to the 245_a field, and then click OK. On the title Editor window, click Close. In the top right corner of the Items window, click Save. Lock record by clicking the padlock icon.
|
|
| Content Block |
|---|
| name | Author Editor |
|---|
| id | 1262737800 |
|---|
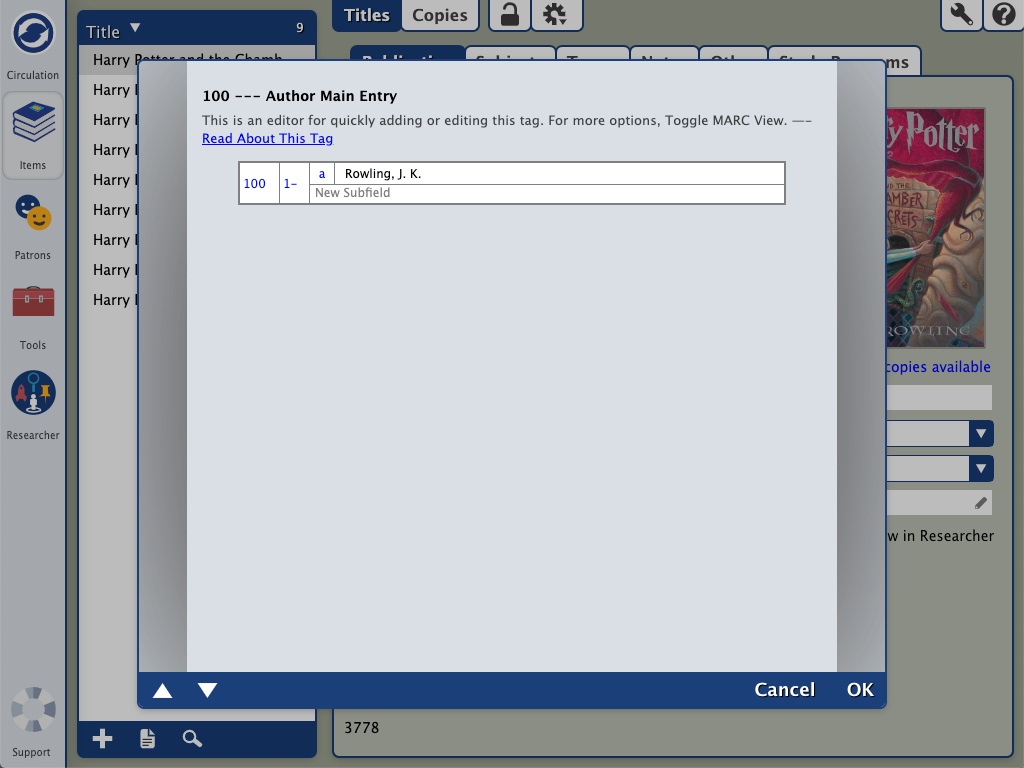
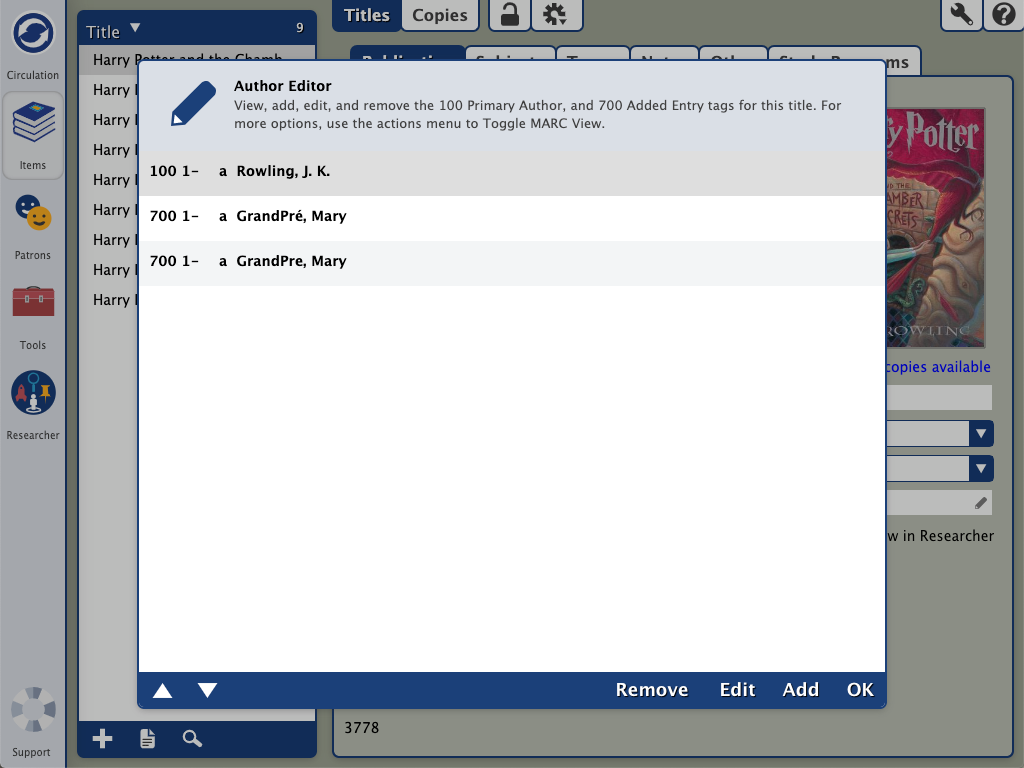
| Author EditorThe Author Editor allows you to view, add, edit or remove the following Author tags: - 110 - Author Main Entry - Corporate Name
- 222 - Author Main Entry - Meeting Name
- 700 - Author Main Entry - Personal Name
- 710 - Author Main Entry - Corporate Name
- 711 - Author Main Entry - Meeting Name
Image Removed Before you can make any changes, click theImage Removedpadlock icon toImage Removed unlock the record. Then when you're done, click the icon again to lock the record. Edit an Author TagIn the Author field, click the Image Modified Click Edit. Make any necessary changes to the tag, then click Save. Add an Author Tag- In the Author field, click the pencil icon to open the editor.
- Click Add.
- Choose the MARC tag you wish to add.
Enter MARC information in the corresponding fields and click Save.
Remove an Author Tag- Click the pencil icon in the Author field.
- Select the tag you wish to remove.
- Click Remove.
- Close the Author Editor window.
- Click Save.
| Expand |
|---|
| title | Click to view the old interface |
|---|
| Author EditorThe Author Editor allows you to view, add, edit or remove the following Author tags: - 110 - Author Main Entry - Corporate Name
- 222 - Author Main Entry - Meeting Name
- 700 - Author Main Entry - Personal Name
- 710 - Author Main Entry - Corporate Name
- 711 - Author Main Entry - Meeting Name
Before you can make any changes, click thepadlock icon to unlock the record. Then when you're done, click the icon again to lock the record. Edit an Author Tag- In the Author field, click the pencil icon to open the editor.
- Select the tag you wish to change.
Click Edit. Make any necessary changes to the tag, then click OK. Close the Author Editor window. Click Save.
Add an Author Tag- In the Author field, click the pencil icon to open the editor.
- Click Add.
- Choose the MARC tag you wish to add.
Enter MARC information in the corresponding fields. Click OK. Close the Author Editor window. Click Save.
Remove an Author Tag- Click the pencil icon in the Author field.
- Select the tag you wish to remove.
- Click Remove.
- Close the Author Editor window.
- Click Save.
|
|
| Content Block |
|---|
| name | Series Editor |
|---|
| id | 295687790 |
|---|
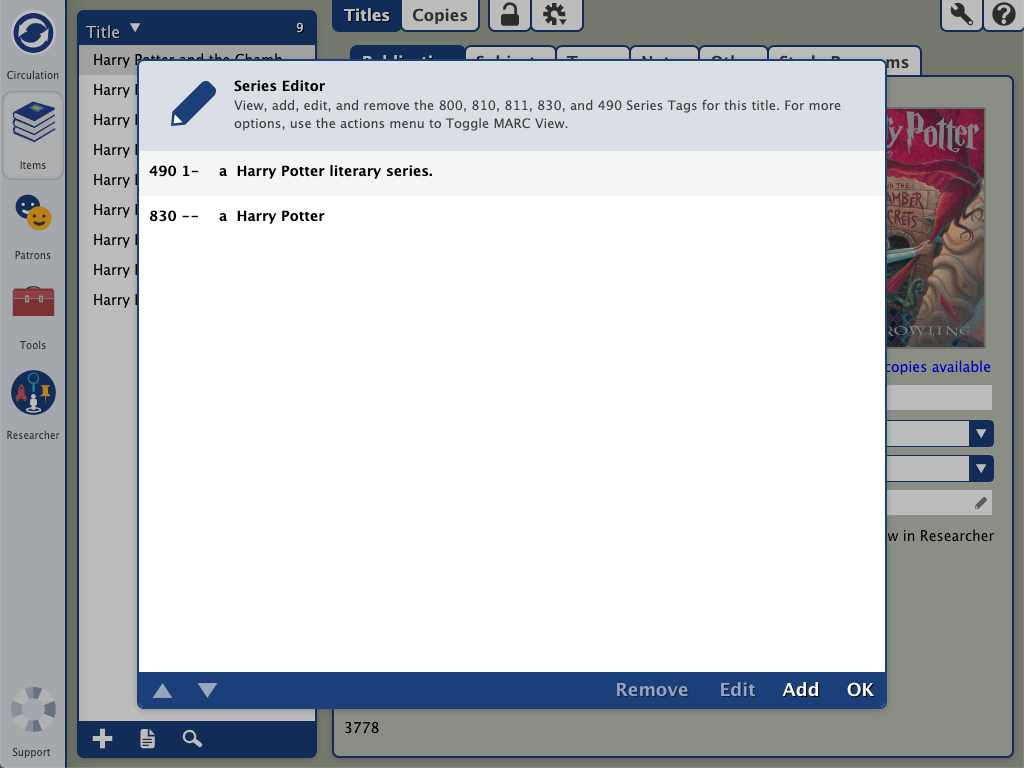
| The Series editor view, add, or edit the following MARC tags and subfields: Before you can make any changes, click theImage Removedpadlock iconImage Removed to unlock the record. Then when you're done, click the icon again to lock the record. Edit a Series Tag- In the Series Volume field, click the Image Removed pencil icon to open the editor.
- Select a tag.
Click Edit. Make any necessary changes to the tag, then click OK. Close the Series Editor window. Click Save.
Add a Series Tag- 800_a _d _t - Series Added Entry - Personal Name
- 810 _a _b _t - Series Added Entry - Corporate Name
- 811_a _n _t - Series Added Entry - Meeting Name
- 830_a _v _h - Series Added Entry - Uniform Title
- 490_a _v - Series Statement
Image Removed Image Removed In the Series Volume field, click the Image Modified Remove a Series TagIn the Series Volume field, click the Click Add.Choose the MARC tag you wish to add.Enter MARC information in the corresponding fields. Click OK. Close the Series Editor window. Click Save. Image Modified Close the Series Editor window.Click Save.| Expand |
|---|
| title | Click to view the old interface |
|---|
| Series EditorThe Series editor view, add, or edit the following MARC tags and subfields: - 800_a _d _t - Series Added Entry - Personal Name
- 810 _a _b _t - Series Added Entry - Corporate Name
- 811_a _n _t - Series Added Entry - Meeting Name
- 830_a _v _h - Series Added Entry - Uniform Title
- 490_a _v - Series Statement
Before you can make any changes, click thepadlock icon to unlock the record. Then when you're done, click the icon again to lock the record. Edit a Series Tag- In the Series Volume field, click the pencil icon to open the editor.
- Select a tag.
Click Edit. Make any necessary changes to the tag, then click OK. Close the Series Editor window. Click Save.
Add a Series Tag- In the Series Volume field, click the pencil icon to open the editor.
- Click Add.
- Choose the MARC tag you wish to add.
Enter MARC information in the corresponding fields. Click OK. Close the Series Editor window. Click Save.
Remove a Series Tag- In the Series Volume field, click the pencil icon to open the editor.
- Select the tag you wish to remove.
- Click Remove.
- Close the Series Editor window.
- Click Save.
|
|
| Content Block |
|---|
| name | Genre Editor |
|---|
| id | 295736551 |
|---|
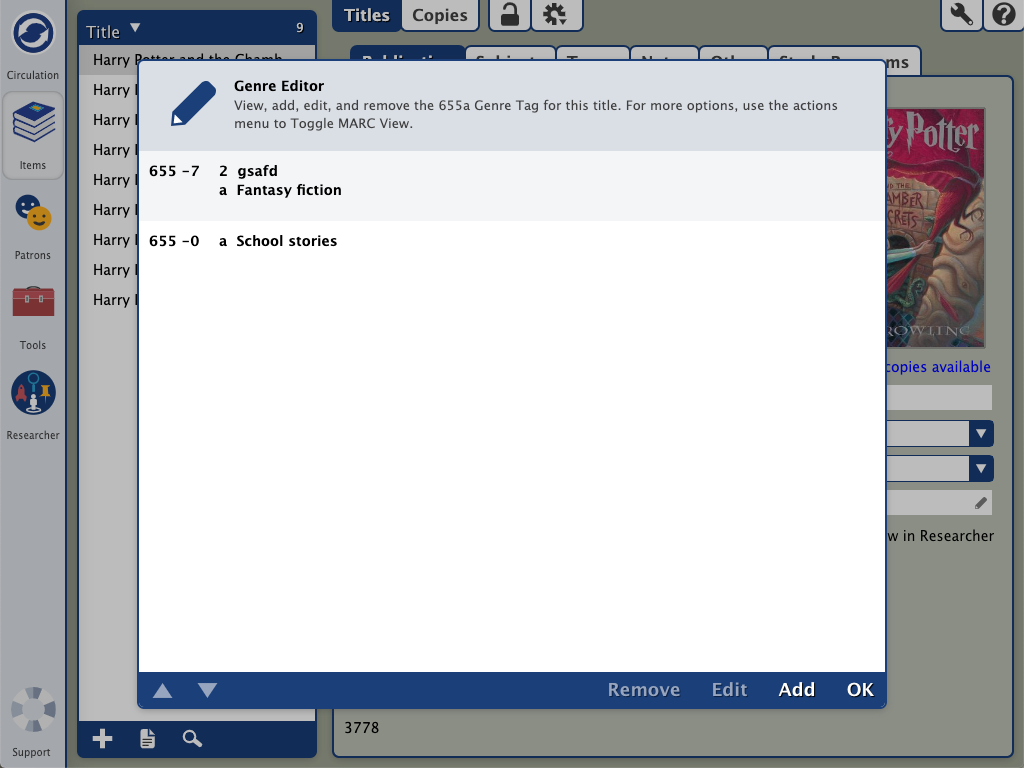
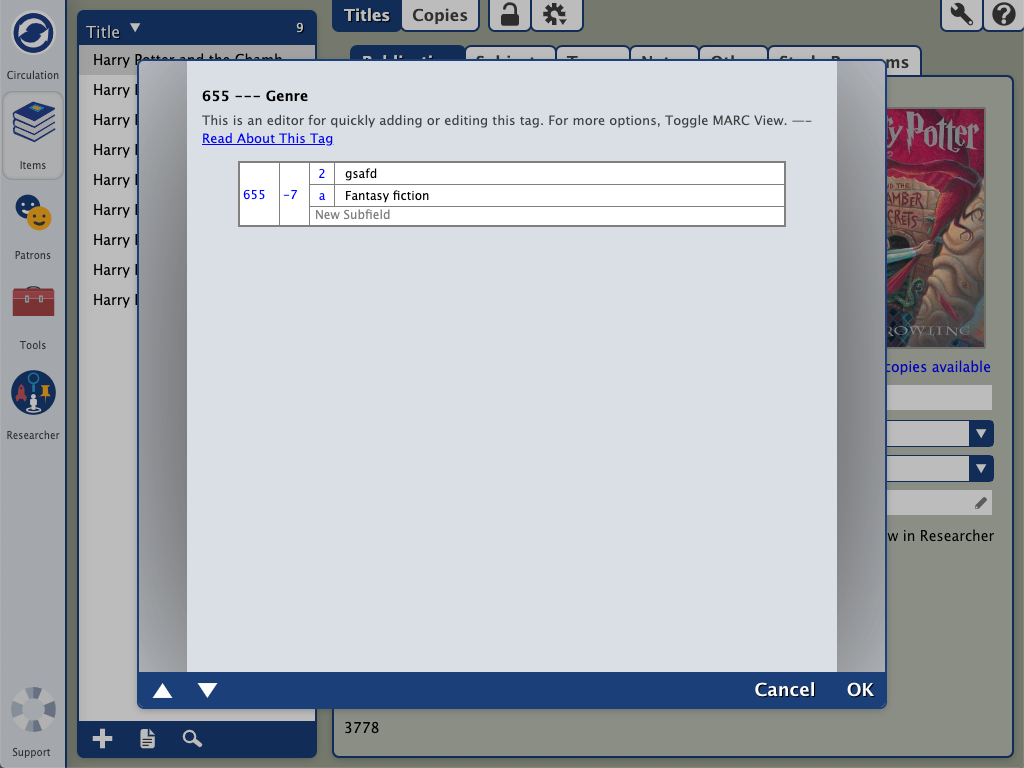
| The Genre editor allows you to view, add, edit or remove the 655_a tag. Image Removed Image Removed Before you can make any changes, click theImage Removedpadlock icon Image Removedto unlock the record. Then when you're done, click the icon again to lock the record. Edit a Genre TagIn the Genre field, click the Image Removed pencil icon to open the editor.Select a tag.Click Edit. Make any necessary changes to the tag, then click OK. Close the Genre Editor window. Click Save.Add a Genre TagIn the Genre field, click the
Image Modified Click OK. Close the Genre Editor window. Click Save. Remove a Genre TagIn the Genre field, click the Image Modified Click Save.| Expand |
|---|
| title | Click to view the old interface |
|---|
| Genre EditorThe Genre editor allows you to view, add, edit or remove the 655_a tag.
Before you can make any changes, click thepadlock icon to unlock the record. Then when you're done, click the icon again to lock the record. Edit a Series Tag- In the Genre field, click the pencil icon to open the editor.
- Select a tag.
Click Edit. Make any necessary changes to the tag, then click OK. Close the Genre Editor window. Click Save.
Add a Series Tag- In the Genre field, click the pencil icon to open the editor.
- Click Add.
- Enter MARC information in the corresponding fields.
Click OK. Close the Genre Editor window. Click Save.
Remove a Series Tag- In the Genre field, click the pencil icon to open the editor.
- Select the tag you wish to remove.
- Click Remove.
- Close the Genre Editor window.
- Click Save.
|
| | Content Block |
|---|
| name | Subject Editor |
|---|
| id | 751356519 |
|---|
| Subject EditorThe Subject Editor allows you to view, add, edit or remove subject entries for the Title. The Subject Editor is located on the Subjects tab in the Title record. Image Removed Before you can make any changes, click theImage Removedpadlock icon toImage Removed unlock the record. Then when you're done, click the icon again to lock the record. Edit a Subject Tag- Click on the Subjects tab
- Click the Edit button
- Edit the 650 tag
- Click OK
- Click the Save button
- Lock record by clicking the padlock icon
Add a Subject Tag- Click on the Subjects tab
- Click the Add button
- Enter Subject information in the 650 tag
- Click OK
- Click the Save button
- Lock record by clicking the padlock icon
Remove a Subject Tag - Select the subject you wish to remove.
- Click Remove.
- Click Save.
- Lock record by clicking the padlock icon again.
| Expand |
|---|
| title | Click to view the old interface |
|---|
| Subject EditorThe Subject Editor allows you to view, add, edit or remove subject entries for the Title. The Subject Editor is located on the Subjects tab in the Title record.  Image Removed Image Removed
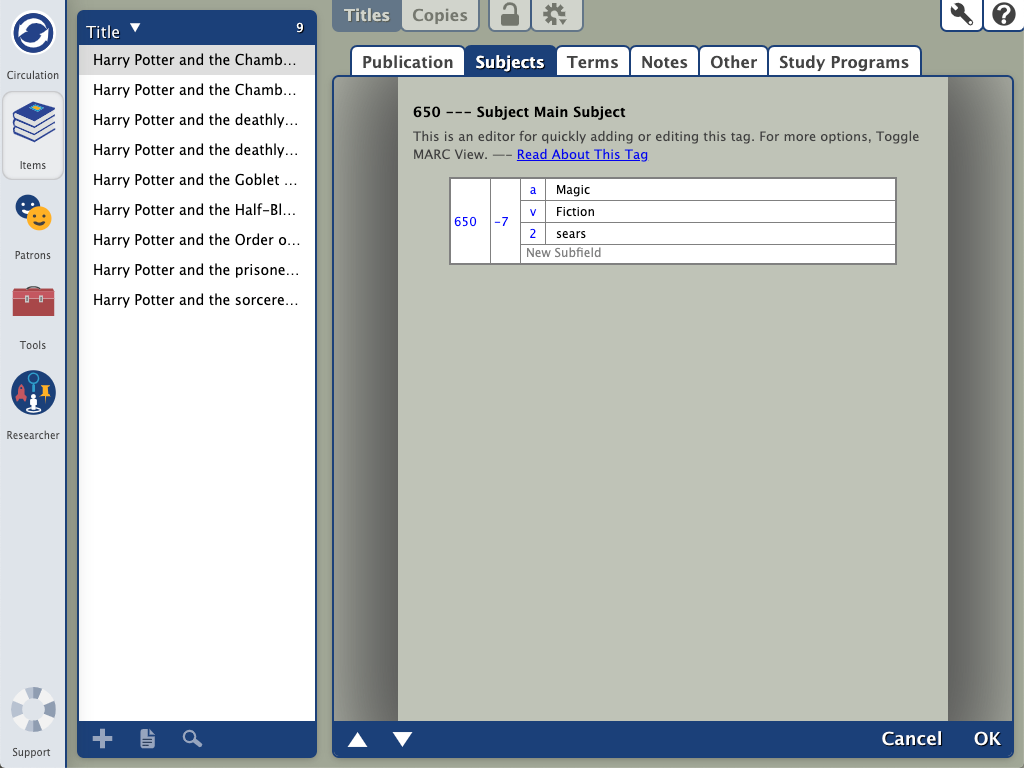 Image Removed Image Removed
Before you can make any changes, click theImage Removedpadlock icon toImage Removed unlock the record. Then when you're done, click the icon again to lock the record. Add a subject tag - Unlock the record by clicking the padlock icon
- Click on the Subjects tab
- Click the Add button
- Enter Subject information in the 650 tag
- Click OK
- Click the Save button
- Lock record by clicking the padlock icon
Edit a subject - Unlock the record by clicking the padlock icon
- Click on the Subjects tab
- Click the Edit button
- Edit the 650 tag
- Click OK
- Click the Save button
- Lock record by clicking the padlock icon
remove a subject tag - Click the Image Removedpadlock icon to Image Removedunlock the record.
- Select the subject you wish to remove.
- Click Remove.
- Click Save.
- Lock record by clicking the padlock icon again.
|
|
|
|
