The Support Center has moved!! See the new website https://support.goalexandria.com/ ![]()

Angular Self-Service
Last Updated: $action.dateFormatter.formatDateTime($content.getLastModificationDate())

Self-Service is an unattended kiosk interface that allows patrons to check items in or out themselves, freeing librarians to handle other library responsibilities.
To access Alexandria's Self-Service mode, add /selfservice or /selfserviceinout to the end of your Alexandria login URL. Choose Check Out or Check In, then log in to set the mode.
Security
The Self-Service settings in Alexandria's Security Preferences determine whether you can use Self-Service to perform check in, check out, or renew.
Self-Service can only be accessed by operators who are logged in and have the proper security settings. Once logged in, the Self-Service interface will never automatically log out—operators must manually choose to Log Out from the menu.
Security Preferences
The Self-Service settings in Alexandria's Security Preferences determine what access you (the security group you're assigned to) have to Self-Service:
- No Access
- Check In Only
- Check Out Only
- Check In and Out
Self-Service can only be accessed by operators with the proper Security Preference. Once logged in, the Self-Service interface will never automatically log out—you must manually choose to Log Out from the menu.
Log In
The module can be accessed from /tools or /SelfService, which has a mode selection to choose Check In or Check Out.
The following URLs can also be used….
- /SelfServiceOut selects the mode Check Out
- /SelfServiceIn selects the mode Check In
Once you're logged in, you'll stay logged in until you manually log out from the menu. Self-Service will not time-out or log you out automatically. Patrons cannot accidentally log out
To choose another mode,
Menu
Language
- Change the interface language to English (Inglés), Spanish (Español), and French (Français).
Settings
These settings are specific to the station and browser you're working on. Each station (computer, tablet, browser, etc.) will need to set these settings manually. If the browser's cache is cleared, these settings will be cleared also.
- Require Authentication for Check Out. When checked, patrons must enter their log in password to check out items.
- Use Alexandria Network Printer. Receipts for Check Out and Check In will be formatted to print on the Alexandria Network Printer.
- Printer Address. Enter the IP address for your network printer.
Log Out
You wouldn't want a student to log out of Self-Service mode, so only the operator who logged in can log out.
This option will allow you to log out of the Self-Service interface. As an operator with the proper security settings, you must enter your password to log out of Self-Service. Doing so returns you to the Self-Service mode selection window.
This is for the librarian to log out of Self-Service mode, not for the patron to log out of their account or session. It must be the same person who logged in to Self-Service mode.
Self-Service Check Out / In
This is the mode you're logged in to. Click the title to select a different mode. Because you're effectively logging out of one mode to log in to another, you will need to enter your password again
Command Line / Scan Bar
Let's get started.
Scan or type your patron barcode.
I'm Done
When you're done checking books in or out, click I'm Done at the bottom right of your screen. Next, choose if you want a printed or emailed receipt, then click OK to process your transactions and clear the screen. If you click Cancel, you'll go back to your transaction list.
Are you still there?
If there hasn't been any activity in 1 minute, Alexandria will ask if you're still there. If you are, move your mouse or click Yes to reset it. If there still isn't any activity after 15 more seconds, the session will be cleared so it's ready for the next patron.
Check Out Mode
Enter a patron barcode to begin check out, and click Done in the upper-right corner to clear the window when your transaction is complete.

Patron Info
Once you’ve scanned a patron [in Out], the patron shows at the top with limited information: Patron Picture, Patron Name, Items Out, In-Stock Holds, and Charges.
The row persists at the top. As items are scanned, the information should update, e.g. if Darla checks out her In-Stock Hold, the number should go from 1 to 0, and her Items Out should go from 5 to 6.
Enter Password
If Require Authentication for Check Out is checked, the patron will be required to enter their password after scanning their barcode.
For Self-Service Check Out, if ‘Require Authentication for Check Out’ is ON for this station, after scanning the patron barcode (BEFORE any info shows), the patron is required to enter their password.
Scan items - Out
Scanned items show up at the top, just like the Transaction Log. In Out mode, this is right under the Patron; in In mode, under the scan bar. The space to the left shows the item cover art (note: should be flush with lines and left edge), the item info shows the Title (ALERT Myra 20180914 do we allow 2 lines for the title? at what point do we cut it off?), Copy Barcode, Status of the item, and its Due date.
The items area scrolls. (Patron persists.)
NOTE: The text should be selectable, i.e. I should be able to double-click to select and copy the item barcode.
Scan items - In
For check in, it only shows one item at a time; the idea is a running bookdrop. There is still an ‘I’m Done’ button but all it does is clears the window.
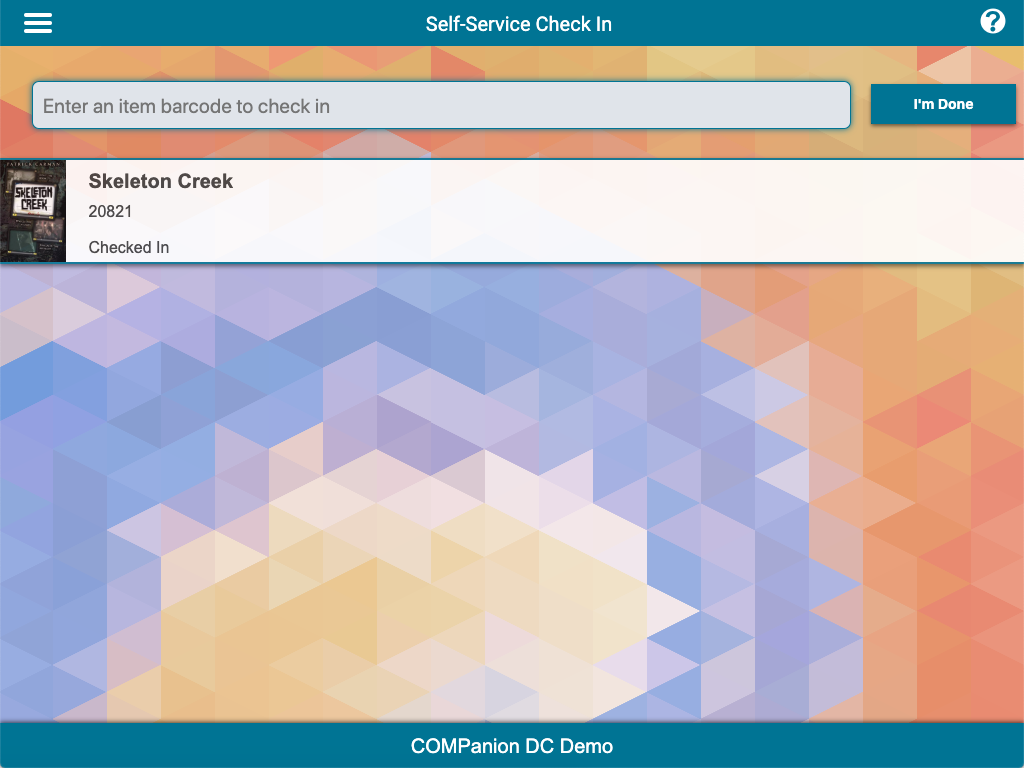
The item info shows ‘Checked In’ and when the item ‘Was Due’; if the item is overdue, show the date in red.

When a circulation transaction can not be processed in the Self-Service interface, a warning sounds and message appears and you will be directed to the front desk for additional help. These exceptions can occur due to policy restrictions, unapproved transactions (e.g. an item checked out to another patron), hold/reservation and policy conflicts, temporary items, items from outside locations, etc.
Step-by-Step Instructions
Self-Service Check Out
If there is no current patron, enter (or scan) a patron barcode to begin checkout; if the same patron barcode number is scanned twice, it will be ignored.
- When the patron is made current, enter (or scan) an item barcode to checkout or click Done to clear the Self-Service interface.
- If a barcode of fifty or less is scanned, an error occurs; system patrons can not be used in conjunction with Self-Service checkout.
- If an item barcode is scanned without a patron being current, an error occurs.
- When a new patron barcode is scanned (different from the Current Patron), the Self-Service interface is refreshed and the new patron is made current. This way, if the current patron walks away from the self-service station and another patron walks up and enters their barcode, they will be able to check out books.
- If an item barcode is scanned and no exceptions are triggered, the item is successfully checked out; an entry will be made to the transaction log.
- If an item barcode is scanned that has a “In-Stock Hold” or “Reservation” for the current patron and no exceptions are triggered, the item is successfully checked out; an entry will be made to the transaction log.
- If an item barcode is scanned that is currently checked out to the current patron, Alexandria will attempt to perform a renewal. If successful, an entry will be made to the transaction log.
I'm Done
When you're done checking books in or out, click I'm Done at the bottom right of your screen. Next, choose if you want a printed or emailed receipt, then click OK to process your transactions and clear the screen. If you click Cancel, you'll go back to your transaction list.
Are you still there?
If there hasn't been any activity in 1 minute, Alexandria will ask if you're still there. If you are, move your mouse or click Yes to reset it. If there still isn't any activity after 15 more seconds, the session will be cleared so it's ready for the next patron.
Check In
To access the Check In (i.e. Bookdrop) mode of the Self-Service, type /selfservicein at the end of your Alexandria login URL.
Enter an item barcode to check in (i.e. bookdrop) or click Done to clear the window.
Use the Done button in the upper-right corner to clear the window when your transaction is complete.

Step-by-Step Instructions
- Enter the barcode(s) of the item(s) you want to check in (i.e. bookdrop).
- If a patron barcode is scanned, an error occurs; this includes system patrons with barcodes of fifty or less.
- When a item barcode is successfully bookdropped, an entry will be made to the transaction log.
- If an item has fines due upon check in, the fine will be displayed in the Self-Service interface (e.g. “Overdue Item, Fine of $1.23 charged.”).
- If the patron bookdropping an item is different from the patron associated with the previous item, the Self-Service interface is cleared before displaying new bookdrop confirmation information.
- If a patron checks in a book which is on hold, has a reservation, or is in transit, you will be asked to deliver the book to the librarian or aide at the front desk.
- Click Done to clear the Self-Service interface; the patron checking in the book will never be identified in the interface—only on the printed receipt.
I'm Done
When you're done checking books in, click I'm Done at the bottom right of your screen to clear the screen for the next patron.
Are you still there?
If there hasn't been any activity in 1 minute, Alexandria will ask if you're still there. If you are, move your mouse or click Yes to reset it. If there still isn't any activity after 15 more seconds, the session will be cleared so it's ready for the next patron.