The Support Center has moved!! See the new website https://support.goalexandria.com/ ![]()

Administration
The root page ALEX:Administration could not be found in space Alexandria.
How helpful was this page?
Controller Administration Settings
Last Updated: $action.dateFormatter.formatDateTime($content.getLastModificationDate())

You can access your Alexandria Controller Administration window anywhere in the world by typing the IP address (or server domain name) and (optional) port number of your Controller Data Station followed by “/admin” into your browser's Address field (usually located in the upper-left corner of the window). Be sure to bookmark the web address of your Controller's Administration window for future access!

Controller
Although you are allowed to make changes to individual Preferences for every site your Alexandria Controller maintains—the actual Controller Data Station also contains some limited, globally-based settings of its own.
The Administration settings are high-level preferences intended for network administrators or IT Technology Support departments; in other words, advanced settings that ordinary operators wouldn't be able to configure without help. These settings are used to configure your Controller Data Station (i.e. server) email information, archive schedules, database maintenance, web settings, and system updates.
The only person allowed to access the Controller's Administration settings is the Admin operator defined in the Settings tab; this operator is not a standard patron and can not be modified in Patrons Management. COMPanion will have emailed you the Admin Username and Password required to access Controller Administration; your access and registration information can also be found on the back of your Getting Started Guide. If you still can't locate your login information, contact our support at Customer Support at (800) 347-4942 or by email via: support@companioncorp.com. If needed, you can also use the Can't access your account? link during Login to reset the Controller's Admin Username and Password.
Navigation Bar
| Monitor | This interface give you access to controller capabilities. |
| Settings | Set the Controller's Admin operator, default Language, and other wide-ranging options. |
| Web | Configure web settings and security. |
| Database | Use these settings to configure pre-determined scheduled events throughout the week. |
| These settings allows you to configure the Controller's external mail service. |


These Database settings apply to all sites and contain configurable settings for the entire union; they are available for both Central and Distributed Catalog.
These settings allow you to configure the location where local archives are stored. It is where you will also perform manual archives for your Data Stations.
Archiving is an automatic method of making complete, regular copies of your database and storing them in a designated folder on your hard drive. Manual archives should be performed before making any large-scale changes to your database, such as imports, updates, utilities, or machine upgrades. Your most recent archives are handy when trying to fix a bad import and are invaluable in securing the safety of your data. However, archives are not backups; the major difference between a backup and an archive is that backups are made on removable media and physically stored offsite (or in the cloud). Since archives are entirely useless in the event of a hard drive failure, keeping an offsite or cloud backup is highly recommended!
Database maintenance examines your database files and indexes and then performs patron, item, and circulation verification routines. If database damage is detected, it's automatically fixed. The maintenance should be performed at least once a month to keep your data in good, working order.
Controller-Initiated Operations
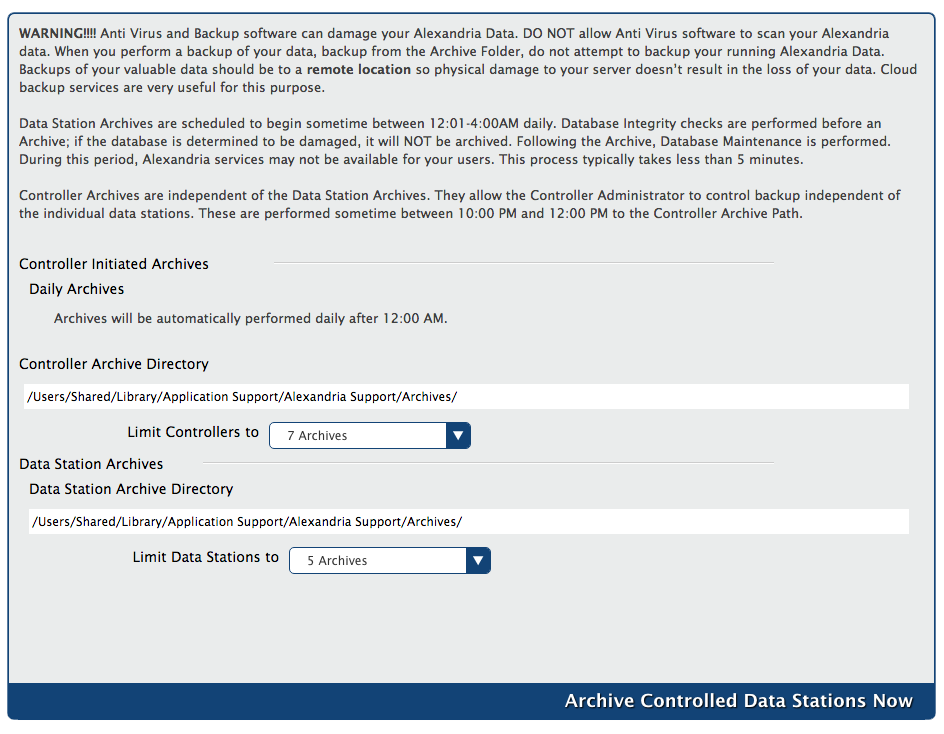
- Daily Archives. The Controller will automatically Archive the Data folder for each of your data sets between 12:01-4:00 A.M. daily. It will Archive the Controller Data folder nightly between 10:00 and 12:00 P.M. During an archive, all other Data Station operations are temporarily suspended.
- Controller Archive Directory. This is the directory where all your Controller archives are stored; typically the shared Alexandria Support folder. The number of archives that can be stored in the Archive Directory, including manual archives such as those created when pressing the Archive button in the Administration Status settings is determined by the Limit Controllers To preference (drop down menu shown below the Controller Archive Directory). When you have reached the set number of archives, the program will first create the new archive before removing the oldest. If you would like to recover data from a previous archive, the Restore From Archive button can be located in the Administration Status settings.
- Data Station Archive Directory. This is the directory that is used when an operator initiates an archive from an individual Data Station. COMPanion suggests that this archive be stored in a location other than the Controller-Initiated Archives (above). Controlled Data Stations will obtain this directory from the Controller on startup and every time the setting is changed. This secondary directory is a great location from which your IT technicians can perform supplementary backups.
- Limit Controllers to. You can limit your Controller to 1-14 archives; default is 7 Archives.
- Limit Data Stations to. You can limit your individual Data Stations to 1-14 archives; default is 5 Archives.
- Archive Controlled Data Stations Now. This performs an immediate, manual archive of your controlled databases; manual archives should be performed before making any large-scale changes such as imports, updates, utilities, or machine upgrades. During an archive, all information in each Data Station's Data folder is copied to the Data Stations Archive Directory you've configured. Additionally, all services on your Data Stations are temporarily disabled.
These Email settings apply to all sites and contain configurable settings for the entire catalog; they are available for both Centralized and Distributed Catalog. These settings also appear for those benefiting from our Cloud-Hosted services.
The way our email system was designed and configured is not quite like that of a personal email client—which rarely sends out more than a few emails at a time; it was designed to potentially cope with hundreds of emails (e.g. generated reports or patron notification) being sent (or resent) over many machines at the same time. Our email throttling defaults are quite effective at spreading out and resending dozens of undeliverable emails without interfering with the sends of those that are deliverable.
If a send fails, the next resend time is generated by adding a random value between 3 and 9 minutes, spreading out the resend times so all the undelivered email still in the “short range” period isn't sent at the same time. If a send hasn't succeeded by the end of the “short range” period, the program will generate new send times using random values between 60 and 90 minutes. This is useful because, in most cases, an undeliverable email can usually be delivered a few minutes later; on the flip side, if an email isn't delivered within the first hour, it might take several hours (or even days) to be successfully delivered. If it still hasn't succeeded after 100 hours (generally referred to as the “give-up” time by the RFC), the email is discarded and a “return-to-sender” email will be sent.
Email Settings
Use the Email settings to configure how Alexandria communicates with your library's email server.
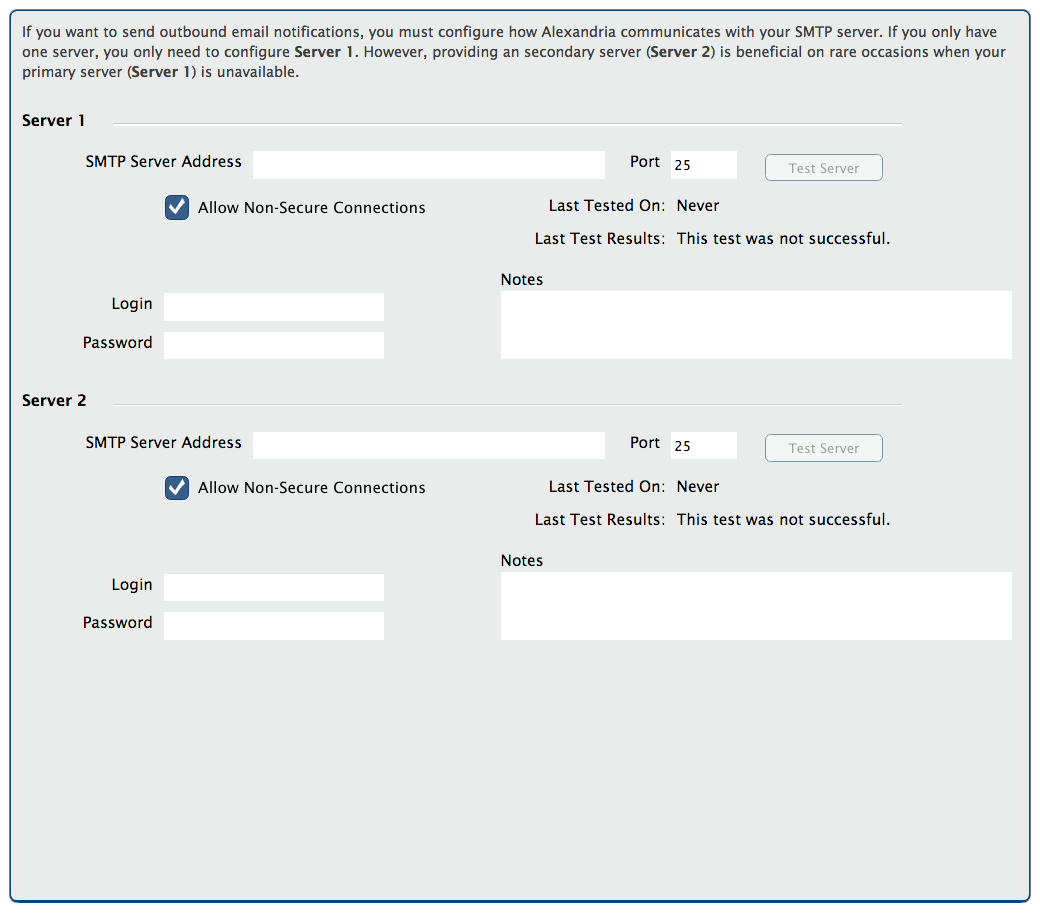
The Server 1 and Server 2 sections are used for out-bound email. The Test Server button will send a test email using your provided SMTP settings. Please contact COMPanion's Technical Support if you have additional questions about setting up your mail server.
- SMTP Server 1 and 2. This is the TCP/IP or DNS address of your library's mail server. Typically, this will be “mail” followed by your domain name. You must enter a valid SMTP Server Address to use email services.
- Port. Supply the port number that your email server uses.
- Allow Non-Secure Connections. Alexandria uses Transport Layer Security (TLS) for secure web communications, when this setting is enabled checked the system will use non-TLS connections if it cannot make an TLS connection.
- Log In. Enter the login (user identification) for the email server.
- Password. Enter the password for the email server.
- Test Server. Test the SMTP Server settings by sending a test email.
- Last Tested On. This field displays the last date/time that the server test was performed.
- Last Test Results. Reports on whether the test was successful or not.
Setting Up Your SMTP Server
The monitor interface gives you access to vital Controller capabilities and settings anywhere around the world; the ability to remotely start or stop controlled Data Stations proves invaluable in times of crisis.
This is where you add, remove, start, stop, restart, rebuild, archive, and configure all of your controlled Data Stations. The monitor interface can be easily broken down into two diverse sections:
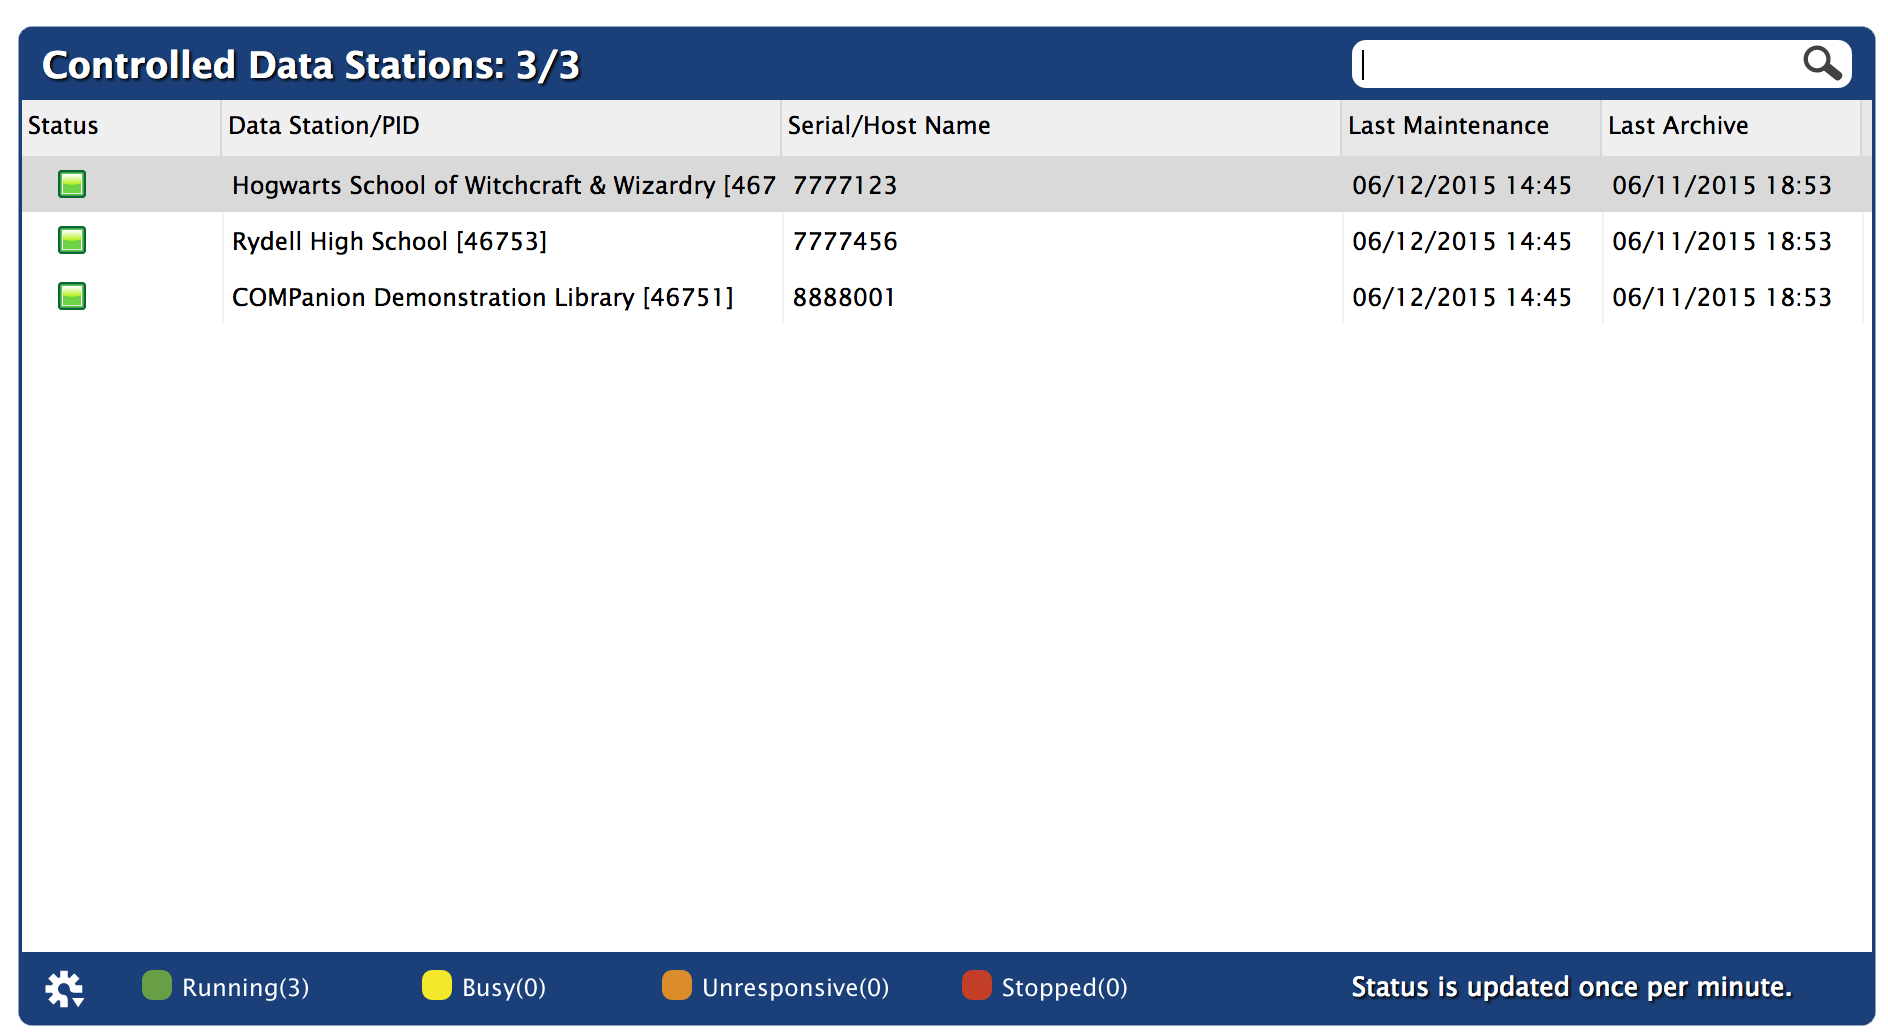
- The top portion is comprised of your managed Data Stations; listed is their current status, serial number/host name, and most recent maintenance.
- The bottom section contains the Controller Log.
Monitor Settings
The top of the monitor interface is comprised of a list of managed Data Stations which can not be rearranged or re-ordered. This list contains information about which Data Stations are active or stopped, their names, serial numbers, IP address, and port numbers.
The Search box at the top-right allows you to quickly isolate a Data Station from the list. Start typing information into the field (e.g. Data Station/PID or Serial/Host Name) and the managed Data Station that most closely matches your criteria will remain. This makes it easy to quickly locate a managed Data Station.

Use the Running, Busy, Unresponsive, and Stopped filters to only show (or hide) Data Stations with corresponding statuses. If there are no Data Stations with matching statuses, the full list will be displayed.

The selections contained in the Actions menu of the monitor interface can be used in conjunction with selected (highlighted) Data Stations; for example, you can Start Selected (currently inactive) or Stop Selected (currently active) Data Stations.
Controlled Data Stations Actions Menu
Actions menu. Allows you to perform a number of useful functions and operations, including modifying managed Data Station's Administration settings (e.g. configure email, set web options, etc.), Add or Remove a Data Station, assign a time zone, or perform an archive or rebuild on a selected Data folder.
Edit Configuration File. Allows you to edit the selected Data Station's “Configuration.txt” file to update your registration information. When a Data Station is newly added to the list, it preserves the Controller's default settings; use the Edit Configuration command to customize them.
Start Selected. If you would like to manually start a selected, disabled Data Station, select Start Selected.
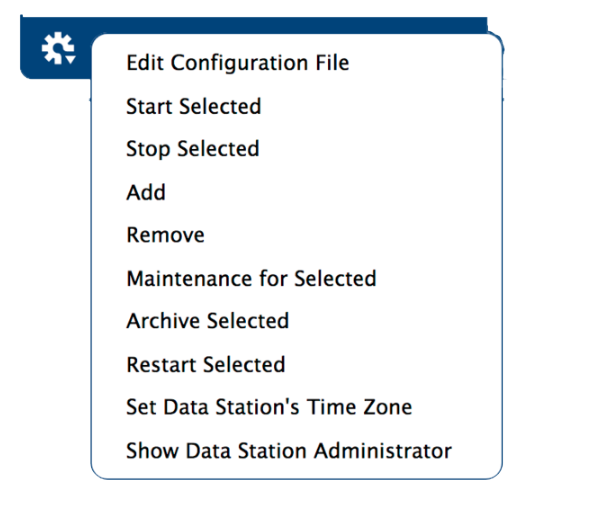
Stop Selected. If you would like to manually stop a selected, active Data Station, select Stop Selected.
Add. You may also click on the Add button, causing a message window to appear. You will be given a choice to Add a new Data folder or Create a new one. If you wish to do neither, click Cancel. For more information on importing or creating new Data Stations, please review Adding New / Existing Data Stations
Remove. If you wish, you may also choose to Remove a selected (i.e. highlighted) Data Station from the management list. Use caution before removing a Data Station; the entire Alexandria Support folder (including your Data folders) will be permanently deleted. This cannot be undone. Removing a Data Station will also remove all of its data and support files. This can not be undone!
Maintenance for Selected. This examines your selected Data Station's database files then performs Patron, Item, and Circulation validation routine. If database damage is detected, it will be recorded in the server log.
Archive Selected. This performs an immediate, manual archive of the selected Data Station's database; manual archives should be performed before making any large-scale changes to your database, such as imports, updates, or utilities. During an archive, all information in the Data Station's Data folder is copied into the Archive Directory you've configured. Additionally, all services on the Data Station are temporarily disabled.
Restart Selected. This allows you to restart the selected Data Station from the list. During the restart duration, Alexandria services, interfaces, and modules will be unavailable to all patrons and operators. Essentially, this is a stop and start routine contained in a single, convenient selection.
Set Data Station's Time Zone. The ability to control remote collections from around the world using a single IP address requires precise time zone settings. For example, if your Controller runs under pacific daylight time (PDE) and you're hosting a Data Station on the east coast (EST), setting the correct time zones for this client will ensure that transactions and other time stamps are recorded to the database at the time they occurred for the Data Station, not for the Controller.
Show Data Station Administration. Opens the Administration interface for Controlled Data Stations in a new browser window. Controlled Data Stations have fewer Administration settings, lacking both Web and Database tabs.
The Controller Log
The bottom half of the monitor interface contain the Controller's log. This log captures and stores all pertinent Controller information, including when each Data Station is stopped or started, and any special operations (e.g. archive or rebuild) that have been initiated or performed.
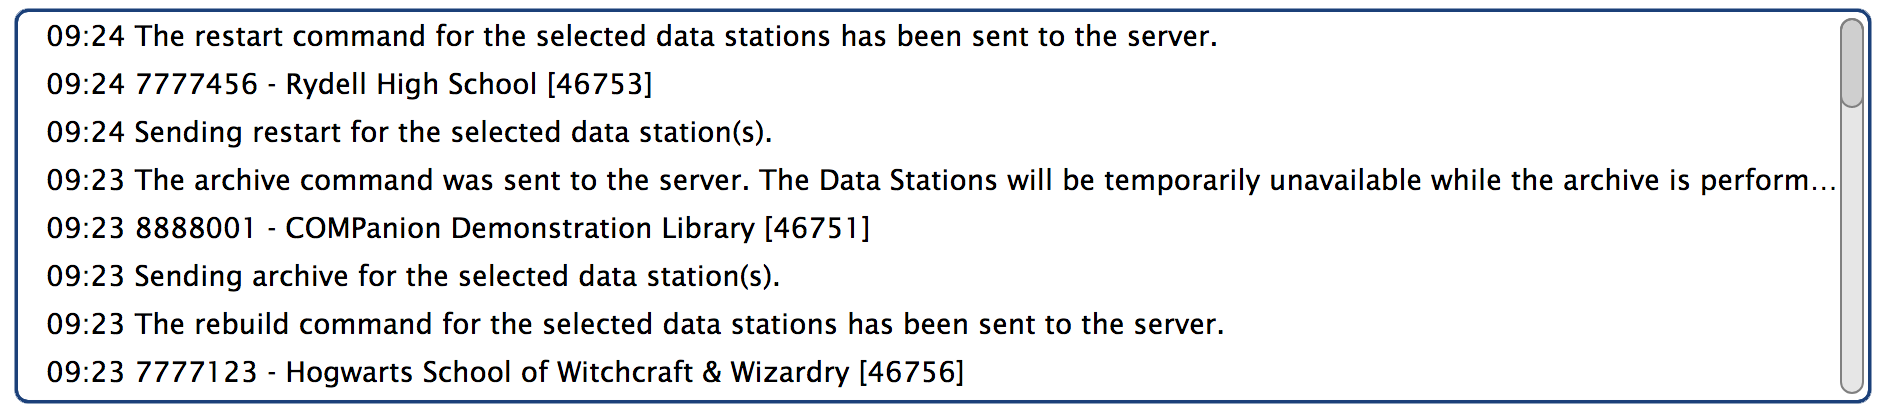
While in this section, you may select Print from the File menu to print the log. The controller log is automatically saved by the Controller. Logs are saved inside the Log folder, located in the Alexandria Controller Support program directory.
Activating Alexandria Data Stations on the Controller
These Database settings only appear for those running a Centralized Catalog, Distributed Catalog, or an independently operated Data Station in a Distributed Catalog. Data Station Administration settings apply to all sites and contain configurable settings for the entire union.
Settings in the Settings interface allow you to configure the Controller to operate in your native language.
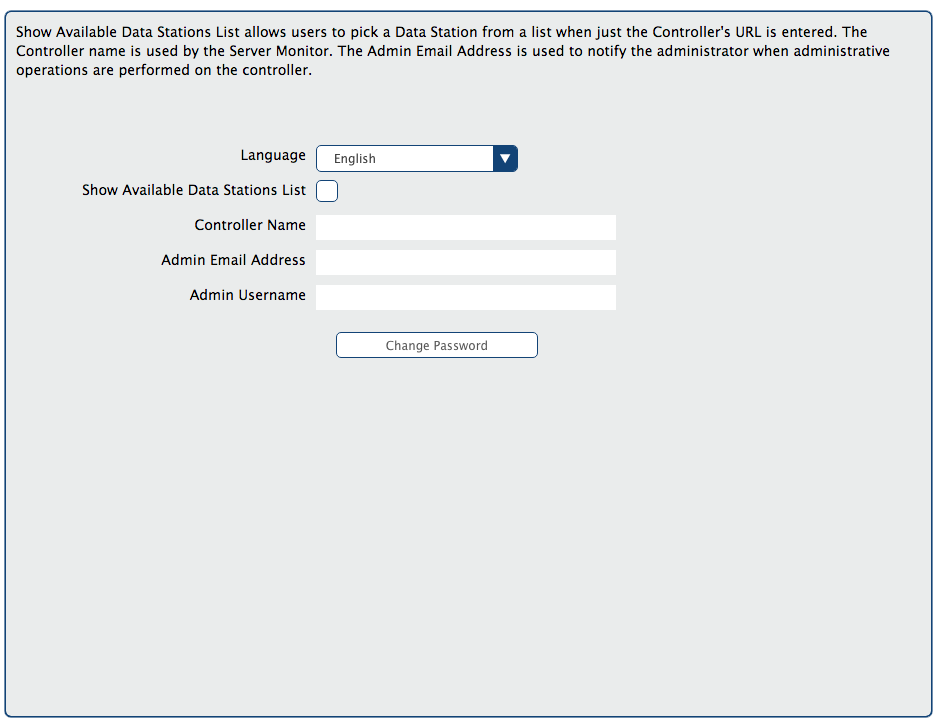
The Show Available Data Stations list allows users to pick a Data Station from a list when just the Controller's URL is entered. The Controller name is use by the Monitor interface. The Admin Email Address is used to notify the administrator when administrative operations are performed on the Controller.
System Settings
- Language. The language selected here will be the default for the Controller; you may choose from one of our currently supported languages: English, Spanish (Español), or French (Français). Changing the default language requires a browser refresh to take effect on the web.
- Show Available Data Stations. If no serial number is specified in the URL when a web client connects, this preference shows a list of available sites to pick from; if disabled for security purposes, you can show the user an error indicating that no such page exists.
- Controller Name. Enter the name of your Alexandria Controller; the default is your district name.
- Admin Email Address. This is the Controller Admin operator's email address, which is used as the return mail address for notices and other email messages sent by Alexandria. To guarantee that your email notifications are being sent, please check the list of requirements located under your Email settings. You must enter a valid email address to use most email services, including COMPanion's Customer Support services.
- Admin Username. This is the Username of your Alexandria Controller Administrator.
- Change Password. Select this option to change the current password for logging into the Controller.
The Web settings apply to all sites and contain configurable settings for the entire catalog; they are available for both Centralized Catalog and Distributed Catalog.
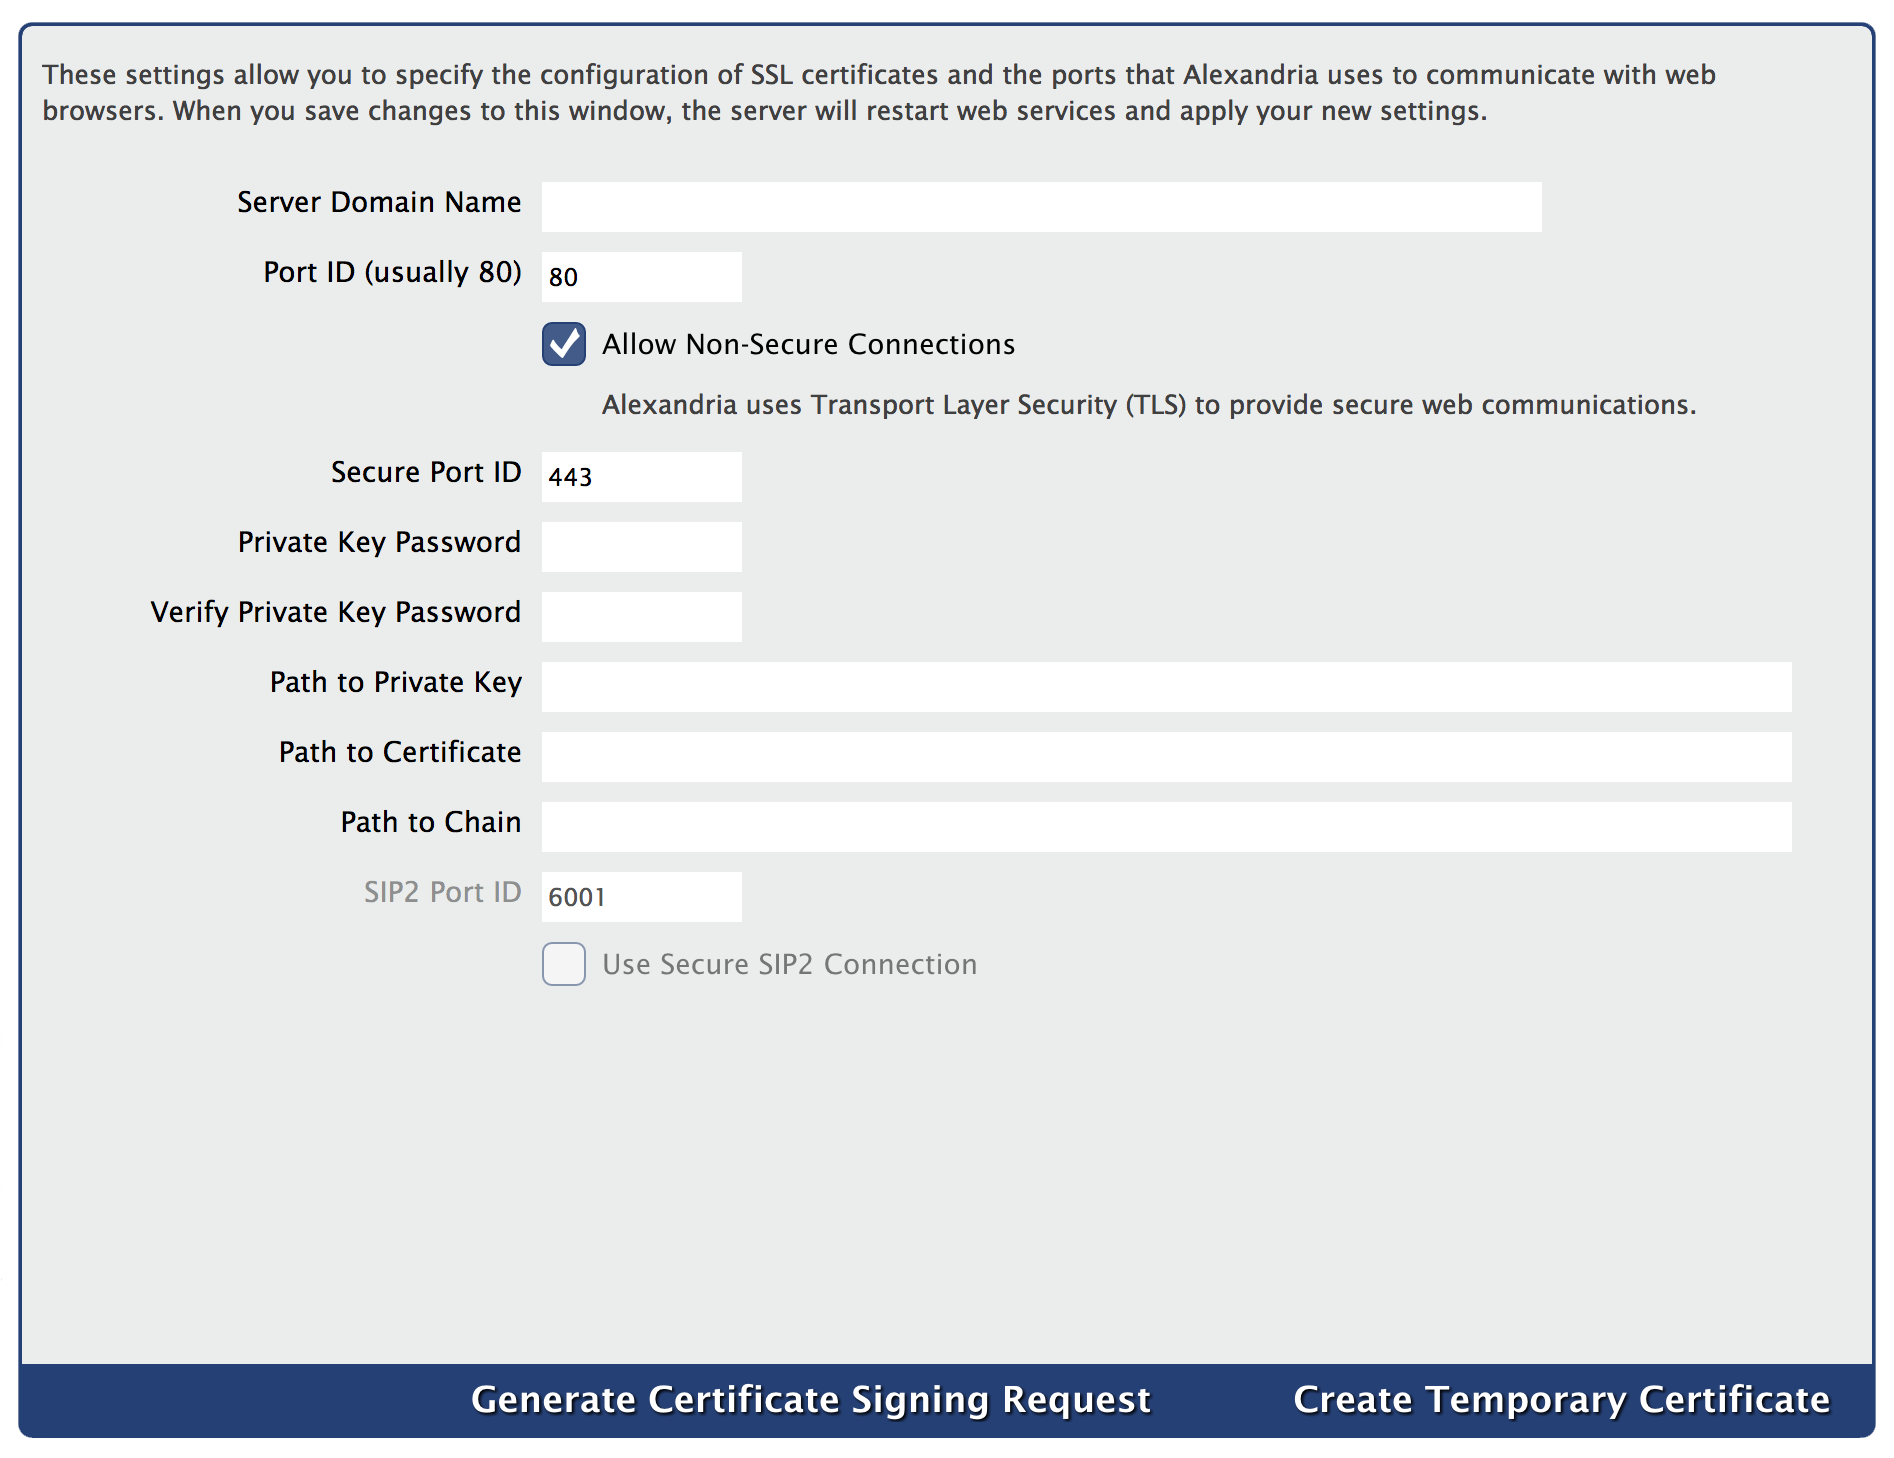
These settings allow you to configure the certificates, ports, and server domain names that Alexandria uses to communicate with web browsers. When you save changes to this window, the Data Station will apply your new settings and restart web services.
Web Settings
Alexandria uses Transport Layer Security (TLS) for secure web communications.
- Server Domain Name. Provide the domain name (if a domain name system is preferred over a plain IP address) that helps clients connect to the Data Station after a web install.
- Port ID (usually 80). This sets the port number used to access your web services and modules (this is usually 80).
- Allow Non-Secure Connections. This setting is enabled the first time you log into Alexandria, however if you wish to maintain a secure connection for web communications you will need to disable the setting by unchecking the box and clicking Save.
- Secure Port ID (Usually 443). Enter the port number used for the secure web interface. The default is 443.
- Private Key (optional). If the private key requires a password, enter it in this field.
- Verify Private Key Password. Verify the private key password.
When it comes to TLS certificates, “file specifications” stand for the correct (and required) directory location, file name, and file extension (e.g. C:\Program Data\Alexandria Support\SSL\*.pem) of your keys/certificates on the Data Station. Accurate file specifications must be provided in order for the key/certificates to be accessed.
- Path to Private Key. This is the file name and location of the Data Station’s private key. The file name and location may be entered or changed manually on a connected Web or Librarian Workstation, but it must follow the correct file specifications. Only certificates in PEM format are recognized.
- Path to Certificate. This is the file name and location of the Data Station’s public certificate. The file name and location may be entered or changed manually on a connected Web or Librarian Workstation, but it must follow the correct file specifications. Only certificates in PEM format are recognized.
- Path to Chain (optional). This is the file name and location of the Data Station’s chain file. The file name and location may be entered or changed manually on a connected Web or Librarian Workstation, but it must follow the correct file specifications. Only certificates in PEM format are recognized.
- SIP2 Port ID. Enter the port number used for the SIP2 communications. The default is 6001.
- Use Secure SIP2 Connection. Enable this setting if you are using a Secure SIP2 Connection
The PEM format (Privacy Enhanced Mail), an early standard for securing electronic email; the PEM format is not widely adopted as an internet mail standard.
Generating Certificates
- Create Temporary Certificate. If clicked, a temporary private key and public certificate will be created with help from Alexandria’s registration information and saved to the default path and location specified above; they will expire 365 days after creation.
Temporary certificates that Alexandria generates are always saved to the SSL folder in the Alexandria Support folder, even if the Path to Certificate that you entered is different than the SSL folder. Since we do not require certificates to exist, Alexandria does not test to see if the Path to Certificate is valid, even if the path entered is different than the default. Alexandria does not relocate certificates from any location.
- Generate Certificate Signing Request. If clicked, then a request for a certificate will be created. This request can be sent to a certificate authority.
The Microsoft Certificate Server is not supported; you will have to use a code signing authority such as GoDaddy™, Comodo ©, or VeriSign™.