The Support Center has moved!! See the new website https://support.goalexandria.com/ ![]()

Getting Started
The root page ALEX:Getting Started Resources could not be found in space Alexandria.
How helpful was this page?
End-of-Year Procedures
Last Updated: $action.dateFormatter.formatDateTime($content.getLastModificationDate())

End-of-Year Procedures
Planning ahead is crucial for a completely stress-free end of the school year and a smoother transition into the next one. Here are the steps we suggest you follow. Some of these steps can be performed during the beginning or end of year procedures. Choose the steps that work best for your library!
An archive should be made prior to running any of the data-changing utilities described below. This way, you have a restore point if something unexpected happens. We also recommend creating a back up if you are Self-Hosted.
Calendars & Period Due Dates
The page ALIB:V70 Tech Videos was not found -- Please check/update the page name used in the MultiExcerpt-Include macro
In most school libraries, circulation stops at the end of the school year and items that are still loaned out need to be returned. Properly configuring your Calendars preferences and assigning Period Due dates can help automate this process by prompting patrons to return loaned items before the end of the year.
- To do this, go to your Calendars preferences.
- Click twice on a calendar day near the end of the academic year to mark it as a Period Due. Remember, a period due date is when you want items returned to the library. Therefore, it is important to select a date early enough for overdue notices to be sent out for all outstanding circulation and give patrons enough time for returns. Period due dates only pertain to patrons who have Apply Period Due Date marked as part of their policy settings.
Keep in mind that Alexandria does not adjust due dates after an item has been checked out; therefore, it's important to set period due dates as soon as possible so that any overlapping circulation periods are shortened to allow items to be returned on time.
Although you can set up calendars for up to three years ahead, we do recommend checking your Calendars preferences at the beginning and end of each school year. In fact, since you're already adjusting your Calendars preferences, you may want to prepare the calendar for the next school year or summer circulation, if applicable.
Hard Due Dates
Some libraries use hard due dates on certain policies to allow items to be checked out all year. However, if your library is using hard due dates to control extended check out periods, those dates must be changed before circulation can resume next year. If you don't use hard due dates, you may skip this step.
- Select Policies from your Preferences module.
- On the Item Policy side, under the Check Out subtab, you can update or remove the Hard Due Date.
Hard Due Dates only apply to items if they have one specified in their item policy. Remember that hard due dates override all other due dates, including period due dates (above). For example, if you set a period due date of June 1st, but your Equipment item policy has a May 2nd hard due date, then items under the Equipment policy will be due on May 2nd.
Inventory
Next, use Inventory Management to perform an end-of-year inventory so that you know exactly what you have, where it is, and what is missing—putting you in a better position to analyze and organize your collection.
Performing inventory can be a lengthy process. Once you start, Alexandria will regularly save everything you've inventoried up to now until you are finished; we call this an inventory “session”. You can stop or pause your session at any time and when you are ready to resume, Alexandria will begin where you left off.
If you're part of a Centralized Catalog, each collection is typically stored at different locations and requires you to perform independent inventories. A single-site configuration can perform inventory in one large—or several smaller—inventory sessions.
For more information on performing end-of-year inventory, please review our Inventory Management documentation here.
Loaned Items Reports
The page ALIB:V70 Tech Videos was not found -- Please check/update the page name used in the MultiExcerpt-Include macro
Before closing your library, you will need to run a Loaned Items Information report to find out what materials are still checked out.
- Select Reports from the Tools module.
- Expand the Circulation category and then click the Information subcategory.
- Select Loaned Items Information from the Report Selection pane.
- In the Options tab, select the relevant Sort by options and 1 Line as the Format.
- Finally, Run the report to send it to the Operations Management queue.
If you perform the report with the suggested (or default) settings, it will show all items that are currently loaned out, even those not yet overdue.
From here, you can determine which items should be marked as lost or discarded and what fees and fines should be charged.
Declare Missing Items Lost
When items are still checked out after they should have been returned, you can run a utility to mark all the items from your Loaned Items Information report (above) as Lost.
- Select Utilities from the Tools module.
- Select the Copies category.
- Select Declare Missing Copies Lost from the Utilities Selection pane.
- Fill in your Inventory Start Date.
- Click Run to perform the utility; this moves all currently checked out items (that were not inventoried since the specified Inventory Start Date) to the Lost Copies System Patron (barcode 1) and automatically charges the responsible patrons accordingly.
If an item is returned after this utility has been performed, its Status will return to Available upon bookdrop; any patron charges will be removed and/or their accounts credited.
Additionally, during Inventory, before you Complete Session, there is a utility that lets you Declare Missing Items as Lost. This will change the Status of all items not inventoried from Available to Lost.
If you choose not to perform this utility during inventory, you can perform it later; here's how:
- Select Utilities from the Tools module.
- Select the Copies category.
- Select Declare Missing Copies Lost from the Utilities Selection pane.
- In the Selections tab, provide your Inventory Start Date.
- Click Run to perform the utility.
Remove Lost and Discarded Items
Next, you may want to permanently remove Lost and/or Discarded items at the end of the school year.
Before you do that, however, you should run reports to verify which items should be removed.
- Select Reports from the Tools module.
- Expand the Copies category and then click the Special Status subcategory.
- You can select the Discarded Copies and Lost Copies reports from the Report Selection pane.
- If you've been providing meaningful reasons during item discard, the Reordering Details report will help isolate items you want to reorder. You’ll find this report in the Copies category under the Information subcategory.
- Run these reports to send them to the Operations Management queue.
In order to remove lost and discarded items:
- Select Utilities from the Tools module.
- Select the Copies category.
- Select Remove Discarded Copies and/or Remove Lost Copies from the Utilities Selection pane.
- The utility defaults are set to remove all lost or discarded copies; however, you can also remove them based on a relative date range. For example, you may want select a period before your last Inventory date, so that any items that were recently declared lost or discarded will remain in the system for a while longer, giving them an opportunity to return.
- If you need to be more specific, you can check the Show Additional Selections box to select copies by individual barcodes.
- Click Run to perform the utility; this will permanently remove all currently lost or discarded items.
Be aware that once you've removed lost and/or discarded copies, those records are permanently and completely removed from your collection.
Advancing Patron Grades
Do you manage patron data via SIF?
Skip this step if you import and update patron data via SIF; do not rearrange the Grade Table or Advance All Grades
The page ALIB:V70 Tech Videos was not found -- Please check/update the page name used in the MultiExcerpt-Include macro
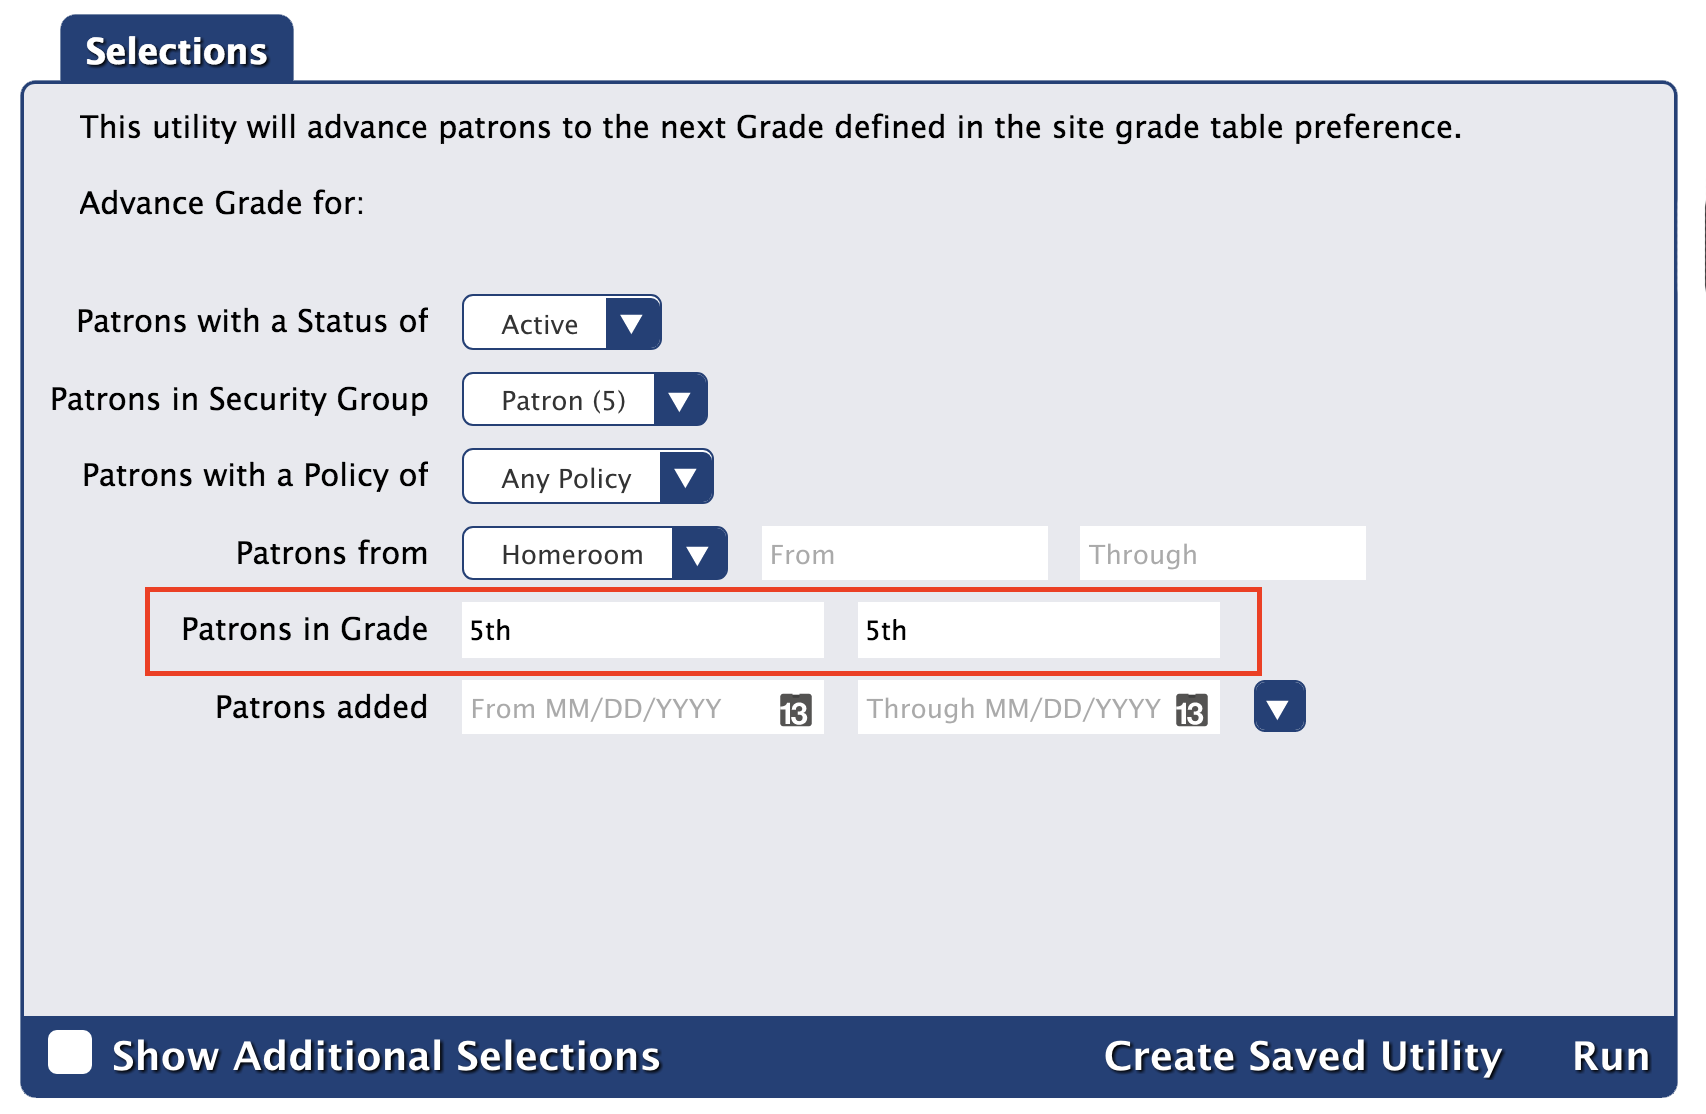
Now it’s time to advance your patron's grades to prepare for next year's students.
- Select Patrons from your Preferences module.
- Next, select the Grade Table tab.
- While you're here, double-check the grade table and the Last Grade field for accuracy.
- If necessary, update the Advance Grade After date—this is usually the graduation date or the last day of school.
- Click Advance All Grades to manually advance your patrons to the next level in the grade table. Patrons who advance past the final grade in the grade table are assigned the Last Grade value (usually Graduated).

If you need to be more exact, you can use the Advance Patron Level utility to select patrons by barcode, security group, policy, or more:
- Select Utilities from the Tools module.
- Expand the Patrons category and then click the General subcategory.
- Select Advance Patron Level from the Utilities Selection pane.
- Use the Selections tab and/or the Show Additional Selections options to select individual or groups of patrons by specific criteria.
- Click Run to perform the utility.
Remove Graduated Students
Retained Graduated Patrons
Skip this step if you retain your graduated patron records; however, be sure to set up a Graduated policy and assign it to all freshly graduated patrons.
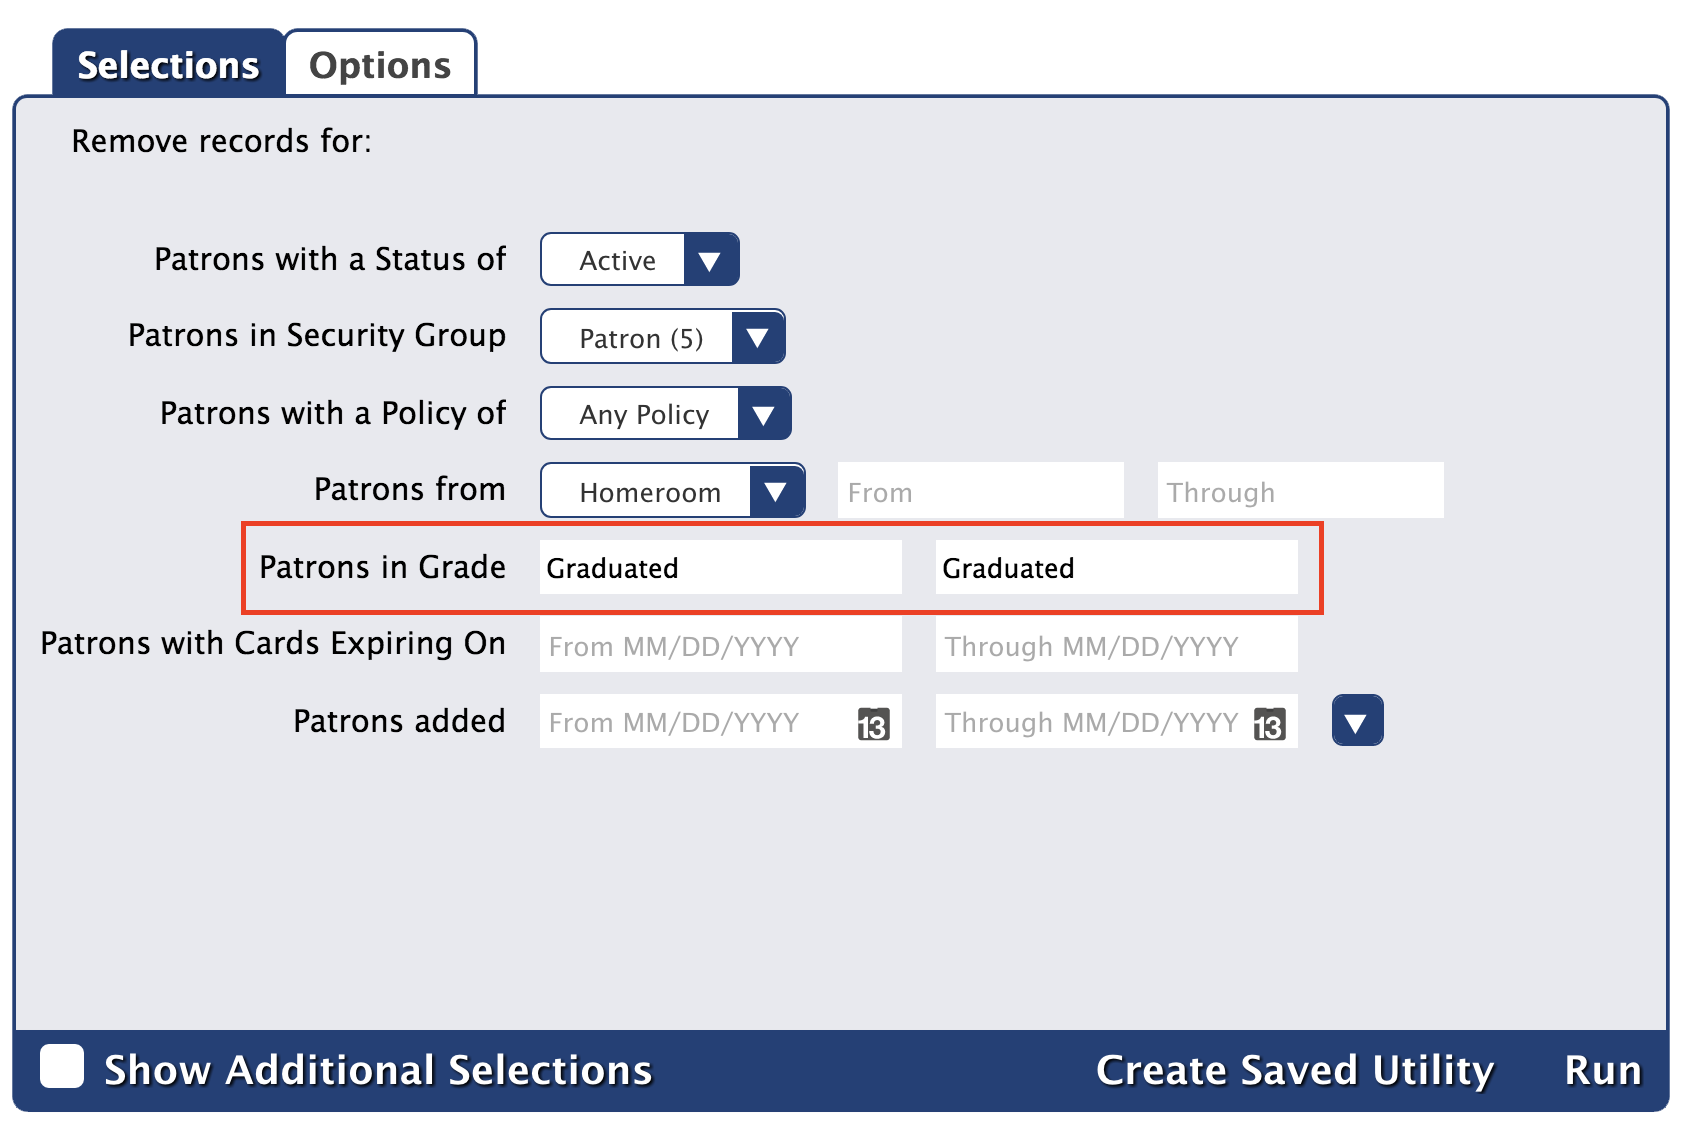
Next, you may want to remove those graduated patrons from your system.
- Select Utilities from the Tools module.
- Expand the Patrons category and then click the General subcategory.
- Select Remove Patrons from the Utilities Selection pane.
- In the Selections tab, provide the user-defined value for Last Grade (most commonly “Graduated”) in the Patrons in Level field. This value is defined in your Grade Table preferences.
- If needed, use the Selections and Options tabs to select individual patrons—or groups of patrons—by specific criteria.
- Click Run to remove your graduated patrons.
Update Your Patron's Policies
Single Patron Policy
You may skip this step if you use a comprehensive or all-encompassing policy for your patrons (i.e. Standard Patron).
Retained Graduated Patrons
If you retain your graduated patron records and have a Graduated policy, assign this policy to all freshly graduated patrons before going any further.
Some libraries prefer assigning a corresponding policy for each grade; for example, a policy that allows tenth graders to check items out for longer periods than second graders. Since you've just advanced each patron's Grade level, it's likely you'll have to update their individual Policy setting to match as well.
- Select Utilities from the Tools module.
- Expand the Patrons category and then click the General subcategory.
- Select Change Patron Policy from the Utilities Selection pane.
- In the Selections tab, enter a grade in the Patrons in Level field exactly how it’s saved in the Grade Table to select the patrons whose policy you'd like to update (e.g. 8th).
- Next, in the Options tab, use the Change Policy to drop-down menu to select the new policy (e.g. Middle Student).
- If needed, you can use the Selections and Options tabs to select individual patrons—or groups of patrons—by specific criteria.
- Click Run and repeat, as needed, to assign other levels with their corresponding policies.
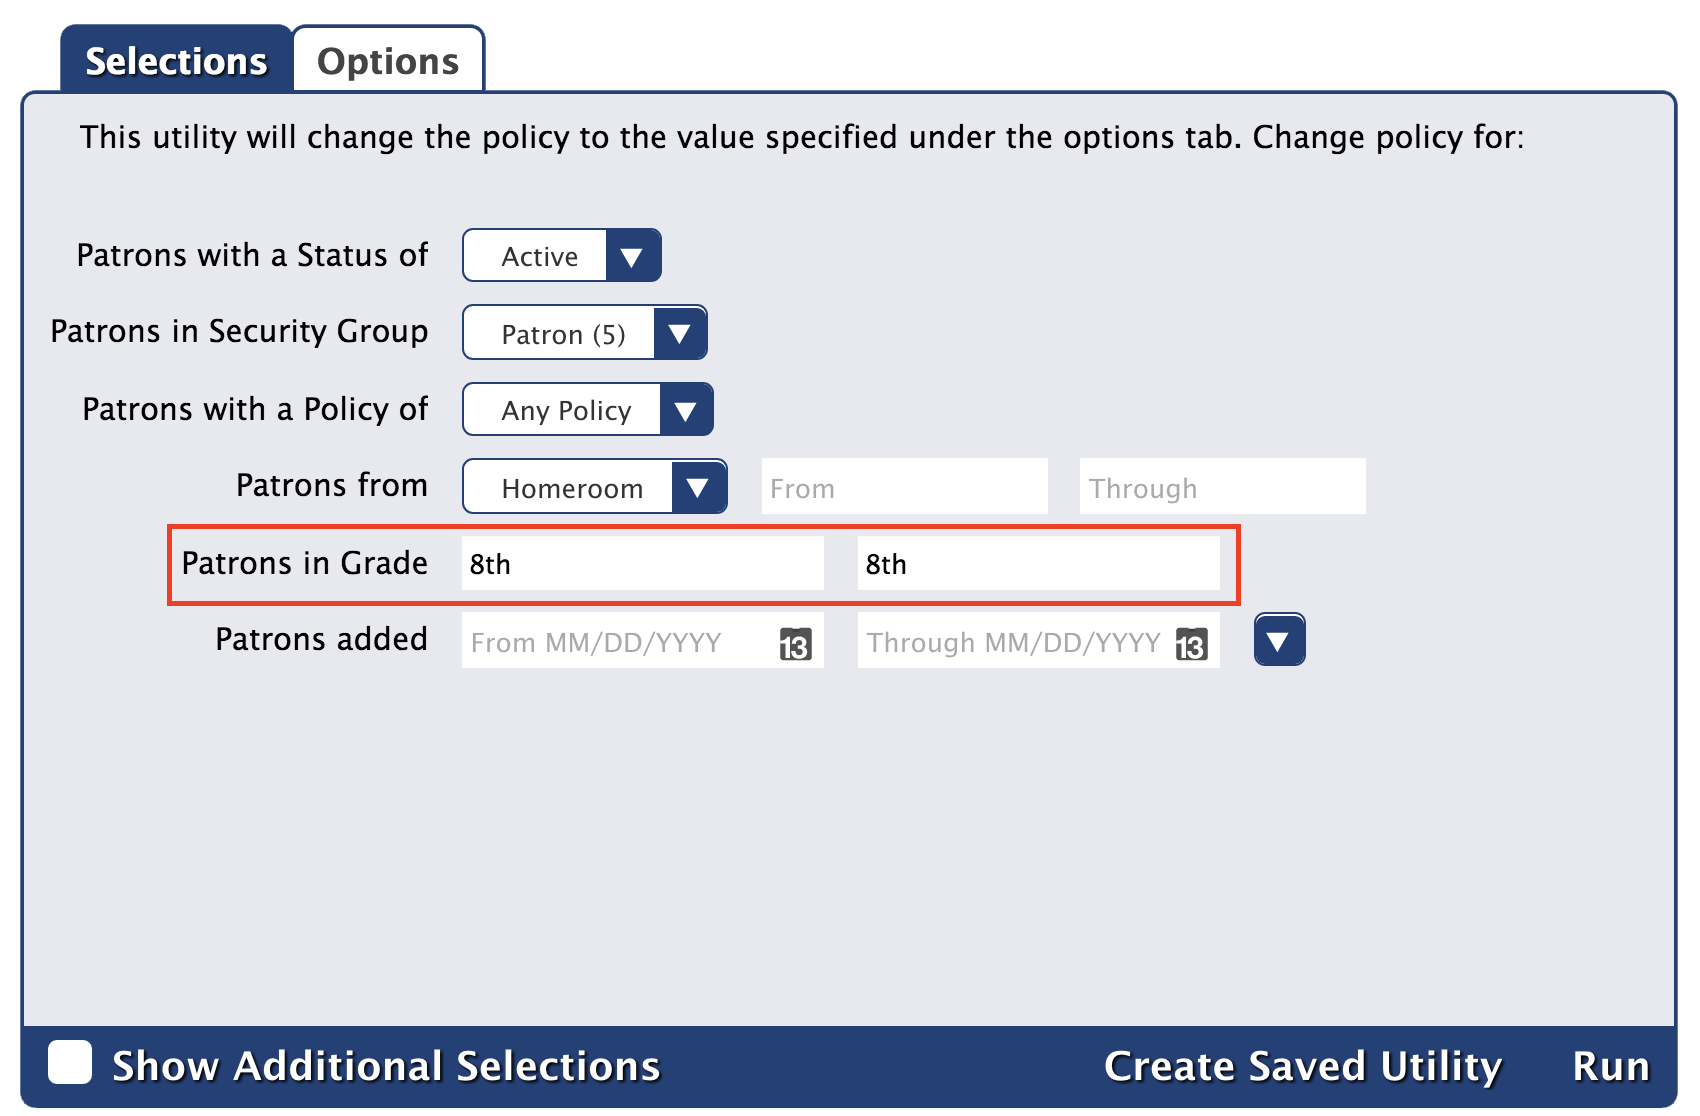

A patron should not have their Policy setting updated until after their Grade has been advanced for next year. Therefore, ideally, these policy changes should either be made at the end of the current school year or the beginning of the next one.
Backup (Self-Hosted only)
Are you Cloud-Hosted?
Cloud-Hosted users may skip this step; backups are only necessary if you're Self-Hosted.
If you're Self-Hosted, the final step before closing your library is to make a permanent backup of your Alexandria Data folder. Unlike an archive, this backup is considered a “last-resort” in case everything else fails. Therefore, stowing this backup on your Data Station or saving it to a USB Flash Drive kept next to your computer isn't sufficient.
Here are our recommendations:
- If you backup to a portable storage device, make sure it’s stored in a fire-resistant safe or, better yet, outside of your library—even off-campus.
- Use a file hosting or cloud storage service such as Dropbox (www.dropbox.com) or CrashPlan (www.crashplan.com) which are specifically designed to backup to other machines or off-site servers.
The end of the year is a good time to review and/or revise your backup strategy. Also, examine the hard drives or portable storage devices on which your backups are stored; they may require maintenance or replacement. Although we hope you'll never need to use it, creating a backup of your valuable data is a simple task that proves invaluable in the worst of scenarios.
- For more information on creating a backup, review our Backup section.
- Please review the Administration settings for more information on enabling automatic archives.
Other Considerations
This concludes our steps for a successful end-of-year closure library closure.
In order to keep things running smoothly, remember to:
- Configure your policies appropriately.
- Ensure that your patrons and/or items are assigned the correct policies.
- Establish your period due dates early.
- Keep descriptive Discard reasons to easily reorder new items.
- Perform an Inventory in small sessions be sure and run all the necessary reports and utilities at the end.
- If you're Self-Hosted, be sure to back up your data.