The Support Center has moved!! See the new website https://support.goalexandria.com/ ![]()

Circulation
The root page ALEX:Circulation could not be found in space Alexandria.
How helpful was this page?
Related Blog Posts
Blog Posts
-
Librarian hack: schedule your overdue notices
created by
Sep 13, 2023
-
Circulation: Items out tab
created by
Mar 21, 2023
-
Circulation: homeroom tab
created by
Mar 15, 2023
-
Circulation: command line
created by
Mar 08, 2023
-
Overdue items notices–"Yes, I am sending them"
created by
Jan 25, 2023
-
Transaction Scripts–Not just for inventory
created by
Nov 26, 2022
-
Keep track of items on display
created by
Nov 02, 2022
-
Shortcut to vendors
created by
Oct 13, 2022
-
Cash drawer report to the rescue!
created by
Oct 04, 2022
-
When does an overdue item become lost?
created by
Mar 15, 2022
Navigating the Circulation Module
Last Updated: $action.dateFormatter.formatDateTime($content.getLastModificationDate())

The Circulation module is the Librarian's primary module, used to perform general library activities such as issuing books, placing hold requests and reservations, processing fees, fines, payments, and renewing books. You can also perform special functions such as inventory, cataloging, record viewing and updating.
Click here for a complete list of circulation commands.
The Circulation window can be divided into three distinct, yet integrated, sections: Circulation Controls Current Patron and Item Panes Circulation Tabs
The top of the Circulation interface contains the Actions menu, the selected Circulation Mode drop-down menu, the Command Line, the Message Center, the Operations Management, and online Support Center buttons.
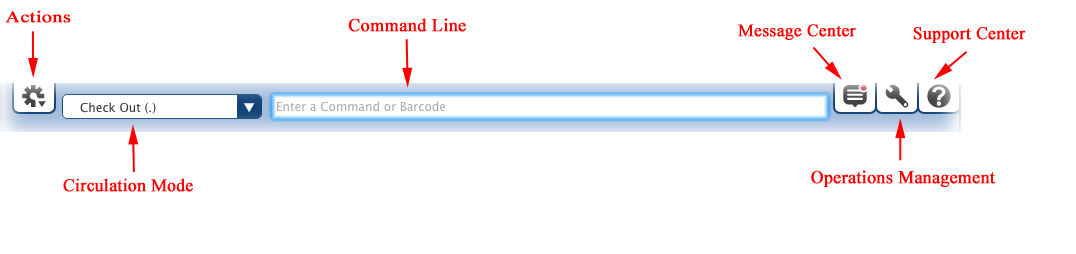
Actions menu
The Actions ![]() dropdown menu contains specialized circulation functions such as the Advanced Bookings and Process Pending Bookings commands.
dropdown menu contains specialized circulation functions such as the Advanced Bookings and Process Pending Bookings commands.
- Cash Drawer Balance. If you dispense or collect cash for lost or damaged materials—i.e. refunds or payments, the Cash Drawer Balance selection helps tally your cash drawer and safeguards against loss. Provide the cash drawer Staring Balance, Start Date (date you want the report to begin), and End Date (through date that you want the report to cover) and click OK. The report totals your payments and refunds and performs all the calculations for you; results include patron barcode numbers, dates and descriptions of charges, total refunds and/or payments, the initial balance, and your new balance.
- Advanced Bookings. This will open the Advanced Bookings window, which allows you to process reservations that begin on or between two selected dates.
- Process Pending Bookings. This performs the Process Pending Bookings command, which checks to see if any of the unavailable items have recently become available. If they have, they're automatically assigned to the requesting patron.
- Log Out. Allows the Librarian to log out.
- Switch Site. This option is only available for libraries that are a part of a Centralized Catalog. It opens the Select A Site window, which allows an operator to select which site(s) they would like to log into; however, the choices offered depend on the sites that the operator has permission to access (review the Site Access window for more information). Therefore, an operator may have access to multiple sites, but not all the sites defined in the Sites Management window. The default selection in the window is always the last site that operator logged into.
Circulation mode
You may select a Circulation Mode from the corresponding drop-down menu, located to the left of the Command Line. The Circulation Mode field indicates which function will be implemented when patron/item barcodes are typed or scanned. Frequently used modes are Bookdrop (B), Check Out (.), Hold (H), and Renewal (R).
- Bookdrop (B). Used to check in items for one—or many—patrons.
- Change Destination Mode (NT). Note: This option is available only in Centralized Catalog systems. This changes the destination of copies whose Status is currently In Transit to somewhere else.
- Check Out (.). Typically used to check out library material to patrons however that depends on two things: the Check Out Options preference (which allows you to change the behavior of Check Out (.) mode), the “status” of the patron, and the item.
- Lost Copies (1). Used to move several copies to the Lost Copies System Patron (barcode # 1).
- Discard Mode (DM). Used to move several copies to the Discarded Copies System Patron and provide a note for each on why they are being discarded.
- Hold (H). This places a Hold on any items that are entered.
- Hold Copy (HC). This places a hold on a particular copy (specific item barcode) of a title for the current patron.
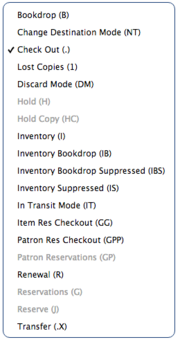
- Inventory (I). This updates the Inventory Date for all materials entered and triggers an alert for Circulation Exceptions.
- Inventory Bookdrop (IB). This updates the Inventory Date for all materials entered while simultaneously bookdropping them and triggers an alert for Circulation Exceptions.
- Inventory Bookdrop Suppressed (IBS). This updates the Inventory Date for all materials entered while simultaneously bookdropping them and bypasses any Circulation Exceptions alerts.
- Inventory Suppressed (IS). This updates the Inventory Date for each item entered and bypasses any Circulation Exceptions alerts.
- In Transit Mode (IT). This assigns checked out copies to the In Transit System Patron (barcode # 9). Afterward, the copy will be placed In Transit to its home library (whichever library is specified in the copy's Copy Site field).
- Item Res Checkout (GG). This is for checking out items that have been reserved by a patron; if the item is entered during a reservation date range it will be checked out to the patron who requested it and that patron will appear in the current patron pane.
- Patron Res Checkout (GPP). This checks out any reserved items a patron has if their patron barcode number is entered during the reservation date range and said item will appear in the current item pane.
- Patron Reservations (GP). This reserves a specific item (specific item barcode) for multiple patrons. This mode saves times when multiple patrons want to reserve the same item however it can't be used if there isn't a current item in the current item pane.
- Renewal (R). This renews currently checked out items.
- Reservations (G). This reserves a specified copy (specific item barcode) to the current patron for a specified date range.
- Reserve (J). This reserves a specified copy (specific item barcode) for the patron in the current patron pane. This mode can't be used if there isn't a patron in the current patron pane.
- Transfer (.X). This works exactly like the Check Out (.), with one exception: when the copy that is scanned is checked out to a patron other than your current patron, instead of allowing you to bookdrop the copy, the copy will be transferred to the current patron.
Command Line
The command line, located at the top-center of Circulation, is where you enter circulation commands or barcode numbers for patrons and items. If you enter only a barcode, the current Circulation Mode (shown to the left of the command line) will determine what action is performed. By default, the command line assumes that text input is a circulation command first and a patron/item barcode second.

- Override Date. An operator-provided Override Date can appear immediately after the Command Line (see above). The function of an override date depends on the current Circulation Mode; please review the Override Date Command section for more information.
 Alexandria's Message Center allows you to receive notifications from COMPanion and other third-party vendors; these notifications contain data or information from COMPanion or COMPanion-sanctioned vendors and will vary depending on what features you are licensed to use.
 Operation Management is a specialized repository where past and future operations (i.e. reports, utilities, exports, or imports) are sorted and stored. You can view operation summaries and open, email, or download saved operations that have previously completed.
 Online Support Center. Click the Help button to access a related section of our on-line Support Center. Alternately, you may use the Command Help tab at the bottom of the Circulation window; this contains a list of available commands and an explanation of how to use each one. Alternatively, you can click here for an extensive list (and explanation) of circulation commands.
Just below the Modes, Commands, and Help section of the Circulation window is where general information about the Current Patron and Current Item is displayed. These sections are nicknamed the Patron Card and Item Card, respectively.

Many Alexandria functions and commands depend on the Current Patron/Item. For example, you must have a Current Patron to check out, hold, or reserve an item.
Current Patron pane
The Current Patron pane consists of two areas: The larger, white area contains patron name, barcode, policy, homeroom, picture, and a short summary of the number of items checked out, on hold, reserved, with reservations, overdue, and the total fines or credits accrued; other things, such as the patron's current Lexile or Reading Level measurement, can be displayed here if you have your preferences set correctly.
The colored strip at the bottom of the pane contains buttons for Details, Notes, and Lookup; the Actionsmenu located at the bottom-right contains identical (and some exclusive) selections.
- Details. Contains the current patron's account status, including presently loaned items, holds, reservations, fees and other charges, and general patron information.
- Notes. Available when the current patron has associated contact, alert, categorical, or general notes. Notes are provided for patrons in the Notes tabs of Patrons Management. When clicked you are also able to add notes directly to the resulting Patron Notes dialog.
- Reserves. Provides a list of the current patron's reserves; you can remove some or all reserves from the resulting Patron Reserves dialog.
- History. Creates a Patron History report, containing the current patron's complete transaction history; if the patron's Keep Patron History box in the Statistics[1] tab of Patrons Management is not checked, only payment and fine history are collected for this and future assessments.
- Lookup. Opens the Patron Lookup dialog, allowing you to search your database for patron records; performs the same action as using the “L” command.
Current Item pane
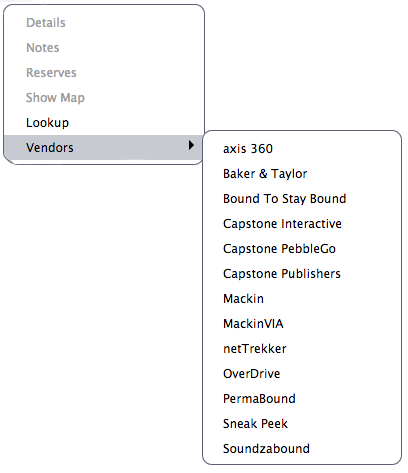
The Current Item pane consists of two areas: The white area contains the copy, barcode, policy, call number, status, picture, and a short summary of available title copies. The colored strip at the bottom of the pane is where the buttons for item Details, Copy Stats, Notes, and Lookup; the Actions menu located at the bottom-right contains identical (and some exclusive) selections.
- Details. Contains the status for all the copies of the associated title record; particulars include copies that are currently checked out, the patron(s) currently borrowing them, their due date(s), the bibliographic record, and any additional attachments.
- Notes. Available when the current copy has associated copy or alert notes. Notes are provided for copies in the Copies: Notes subtab of Items Management. When clicked, you are also able to add notes directly to the resulting Copy Notes dialog.
- Reserves. Provides you with a list of patrons with reserves on the current copy.
- Show Map. If the current copy's Call Number falls within the Call Number range of a corresponding map (created in Maps Management), selecting Show Map will display the the map, detailing where the copy is located in your library. These maps can be conveniently printed from your browser and handed to interested patrons. If the current copy lacks a Call Number (or there is no map with an associated call number range), the Show Map selection is disabled.
- Lookup. Opens an Item Lookup dialog, allowing you to search your catalog; performs the same function as using the “ST” command.
- Vendors. This selection opens a secondary menu containing a list of Alexandria third-party partners that, when selected, link to their respective websites. Individual vendors can be disabled from Extras Preferences.
Alexandria's Message Center allows you to receive notifications from COMPanion and other partners; these notifications contain data or information from COMPanion or COMPanion-sanctioned third parties and will vary depending on what features you are licensed to use. The interface for the Message Center window is comprised of a single list, with COMPanion messages shown first.
The Message Center icon resides alongside the Operations Management and Help icons in the Circulation module.
Click on the Message Center icon to open the Message Center and display a list of your notifications; when you have unread notifications or receive notification that new messages are available, a red dot appears on the Message Center icon. New messages are checked for when Alexandria performs Daily Chores.

Message Center: Basics
- Alexandria checks for new messages:
- During Daily Chores and
- anytime the Message Center interface is activated
Notifications or important files from other third-party partners are also included when Alexandria checks for new messages.
- Alexandria retrieves COMPanion notifications based on your Data Station's serial number.
- Messages and notifications are relatively time-sensitive; usually, only the most recent ones are relevant. Because of this, the Message Center only keeps the last 10received notifications. Messages in excess of this or older than 90 days are automatically removed.
- Alexandria remembers the last time that the Message Center was opened (per site); this becomes the individual cut-off point for all new messages.
The Operation Management window automatically orders/sorts all pending operations (i.e. reports, utilities, imports, or exports) and allows you to view summaries and open, email, or save operations that you (or others) have previously completed. Simply think of the Operation Management window as a nerve center that consolidates all operations that you, the current user, the system, or others (depending on your Security permissions), have been performing; in essence, a specialized transaction log for past and future operations.
Once a report, utility, import, or export has been initiated, you can open Operation Management to track the progress of the current operation and allowing you to view (or save) previously completed operations. Completed operations shown in the “queue” include the name and status of the operation and are affixed with a time/date stamp. An operation that is currently running provides a Cancel option.
Each time the Operation Management window is opened, the Date Range drop-down filter defaults to Today; in other words, only the current user's newest (i.e. Today) operations are initially visible in the Operation Management window's “queue”. Everything in this list is ordered chronologically (newest-to-oldest in top-down order) which is helpful when trying to discover if there are any operations in the queue ahead of yours. The Operation Type drop-down filer defaults to All Operations; the All Operations selection includes pending (or completed) automatic system operations such as the Daily Chores system utility (which clears expired holds, reservations, and overdue items that were declared “lost”).
For reasons of accountability and transparency, the Operation Management window will retain all information for canceled and completed operations for a week at least; operations older than a week can be removed from the queue by choosing one of the Remove older than XX days selections from the Operation Management window's Actions menu. Your security privileges (i.e. Remove All) determine whether a particular user has the ability to remove canceled or completed operations from the queue. By default, all operations older than ninety days are automatically removed from the Operation Management window.

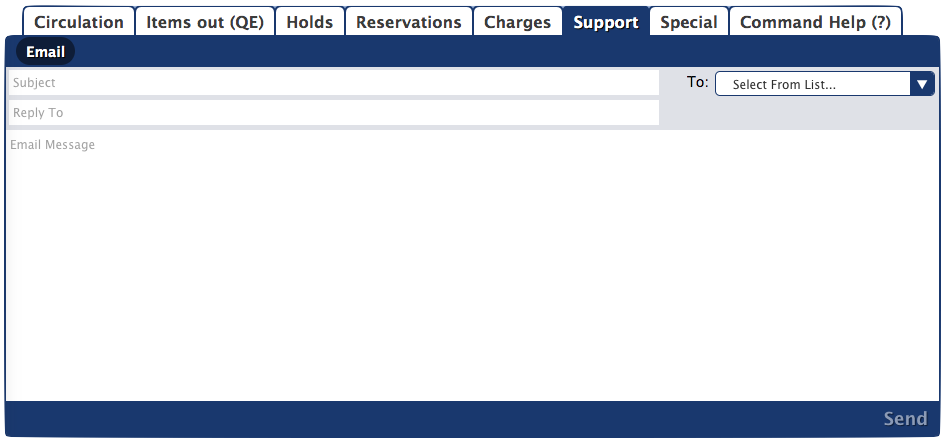
The Support tab of the Circulation window has two modes: Email and FTP. You can access these different modes by clicking on the subtabs that horizontically cross the top of the Support pane
If you have an open connection to the internet, you can use the Email Customer Support subtab to send questions to COMPanion's Customer Support team. Include a title in the Subject field and describe the nature of the problem you need help with or the question you need answered in the Email Message field.
If you would like to send an email to a division of COMPanion Corporation other than Customer Support, use the Send Email To drop-down menu (located to the right of the Subject field) to select the location where you would like your email sent. For example, if you happen across a software “bug” while using Alexandria, you can notify COMPanion's Quality Assurance department by selecting Bugs from the Customer Support drop-down menu. Additionally, if you come across a passage in this (or any other COMPanion) documentation that seems too convoluted to understand, you can select Documentation from the Send Email To drop-down menu to deliver your questions or concerns to COMPanion's Technical Documentation department.
You can add attachments to send along with your email message by clicking the Attachments button. This will open an Email Attachments window. All you need to do is point Alexandria in the direction of your file (or files) using the add and remove attachment buttons. The red number to the right of the Send Email To drop-down menu indicates the number of attachments you have affixed to the email.
When you are ready, click Send to email the notice to the party you have specified in the Send Email To drop-down menu.
If you haven't yet provided an email address in the Sites Management interface interface or properly configured your Administration Email settings, you will not be able to send email to the Customer Support team.
Alexandria won't check to see if your email address is valid, so any address that seems legitimate will be accepted. If you are using this technique to fool Alexandria, don't forget to explain why in your message and provide correct return contact information—otherwise, Customer Support will respond to your fabricated email address and you won't receive the help you need.