The Support Center has moved!! See the new website https://support.goalexandria.com/ ![]()

Patrons
The root page ALEX:Patrons could not be found in space Alexandria.
How helpful was this page?
Related Blog Posts
Blog Posts
-
Notes for student aides–System Patron notes
created by
Oct 10, 2023
-
Restricted items–using patron alert notes
created by
Sep 27, 2023
-
Passwords: protect your data
created by
Sep 07, 2023
-
Four features in Patrons you might not be using
created by
Apr 05, 2023
-
Say cheese! All about patron pictures
created by
Aug 10, 2022
-
End-of-year tips: Managing patrons
created by
May 03, 2022
-
Assigning policies–the complete guide
created by
Mar 23, 2022
-
Setting rules–Patron Policy Preferences
created by
Mar 08, 2022
-
Search smarter!—Combine search results
created by
Oct 13, 2021
-
Introducing... FAQs!
created by
Jul 07, 2021
Patron Records
Last Updated: $action.dateFormatter.formatDateTime($content.getLastModificationDate())

Current Record Pane
Operators (Library Administrator, Librarian, Student Aide, etc.) are still considered patrons. Their records are created and managed in Patrons Management, and the Security Group field is what determines their program access. See Add Operator Record for more information.
The greater half of the Patrons Management module is dedicated to the Current Patron Record pane, which provides access to the information stored in the title or copy record selected from the patrons Records List on the left. The tabs that are available in the Current Record pane contain the settings, options, editable fields, drop-down menus, and checkboxes that are used to manage the patrons or operators who use your library.

Patrons Management tabs
The Patrons Management tabs contain pertinent information for each patron.
You may notice a peculiar number to the right of the Programs tab. This is the patron Sequence Number, a unique number that Alexandria assigns to new patrons or operators. This number is useful when browsing patrons by order of entry.
Personal
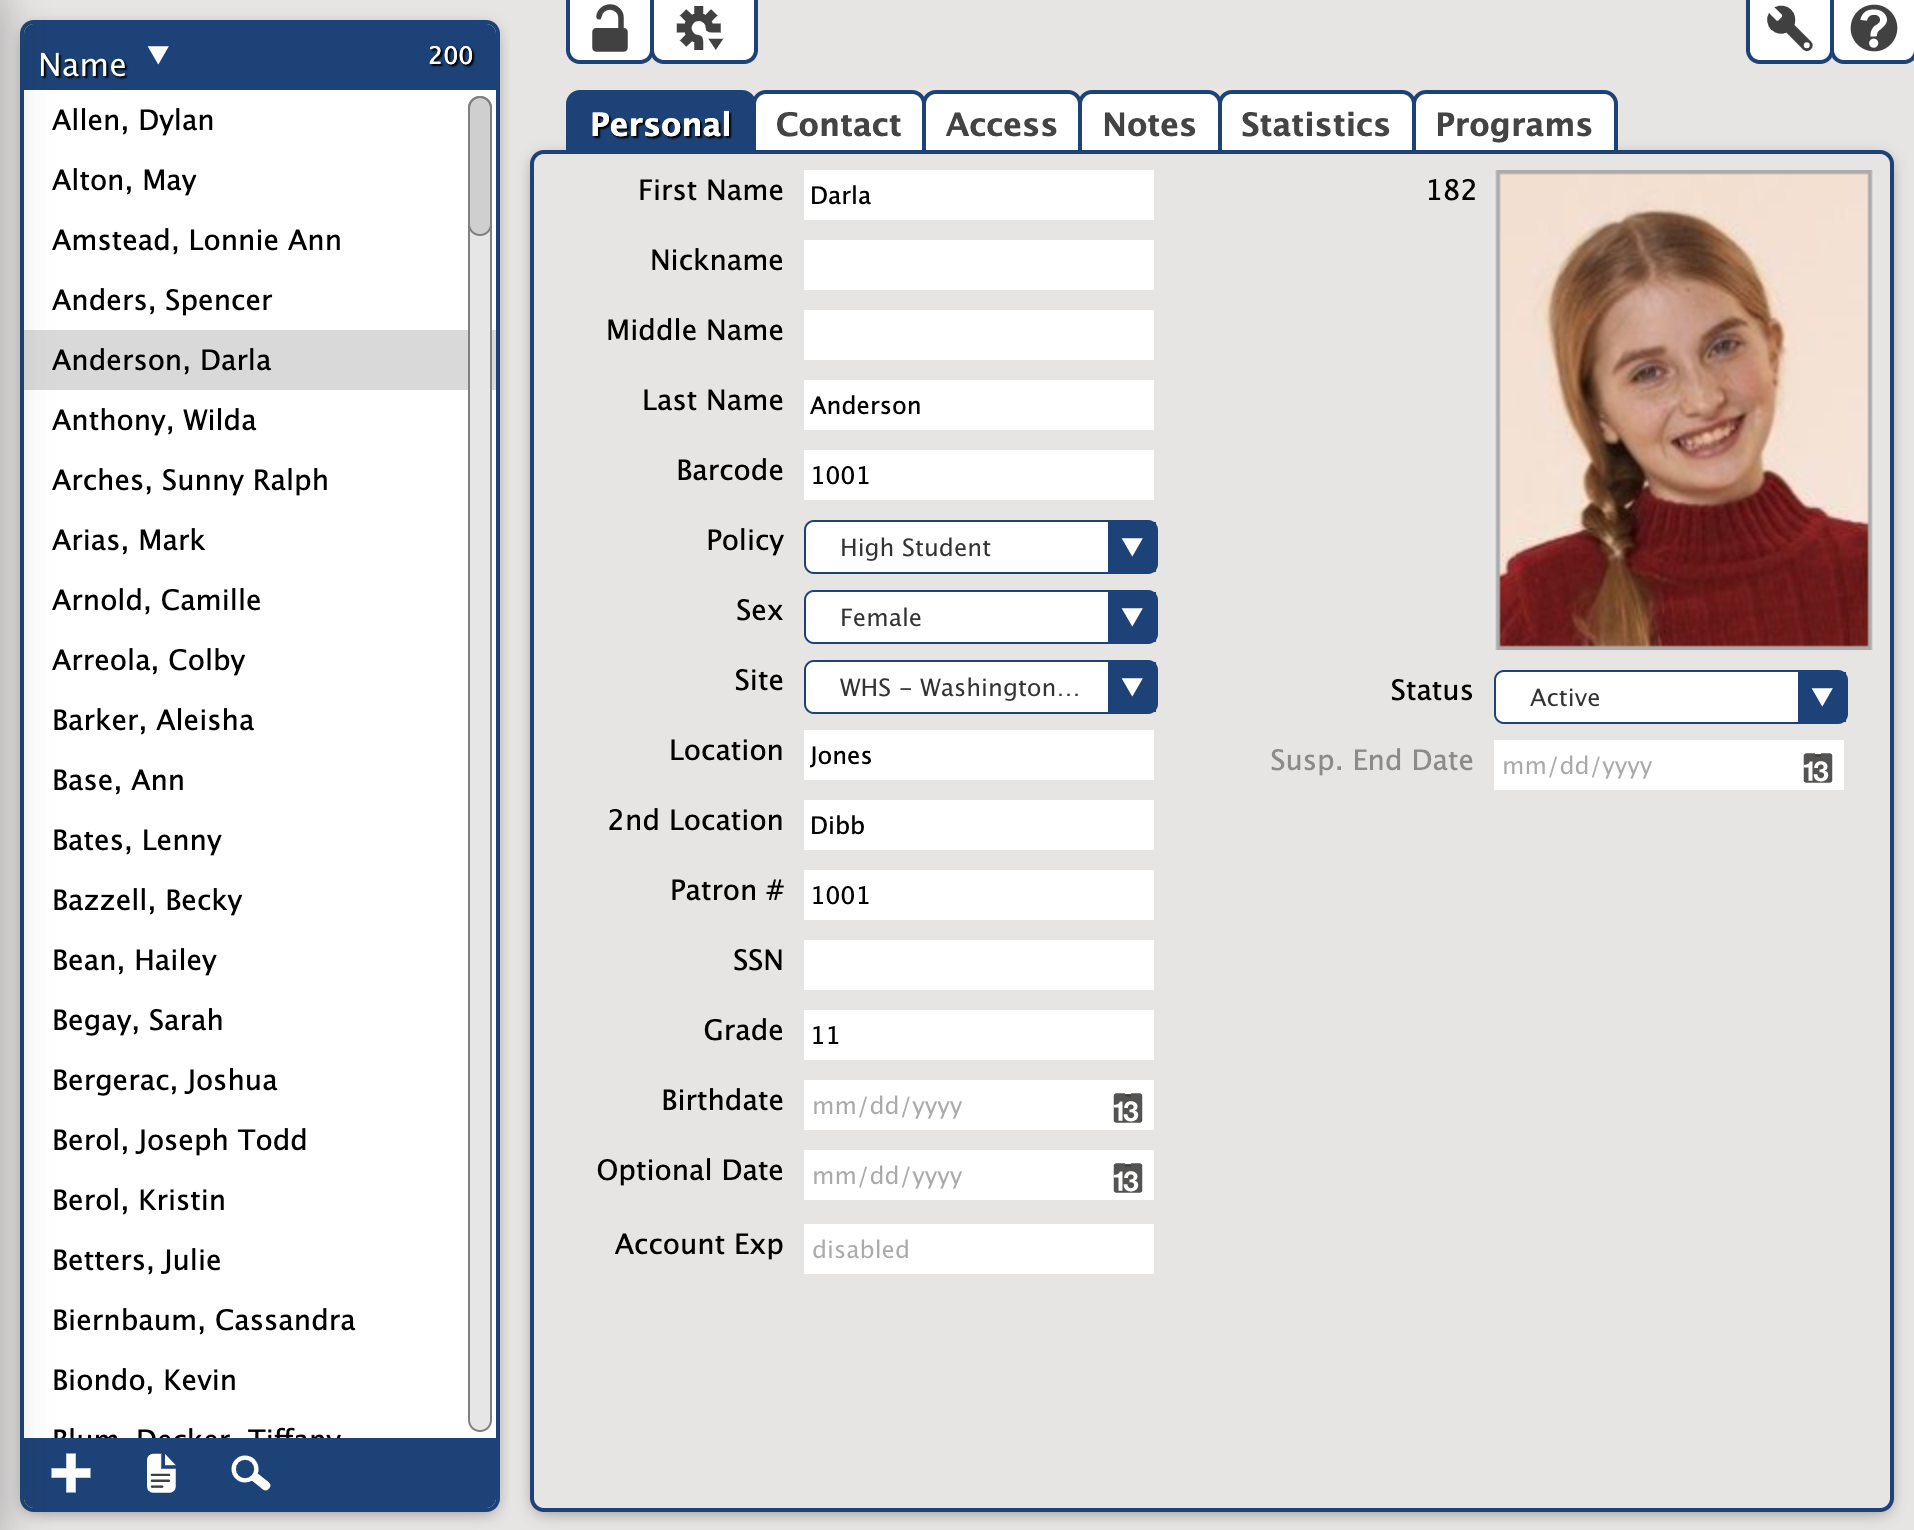
First & Middle Name
Enter the patron (or operator) first name or the first name and middle name (or the first name and middle initial).
Nickname
Enter the patron's nickname if they have one. This could be a shortened version of their first name or an entirely different name they prefer to go by. It will be displayed in parentheses after their first name in both Patrons Management and the Circulation Current Patron pane, and can be used to look up a patron record. Also, a patron's nickname will be used in place of their first name in Self-Service, Activity, Status, and all emails from the library (except receipts). This field is optional.
Last Name
Enter the patron (or operator) last name. This field is required, you cannot save a record without a last name.
Barcode
Each patron and operator is assigned a unique barcode up to 15 characters long, based on the value set in Preferences > Patrons. You can change the assigned barcode here.
Learn more in Barcode Your Collection.
Policy
The policy that you assign to a patron or operator determines the library rules to which this patron or operator must adhere. To choose a policy for a patron, click the arrow at the end of the Policy drop-down menu and select a value. The default policy for new patrons or operators is automatically assigned based upon your Default Policy setting in the Patron Defaults preferences.
Sex
Use this drop-down menu to help identify the sex of this patron; Male, Female, or Unspecified. The default is Unspecified until the patron's sex has been designated.
Site
Use this drop-down menu to choose the site or school that your patron attends. A list of valid and available sites will always be pulled from Sites Management window. To ensure the accuracy of reports, be consistent when selecting this information. Reports can be generated and sorted by this field. For example, you may print an overdue list for all the students of a particular school.
Homeroom
The location of a patron in a school is typically the student's homeroom or first period class. To ensure the accuracy of reports, be consistent when entering information in this field. Reports can be generated and sorted by this field. For example, you may print an overdue list of all students in a homeroom with overdue items. You are allowed to customize the name of this [Location] field in the Localization preferences.
2nd Location
Use this field to group patrons by a second location or to track any other useful data. You can enter letters, numbers, as well as spaces in this field. Reports can be generated and sorted by this field. Therefore, to ensure the accuracy of reports, be consistent when entering information in this field. You could, for example, use this field to classify the ethnicity of patrons for government or internal reports. If desired, you are allowed to customize the name of this [sublocation] field in your Localization preferences.
Student #
The community ID is designed to be used for your local ID. This could be a student code, phone number, parcel number or any other unique identification code. You are allowed to customize the name of this [Community ID] field in the Localization preferences.
SSN
In the United States, the “government ID” is typically the social security number (SSN); other countries may use other formats. You are allowed to customize the name of this [Government ID] field in the Localization preferences.
A Note About Community and Government ID
These are alternate, unique ID codes you may want to use with Alexandria. If you plan on updating patron information automatically from a central administration system (or you want to locate patrons by alternative codes, enter data in these fields). Duplicate values are not allowed; if a duplicate code is entered, Alexandria will give you an error message, notifying you that you need to make your code unique.
Grade
This field identifies the patron's level in school. If the school library and graduation date have been entered, Alexandria will assign the level based on your preferences. If you enter a level and a school library, Alexandria will calculate the graduation date for you. Alexandria will advance patrons by one level after the last day of school if the level is set to either “JK” (junior/kindergarten), “PS” (pre-school), “K” (kindergarten), or “1-12". Patrons automatically graduate to the next grade level on the date you enter as the last day of school on the Library Information preference window. Graduated patrons are given the grade level of “Graduated”.
- This term can be customized by the librarian (see Terminology Preferences).
Birthdate
Enter the patron's birth date. This information is used solely for reference.
Graduation Date
Enter the date that the patron will graduate. You are allowed to customize the name of this [Optional Date] field in the Localization preferences.
Account Exp
Enter the date that the patron's account expires. If you leave this field blank, Alexandria will calculate the expiration date based on the patron's policy when the patron record is first added to the system. For example, if a Patron Policy in Preferences is set for 365 days, the account will expire 365 days from the date the patron was entered. When a patron's account expires, their status will be changed to Inactive during Alexandria maintenance.
Patron Picture
This is the patron picture field; if you would like to add or change a patron’s picture at this time, you can upload a GIF, BMP, PCT, PNG, JPG (or any other standard image file) using the Browse for Patron Picture selection from the primary Actions menu of Patrons Management; you can reset to the default patron picture by selecting Remove Patron Picture. Although they turn up elsewhere, patron pictures primarily appear in the Current Patron pane of Circulation.
Status
Use this drop-down menu to change the status of the current patron. The Status setting separates active patrons from those with special circumstances such as a lost cards or or transferred. Select one of the following available statuses from the patron Status drop-down menu:
Suspension End Date
If the patron Status is set to Suspended and a date is entered in this field, the suspension will expire on this date. The field appears grayed out if the patron's status is not set to Suspended.
GUID
If you use Clever, the patron's GUID will be displayed in small lettering just above the Site Access button. This cannot be edited and is only there for reference.
Picture
There are several ways to add patron pictures. You can upload a JPEG, GIF, PNG, or BMP (or any other image format that your browser supports) using the Browse for Patron Picture selection from the primary Actions ![]() menu of Patrons Management. Or, you may drag the patron picture from your operating system desktop into the picture field of the Patron Management window's Personal Info tab. There is a 250kb size limit for uploaded images. Lastly, you can import multiple patron pictures at once. Larger images will be auto-sized and shrunk (or stretched) to fit the 240 x 186 pixel specifications if they're revealed to be too large (or small). Whichever way you choose, the patron picture should now appear in the right-hand area of the Personal Info tab.
menu of Patrons Management. Or, you may drag the patron picture from your operating system desktop into the picture field of the Patron Management window's Personal Info tab. There is a 250kb size limit for uploaded images. Lastly, you can import multiple patron pictures at once. Larger images will be auto-sized and shrunk (or stretched) to fit the 240 x 186 pixel specifications if they're revealed to be too large (or small). Whichever way you choose, the patron picture should now appear in the right-hand area of the Personal Info tab.
Personal
First & Middle Name
Enter the patron (or operator) first name or the first name and middle name (or the first name and middle initial).
Nickname
Enter the patron's nickname if they have one. This could be a shortened version of their first name or an entirely different name they prefer to go by. It will be displayed in parentheses after their first name in both Patrons Management and the Circulation Current Patron pane, and can be used to look up a patron record. Also, a patron's nickname will be used in place of their first name in Self-Service, Activity, Status, and all emails from the library (except receipts). This field is optional.
Last Name
Enter the patron (or operator) last name. This field is required, you cannot save a record without a last name.
Barcode
Each patron and operator is assigned a unique barcode up to 15 characters long, based on the value set in Preferences > Patrons. You can change the assigned barcode here.
Learn more in Barcode Your Collection.
Policy
The policy that you assign to a patron or operator determines the library rules to which this patron or operator must adhere. To choose a policy for a patron, click the arrow at the end of the Policy drop-down menu and select a value. The default policy for new patrons or operators is automatically assigned based upon your Default Policy setting in the Patron Defaults preferences.
Sex
Use this drop-down menu to help identify the sex of this patron; Male, Female, or Unspecified. The default is Unspecified until the patron's sex has been designated.
Site
Use this drop-down menu to choose the site or school that your patron attends. A list of valid and available sites will always be pulled from Sites Management window. To ensure the accuracy of reports, be consistent when selecting this information. Reports can be generated and sorted by this field. For example, you may print an overdue list for all the students of a particular school.
Homeroom
The location of a patron in a school is typically the student's homeroom or first period class. To ensure the accuracy of reports, be consistent when entering information in this field. Reports can be generated and sorted by this field. For example, you may print an overdue list of all students in a homeroom with overdue items. You are allowed to customize the name of this [Location] field in the Localization preferences.
2nd Location
Use this field to group patrons by a second location or to track any other useful data. You can enter letters, numbers, as well as spaces in this field. Reports can be generated and sorted by this field. Therefore, to ensure the accuracy of reports, be consistent when entering information in this field. You could, for example, use this field to classify the ethnicity of patrons for government or internal reports. If desired, you are allowed to customize the name of this [sublocation] field in your Localization preferences.
Student #
The community ID is designed to be used for your local ID. This could be a student code, phone number, parcel number or any other unique identification code. You are allowed to customize the name of this [Community ID] field in the Localization preferences.
SSN
In the United States, the “government ID” is typically the social security number (SSN); other countries may use other formats. You are allowed to customize the name of this [Government ID] field in the Localization preferences.
A Note About Community and Government ID
These are alternate, unique ID codes you may want to use with Alexandria. If you plan on updating patron information automatically from a central administration system (or you want to locate patrons by alternative codes, enter data in these fields). Duplicate values are not allowed; if a duplicate code is entered, Alexandria will give you an error message, notifying you that you need to make your code unique.
Grade
This field identifies the patron's level in school. If the school library and graduation date have been entered, Alexandria will assign the level based on your preferences. If you enter a level and a school library, Alexandria will calculate the graduation date for you. Alexandria will advance patrons by one level after the last day of school if the level is set to either “JK” (junior/kindergarten), “PS” (pre-school), “K” (kindergarten), or “1-12". Patrons automatically graduate to the next grade level on the date you enter as the last day of school on the Library Information preference window. Graduated patrons are given the grade level of “Graduated”.
- This term can be customized by the librarian (see Terminology Preferences).
Birthdate
Enter the patron's birth date. This information is used solely for reference.
Graduation Date
Enter the date that the patron will graduate. You are allowed to customize the name of this [Optional Date] field in the Localization preferences.
Account Exp
Enter the date that the patron's account expires. If you leave this field blank, Alexandria will calculate the expiration date based on the patron's policy when the patron record is first added to the system. For example, if a Patron Policy in Preferences is set for 365 days, the account will expire 365 days from the date the patron was entered. When a patron's account expires, their status will be changed to Inactive during Alexandria maintenance.
Patron Picture
This is the patron picture field; if you would like to add or change a patron’s picture at this time, you can upload a GIF, BMP, PCT, PNG, JPG (or any other standard image file) using the Browse for Patron Picture selection from the primary Actions menu of Patrons Management; you can reset to the default patron picture by selecting Remove Patron Picture. Although they turn up elsewhere, patron pictures primarily appear in the Current Patron pane of Circulation.
Status
Use this drop-down menu to change the status of the current patron. The Status setting separates active patrons from those with special circumstances such as a lost cards or or transferred. Select one of the following available statuses from the patron Status drop-down menu:
Suspension End Date
If the patron Status is set to Suspended and a date is entered in this field, the suspension will expire on this date. The field appears grayed out if the patron's status is not set to Suspended.
GUID
If you use Clever, the patron's GUID will be displayed in small lettering just above the Site Access button. This cannot be edited and is only there for reference.
Picture
There are several ways to add patron pictures. You can upload a JPEG, GIF, PNG, or BMP (or any other image format that your browser supports) using the Browse for Patron Picture selection from the primary Actions ![]() menu of Patrons Management. Or, you may drag the patron picture from your operating system desktop into the picture field of the Patron Management window's Personal Info tab. There is a 250kb size limit for uploaded images. Lastly, you can import multiple patron pictures at once. Larger images will be auto-sized and shrunk (or stretched) to fit the 240 x 186 pixel specifications if they're revealed to be too large (or small). Whichever way you choose, the patron picture should now appear in the right-hand area of the Personal Info tab.
menu of Patrons Management. Or, you may drag the patron picture from your operating system desktop into the picture field of the Patron Management window's Personal Info tab. There is a 250kb size limit for uploaded images. Lastly, you can import multiple patron pictures at once. Larger images will be auto-sized and shrunk (or stretched) to fit the 240 x 186 pixel specifications if they're revealed to be too large (or small). Whichever way you choose, the patron picture should now appear in the right-hand area of the Personal Info tab.