The Support Center has moved!! See the new website https://support.goalexandria.com/ ![]()

Patrons
The root page ALEX:Patrons could not be found in space Alexandria.
How helpful was this page?
Related Blog Posts
Blog Posts
-
Notes for student aides–System Patron notes
created by
Oct 10, 2023
-
Restricted items–using patron alert notes
created by
Sep 27, 2023
-
Passwords: protect your data
created by
Sep 07, 2023
-
Four features in Patrons you might not be using
created by
Apr 05, 2023
-
Say cheese! All about patron pictures
created by
Aug 10, 2022
-
End-of-year tips: Managing patrons
created by
May 03, 2022
-
Assigning policies–the complete guide
created by
Mar 23, 2022
-
Setting rules–Patron Policy Preferences
created by
Mar 08, 2022
-
Search smarter!—Combine search results
created by
Oct 13, 2021
-
Introducing... FAQs!
created by
Jul 07, 2021
Patron Tabs
Last Updated: $action.dateFormatter.formatDateTime($content.getLastModificationDate())

Personal Info Settings
Any numeric ranges are used in these fields, they should be padded with zeros so that they may be sorted and selected correctly; for example, instead of a “1”, “2”, “402”, you'd insert “001”, “027”, “402”. Essentially, in order to sort properly, all entries within a numeric range need to have the same number of digits.
- First & Middle Name. Enter the patron (or operator) first name or the first name and middle name (or the first name and middle initial).
- Last Name. Enter the patron (or operator) last name. This field is required, you cannot save a record without a last name.
- Barcode. Each patron or operator will have a unique barcode number that is either supplied by the program or entered manually. This barcode can contain up to 15 digits and must be unique. It may contain numbers and/or letters, but no punctuation characters or spaces. However, if you attempt to manually enter a patron or operator barcode number that is less than three alphanumeric characters, Alexandria or Textbook Tracker will display a warning message and disable the Save feature until the user has changed the barcode. This field is required, you cannot save a record without a unique barcode.

- Policy. The policy that you assign to a patron or operator determines the library rules to which this patron or operator must adhere. To choose a policy for a patron, click the arrow at the end of the Policy drop-down menu and select a value. The default policy for new patrons or operators is automatically assigned based upon your Default Policy setting in the Patron Defaults preferences.
- Sex. Use this drop-down menu to help identify the sex of this patron; Male, Female, or Unknown. The default is Unknown until the patron's sex has been designated.
- Site. Use this drop-down menu to choose the site or school that your patron attends. A list of valid and available sites will always be pulled from Sites Management window. To ensure the accuracy of reports, be consistent when selecting this information. Reports can be generated and sorted by this field. For example, you may print an overdue list for all the students of a particular school.
- Homeroom. The location of a patron in a school is typically the student's homeroom or first period class. To ensure the accuracy of reports, be consistent when entering information in this field. Reports can be generated and sorted by this field. For example, you may print an overdue list of all students in a homeroom with overdue items. You are allowed to customize the name of this [Location] field in the Localization preferences.
- 2nd Location. Use this field to group patrons by a second location or to track any other useful data. You can enter letters, numbers, as well as spaces in this field. Reports can be generated and sorted by this field. Therefore, to ensure the accuracy of reports, be consistent when entering information in this field. You could, for example, use this field to classify the ethnicity of patrons for government or internal reports. If desired, you are allowed to customize the name of this [sublocation] field in your Localization preferences.
- Student #. The community ID is designed to be used for your local ID. This could be a student code, phone number, parcel number or any other unique identification code. You are allowed to customize the name of this [Community ID] field in the Localization preferences.
- SSN. In the United States, the “government ID” is typically the social security number (SSN); other countries may use other formats. You are allowed to customize the name of this [Government ID] field in the Localization preferences.
- Reading Level. Any reading level-related information you provide in this field will appear in the Current Patron Pane of the Circulation module when a patron is made current. It is commonly used as a quick reference for library staff to determine if an item's readability is compatible with your patron. If the term Reading Level is not specific enough for your tastes, you can customize this terminology in the Localization preferences (e.g. Fountas and Pinnell or Accelerated Reader).
- Typically, the term Reading Level will suffice unless your site doesn't use reading levels or the terminology is irrelevant. In this case, the field can be renamed in your Terminology preferences and used to store other information such as whether your patrons have accepted your AUP (acceptable usage policy); in this case, you would provide the appropriate information in the field (e.g. “Accept”/“Decline”, “Yes”/“No”, “Agree”/“Disagree”, etc.).
- Grade. (shown as Grade in the previous example) This field identifies the patron's level in school. If the school library and graduation date have been entered, Alexandria will assign the level based on your preferences. If you enter a level and a school library, Alexandria will calculate the graduation date for you. Alexandria will advance patrons by one level after the last day of school if the level is set to either “JK” (junior/kindergarten), “PS” (pre-school), “K” (kindergarten), or “1-12". Patrons automatically graduate to the next grade level on the date you enter as the last day of school on the Library Information preference window. Graduated patrons are given the grade level of “Graduated”. You are allowed to customize the name of this [Level] field in the Localization preferences.
- Reading Level. Any reading level-related information you provide in this field will appear in the Current Patron Pane of the Circulation module when a patron is made current. It is commonly used as a quick reference for library staff to determine if an item's readability is compatible with your patron. If the term Reading Level is not specific enough for your tastes, you can customize this terminology in the Localization preferences (e.g. Fountas and Pinnell or Accelerated Reader).
Typically, the term Reading Level will suffice unless your site doesn't use reading levels or the terminology is irrelevant. In this case, the field can be renamed in your Terminology preferences and used to store other information such as whether your patrons have accepted your AUP (acceptable usage policy); in this case, you would provide the appropriate information in the field (e.g. “Accept”/“Decline”, “Yes”/“No”, “Agree”/“Disagree”, etc.).
- Grade. (shown as Grade in the previous example) This field identifies the patron's level in school. If the school library and graduation date have been entered, Alexandria will assign the level based on your preferences. If you enter a level and a school library, Alexandria will calculate the graduation date for you. Alexandria will advance patrons by one level after the last day of school if the level is set to either “JK” (junior/kindergarten), “PS” (pre-school), “K” (kindergarten), or “1-12". Patrons automatically graduate to the next grade level on the date you enter as the last day of school on the Library Information preference window. Graduated patrons are given the grade level of “Graduated”. You are allowed to customize the name of this [Level] field in the Localization preferences.
- This term can be customized by the librarian (see Localization Preferences).
- Birthdate. Enter the patron's birth date. This information is used solely for reference.
- Graduation Date. Enter the date that the patron will graduate. You are allowed to customize the name of this [Optional Date] field in the Localization preferences.
- Card Exp. Date. Enter the date that the patron's library card expires. If you leave this field blank, Alexandria will calculate the expiration date based on the patron's policy when the patron record is first added to the system. For example, if a Patron Policy in Preferences is set for 365 days, the card will expire 365 days from the date the patron was entered.
- Patron Picture. This is the patron picture field; if you would like to add or change a patron’s picture at this time, you can upload a GIF, BMP, PCT, PNG, JPG (or any other standard image file) using the Browse for Patron Picture selection from the primary Actions menu of Patrons Management; you can reset to the default patron picture by selecting Remove Patron Picture. Although they turn up elsewhere, patron pictures primarily appear in the Current Patron pane of Circulation.
- Status. Use this drop-down menu to change the status of the current patron. The Status setting separates active patrons from those with special circumstances such as a lost cards or or transferred. Select one of the following available statuses from the patron Status drop-down menu:
- Active. A patron whose status is set to Active can use the library (check in and out) according to the rules of the assigned patron Policies.
- Lost Card or Suspended. These statuses cause a warning message to appear when the patron barcode is entered in the Circulation module and require operator intervention in order to continue.
- Transferred, Inactive, or Other.These options are used mainly for generating reports for patrons with a statuses other than Active; for example, those who have transferred or are inactive. These statuses cause an alert message to appear on the Circulation module when the patron barcode is entered.
- Suspension End Date. If the patron Status is set to Suspended and a date is entered in this field, the suspension will expire on this date. The field appears grayed out if the patron's status is not set to Suspended.
- Security Group. This is the security level assigned to this patron or operator; a user's access level determines what operations they are allowed to perform. Security Groups can be created, removed, or adjusted in the Security preferences.
- Username. Provide the username that allows operators to log into the Alexandria Librarian securely and your patrons to access the Researcher interfaces (including Scout) and place holds, reservations, and check their status and details.
- Password/Confirm Password. Here is where you create, confirm, and change mandatory patron passwords. If you don't provide one at the time of creation, the password will default to the patron's Last Name without spaces or punctuation. When changing or creating a patron password, be sure that the passwords you enter in the Password and Confirm Password fields exactly match; be sure to provide both. For security reasons, passwords are never shown anywhere in Alexandria.
- Email. Enter the email address for the patron if you plan to use email for notification purposes such as overdue notices. If you choose email as the type of report when printing overdue notices, the notice is sent to the specified email addresses. If you don't enter a valid address or leave the field blank, email messages will not be sent to patrons. To guarantee that your email notifications are being sent, check the Enable Automatic Email Notifications box in your Circulation Settings preferences.
- Site Access. Click this to opens the Site Access dialog which allows you to check (or uncheck) any sites that the patron or operator is permitted to access. This list of valid and available sites will always be pulled from Sites Management interface.
A Note About Community and Government ID
These are alternate, unique ID codes you may want to use with Alexandria. If you plan on updating patron information automatically from a central administration system (or you want to locate patrons by alternative codes, enter data in these fields). Duplicate values are not allowed; if a duplicate code is entered, Alexandria will give you an error message, notifying you that you need to make your code unique.
The Contact Info tab identifies the parent or guardian you need to contact in case of emergency. Enter the contact name, address, and phone number if it is different from the patron's address and phone number. You may enter more than one name and address by separating them with a comma.
Settings
When a field has an obvious meaning or use (such as City or Phone), they will not be described unless there are special circumstances concerning how it's used.
- Parent/Guardian. Enter the patron's parent or guardian. This information is used solely for reference.
- Phone and Mobile. Enter the phone number and fax number that should be used to notify the patron of special events, overdue items, in-stock holds, and other official library business.
- Address, City, State, Postal Code, and Country. Enter the patron's mailing address. Notices and letters will be sent to this address.
- Contact Notes. Use this field to enter notes on how to contact this patron or the patron's legal guardians. You can also use the Contact Notes field to track names, additional phone numbers (cell, home, work, or fax), and email addresses.
You can customize the name of the Additional Contact and Mobile fields in Localization Preferences.
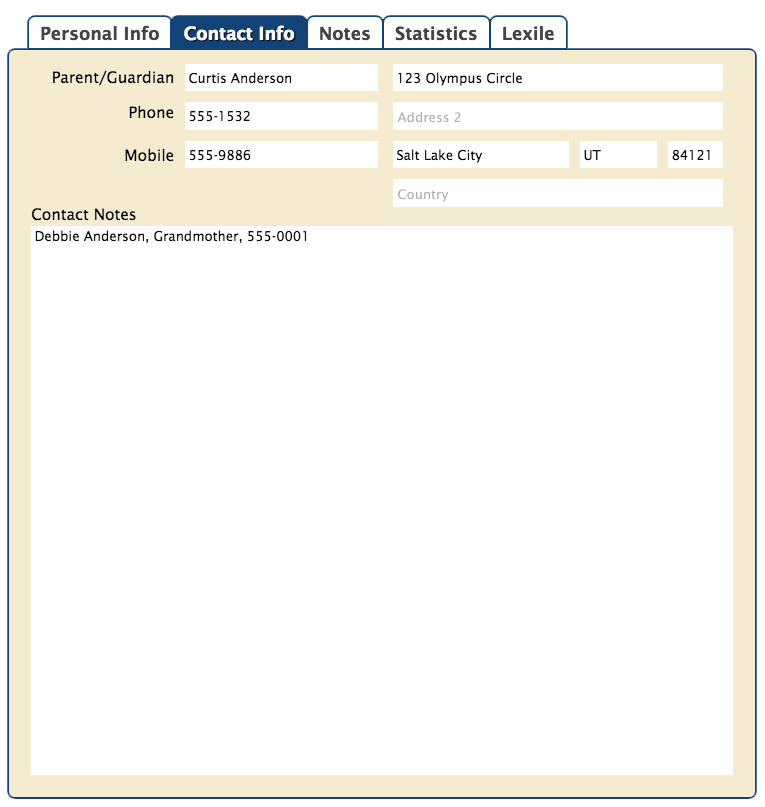
Patron contact information can be viewed and changed by patrons in the Researcher interfaces, if your security preferences allow.
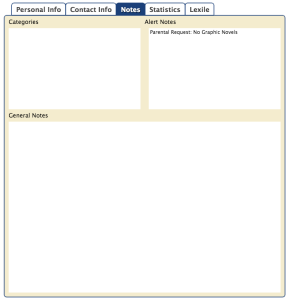
The Notes tab can be used to include information about groups for which the patron belongs or general notes about the patron. If any notes are attached to a patron record, you can view them by clicking Notes at the bottom of the Current Patron pane of Circulation.
You can enter a plus sign (+) into the command line in the Circulation module to display notes for the Current Patron.
Settings
- Categories. Enter information about groups the patron belongs to; for example, special reading programs, at-risk students, special education students, gifted students, library contest students, or any other groups that you find useful. These category entries can be used to select patron records for reports.
- Alert Notes. This field is used to make the librarian aware of special circumstances regarding a patron.
- For example, you can create an alert note so that you may "pass along" certain information to the patron the very next time they use the library. The alert message will automatically appear on the Circulation module when you enter the patron's barcode number.
- General Notes. This field can be used to attach additional comments about a patron. These comments can only be viewed from the Circulation module.
- Click Notes at the bottom of the Current Patron pane in Circulation to view all the notes for this patron.
The Statistics tab contains historical information about your patron's recorded library usage. Alexandria will automatically generate this information; it can not be modified. You can view the transaction history by selecting the Show History option from the secondary Actions menu or by clicking on the Show History button when the Keep Patron History box is checked (activated).
The page ALIB:V70 Tech Videos was not found -- Please check/update the page name used in the MultiExcerpt-Include macro
Settings
- Keep Patron History. When this box is checked, Alexandria will keep a complete history of this patron's library usage.
- For example, the program will keep track of what books the patron has checked out and when those books were returned. Items that are currently loaned out will not appear in the history statistics until they are returned.
- This option can be set for groups of patrons by using the Enable Keep Patron History utility.
- Alternatively, this option can be set for all patrons using the Keep History For All Patrons preference. When this preference is turned on, the Keep Patron History checkbox on the Statistics tab (above) cannot be changed.
- Show History. Click this button to instantly generate a .pdf document containing all of the patron's recorded transaction history—copies that the patron has checked out and returned—since the Keep Patron History setting was enabled. Clicking this button is essentially the same as generating a Patron History report.