The Support Center has moved!! See the new website https://support.goalexandria.com/ ![]()

How helpful was this page?
Related Blog Posts
Blog Posts
-
How to add reports in the new beta–you beta be trying it!
created by
Jan 16, 2024
-
Remind me with reports... for notes!
created by
Oct 04, 2023
-
Loaned Items Notice for teachers
created by
Sep 21, 2023
-
Summer tip: how to print library cards
created by
Jul 12, 2023
-
End-of-year reports
created by
May 10, 2023
-
Curate your collection–Stats with Super Summary
created by
Feb 01, 2023
-
How to share your district report standards
created by
Jan 18, 2023
-
Share your top titles
created by
Jan 10, 2023
-
Cash drawer report to the rescue!
created by
Oct 04, 2022
-
¿Hablas español?- Filter search results by language
created by
Aug 16, 2022
Patron Labels Reports
Last Updated: $action.dateFormatter.formatDateTime($content.getLastModificationDate())

Patron Labels Reports
Tools > Reports > Patrons > Labels
Dimensions in the report names refer to how many labels will fit on each printed label page (i.e. 3x10 means there will be three columns and ten rows for a total of thirty labels on one page).
Purpose
Creates labels with patron barcodes (COMPanion Part Number V0055 or 1"x25/8" labels). You can attach these to student ID cards or use them for internal purposes, such as keeping track of holds. Another potential use is printing patron barcodes for each homeroom, putting them in a binder, and using the sheet for scanning whenever a particular homeroom class visits the library.
Selections
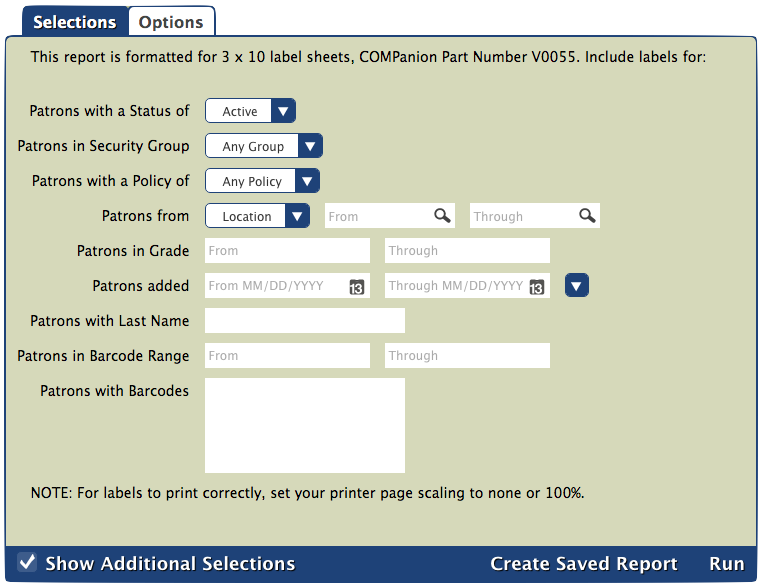
Patrons with a Status of: select for patrons with a particular status
Patrons with a Security Group: select for patrons belonging to a certain security group
Patrons with a Policy of: select for patrons belonging to a certain policy (choose multiple policies by using the Include or Exclude options)
Patrons from: select for patrons belonging to a specific Location or 2nd Location range
Patrons in Grade: select for patrons belonging to a grade range
Patrons added: select for patrons who were added within a certain date range (MM/DD/YYYY)
Patrons with Last Name (Additional Selection): select for patrons with a specific last name
Patrons in Barcode Range (Additional Selection): select for patrons who fall within a barcode range
Patrons with Barcodes (Additional Selection): select for specific patron barcodes (separate by semi-colons??)
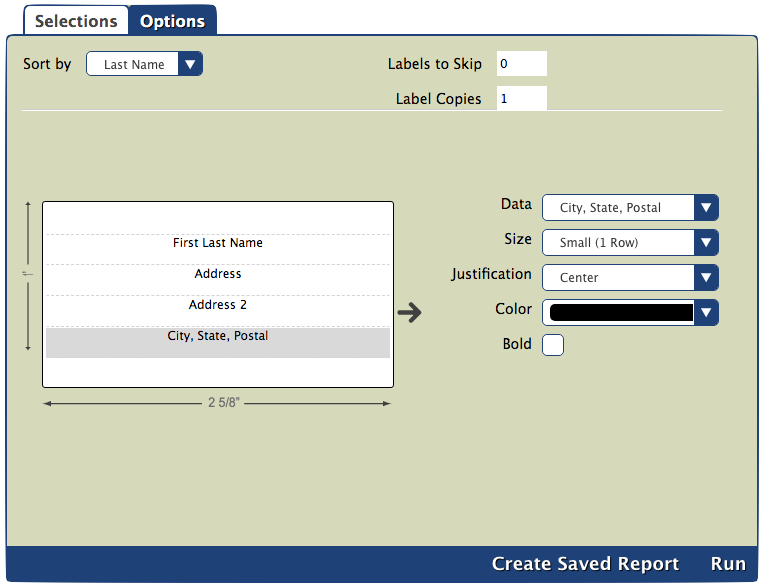
Options
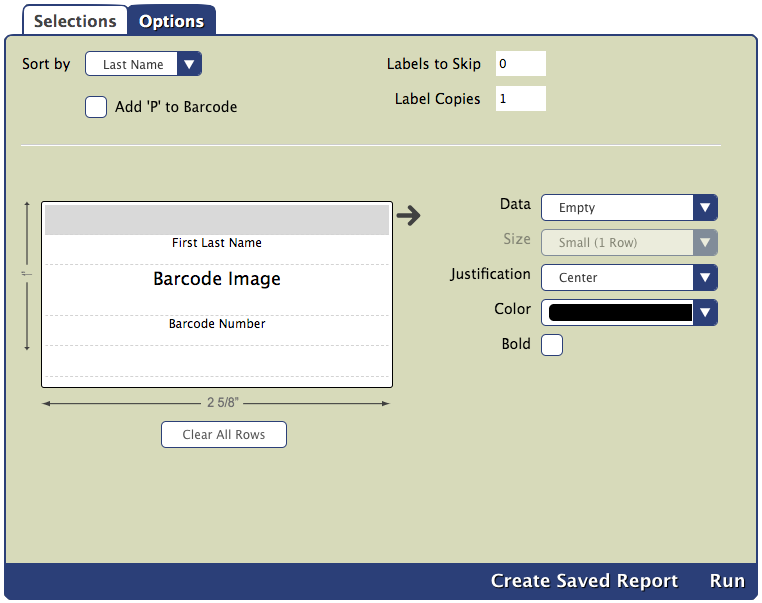
Sort by: choose how you would like the labels to be ordered
Add 'P' to Barcode: if checked, adds a P to the beginning of barcodes why would you do this?
Labels to Skip: enter how many labels you need to skip on the first page, if needed (useful for when you have a half-used sheet of labels)
Label Copies: enter how many copies of each label you need
Data: choose the data type to be displayed in each row in the label
Size: choose whether the highlighted area on the label is Small (1 Row) or Large (2 Rows)
Justification: choose whether the data will be justified in the center, to the left, or to the right for each row
Color: choose the color of the text in each row
Bold: check the box if you would like the text to be bolded in the highlighted row
Example
Purpose
Creates labels with patron information (COMPanion Part Number V0036). It's possible, but not recommended to put barcodes on these labels since they are smaller than the Patron Barcode Labels. However, you can use them to affix other patron information to ID cards if needed.
Selections
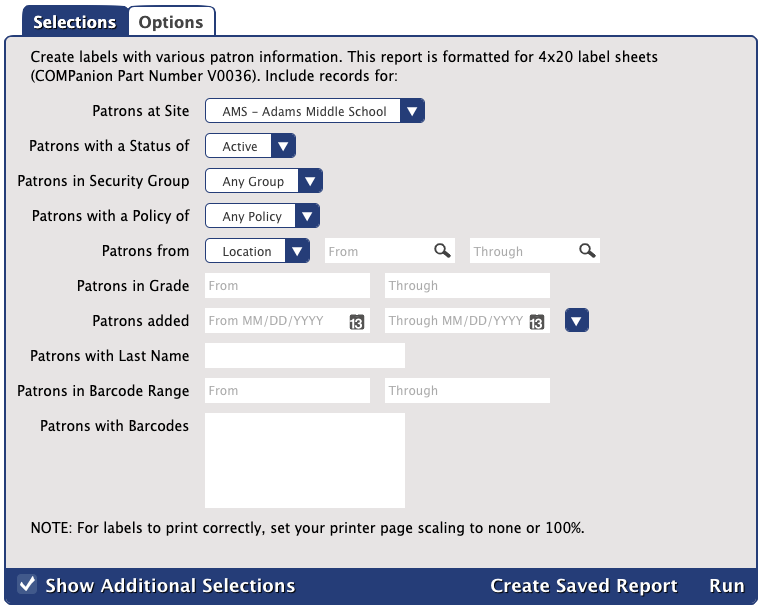
Patrons with a Status of: select for patrons with a particular status
Patrons with a Security Group: select for patrons belonging to a certain security group
Patrons with a Policy of: select for patrons belonging to a certain policy (choose multiple policies by using the Include or Exclude options)
Patrons from: select for patrons belonging to a specific Location or 2nd Location range
Patrons in Grade: select for patrons belonging to a grade range
Patrons added: select for patrons who were added within a certain date range (MM/DD/YYYY)
Patrons with Last Name (Additional Selection): select for patrons with a specific last name
Patrons in Barcode Range (Additional Selection): select for patrons who fall within a barcode range
Patrons with Barcodes (Additional Selection): select for specific patron barcodes (separate by semi-colons??)
Options
Sort by: choose how you would like the labels to be ordered
Labels to Skip: enter how many labels you need to skip on the first page, if needed (useful for when you have a half-used sheet of labels)
Label Copies: enter how many copies of each label you need
Data: choose the data type to be displayed in each row in the label
Size: choose whether the highlighted area on the label is Small (1 Row) or Large (2 Rows)
Justification: choose whether the data will be justified in the center, to the left, or to the right for each row
Color: choose the color of the text in each row
Bold: check the box if you would like the text to be bolded in the highlighted row
Example
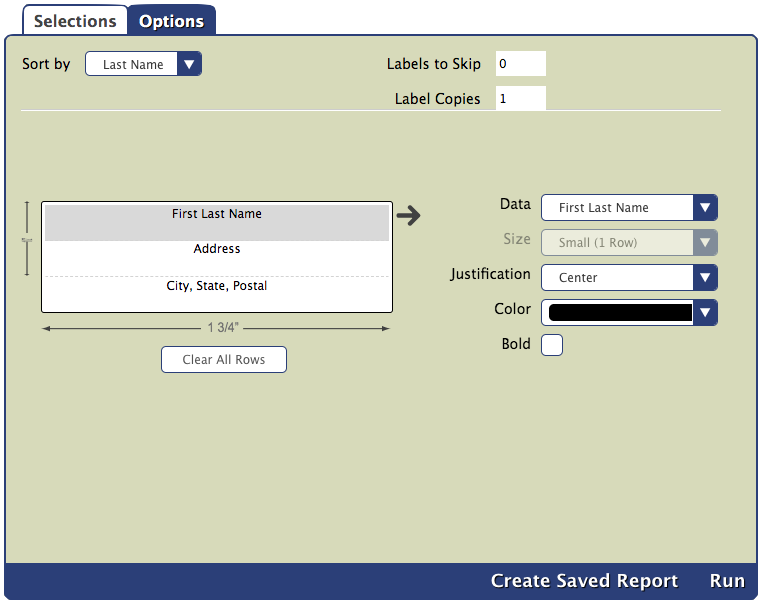
Purpose
Creates labels with patron mailing information (COMPanion Part Number V0055). If you need to mail something to your patrons, using this report is an easy way to generate and print labels with all of their addresses.
Selections
Patrons with a Status of: select for patrons with a particular status
Patrons with a Security Group: select for patrons belonging to a certain security group
Patrons with a Policy of: select for patrons belonging to a certain policy (choose multiple policies by using the Include or Exclude options)
Patrons from: select for patrons belonging to a specific Location or 2nd Location range
Patrons in Grade: select for patrons belonging to a grade range
Patrons added: select for patrons who were added within a certain date range (MM/DD/YYYY)
Patrons with Last Name (Additional Selection): select for patrons with a specific last name
Patrons in Barcode Range (Additional Selection): select for patrons who fall within a barcode range
Patrons with Barcodes (Additional Selection): select for specific patron barcodes (separate by semi-colons??)
Options
Sort by: choose how you would like the labels to be ordered
Labels to Skip: enter how many labels you need to skip on the first page, if needed (useful for when you have a half-used sheet of labels)
Label Copies: enter how many copies of each label you need
Data: choose the data type to be displayed in each row in the label
Size: choose whether the highlighted area on the label is Small (1 Row) or Large (2 Rows)
Justification: choose whether the data will be justified in the center, to the left, or to the right for each row
Color: choose the color of the text in each row
Bold: check the box if you would like the text to be bolded in the highlighted row