The Support Center has moved!! See the new website https://support.goalexandria.com/ ![]()

How helpful was this page?
Related Blog Posts
Blog Posts
-
Items: a few things you may not know...
created by
Apr 12, 2023
-
Searching by Subject
created by
Nov 16, 2022
-
Assigning policies–the complete guide
created by
Mar 23, 2022
-
Title Assistant to the rescue!
created by
Jan 27, 2022
-
Overdue Items Notices? We've got you cover-ed
created by
Nov 24, 2021
-
Search smarter!—Combine search results
created by
Oct 13, 2021
-
Using Contents Notes
created by
Sep 23, 2021
-
Introducing... FAQs!
created by
Jul 07, 2021
-
Changing call numbers—helpful utilities
created by
Mar 03, 2021
-
From our librarians—Reusable book menu cards
created by
Nov 18, 2020
Items Tabs
Last Updated: $action.dateFormatter.formatDateTime($content.getLastModificationDate())

Contents

Click the tabs below to expand for more information on the Items Tabs.
The fields in the Publication subtab are used to supply title-specific publication information.
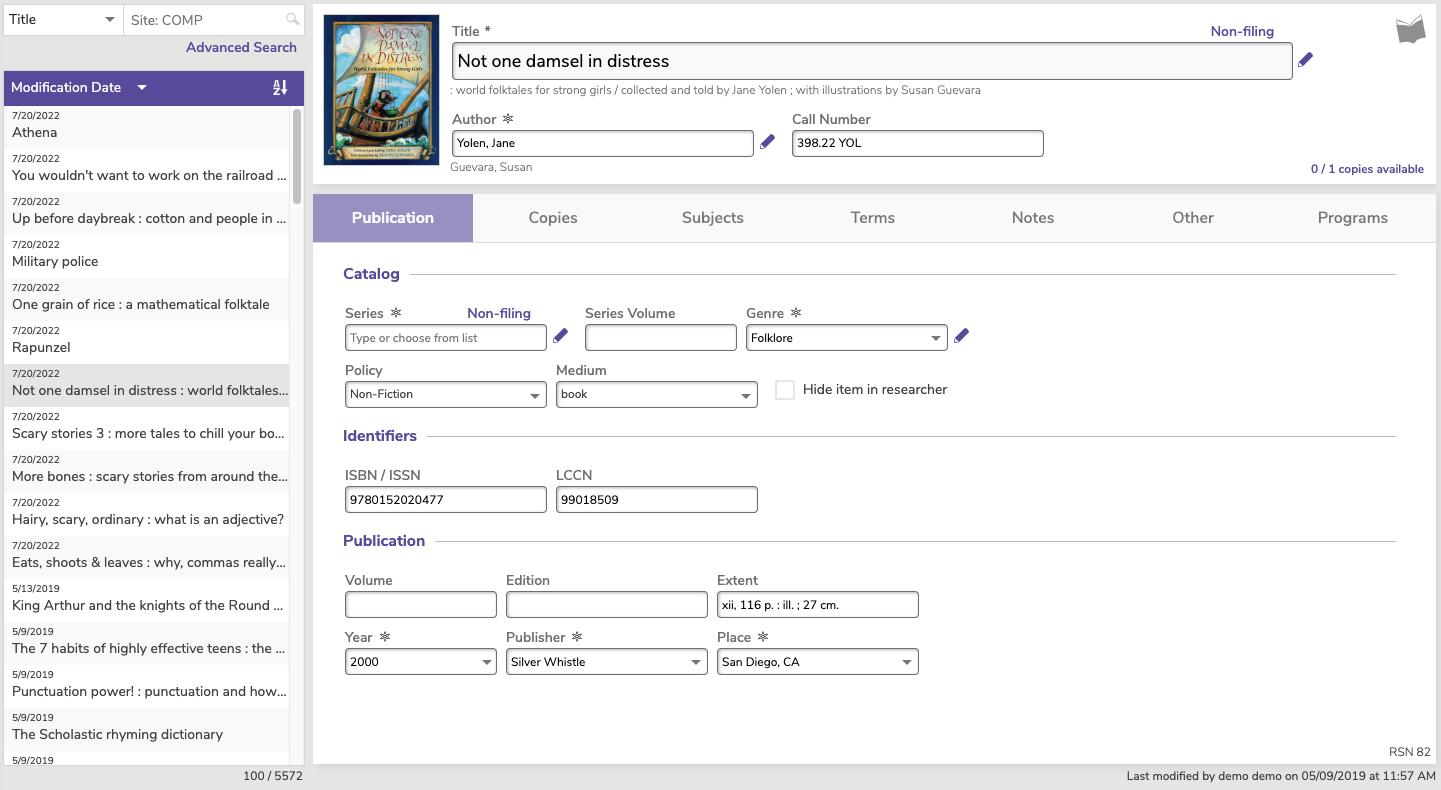
Catalog
Series (Non-Filing)
This drop-down menu allows you to specify terms (less than eight characters long) in the title to ignore when indexing the series. Thus, if your series is “The Chronicles of Narnia”, you can select The from the Non-Filing drop-down menu so the series is sorted (indexed) as “Chronicles of Narnia”. Alexandria will also ignore following spaces or punctuation characters.
Series Volume
If the item is part of a series, enter the series name here. Otherwise, leave this field blank. Saved in MARC fields 800-830. The Volume field distinguishes multiple-volume works such as encyclopedias, certain periodicals, and books. Only volumes that are catalogued as separate titles are valid in this field (the word Volume automatically appears when volume is referenced on an Alexandria window). If the item isn't part of a multiple-volume work, leave the field blank. The volume is saved at MARC tags 800-830 (you can also use 092_v or 490_v).
Genre
A “genre” indicates the form and/or physical characteristics of the item; for example, biography, essay, reviews, journal, diary, etc. You can create a new genre by saving a new 655_a MARC field in the MARC View editor.
Policy
The item policy determines the circulation rules for a particular group of items. Every title is given a policy. In addition to enforcing circulation rules, an item's policy is used to group items for statistical analyses and reporting purposes. Copies will “inherit” the title policy unless a specific policy is assigned.
Medium
The medium identifies the “media type” or physical format of the item. This drop-down menu lets you choose from existing mediums that have been used so far in your library. The default is Book. You can create a new medium by saving a new 245_h MARC field in the MARC View editor. If you would like to remove a medium from this list, you must replace the unwanted “media type” in all records that use it; it will then completely disappear as a selection.
Hide item in researcher
Use this checkbox if you don’t want the title to appear in your Researcher results when a patron performs a search. This setting applies to all copies across all collections in a database.
Identifiers
ISBN/ISSN LCCN
Enter the item's International Standard Book Number; saved in MARC field 020_a. The ISBN is a unique identifier. A title may have more than one ISBN (e.g., the ISBN for the hardback edition differs from the paperback edition). Alexandria only displays the first ISBN found in the MARC record. You can enter an ISSN rather than an ISBN. If the number you enter is 8 digits, Alexandria assumes the number is an ISSN and saves it at MARC tag 022_a. If it has 10 digits, Alexandria assumes it is an ISBN. Enter the item's Library of Congress Control Number. The LCCN is a unique 8-digit identifier assigned to an item's bibliographic record. You may enter the LCCN with or without punctuation, however, only numeric digits are saved. LCCN is saved in MARC field 010_a.
Publication
Volume
The Volume field distinguishes multiple-volume works such as encyclopedias, certain periodicals, and books. Only volumes that are catalogued as separate titles are valid in this field (the word Volume automatically appears when volume is referenced on an Alexandria window). If the item isn't part of a multiple-volume work, leave the field blank. The volume is saved at MARC tags 800-830 (you can also use 092_v or 490_v).
Edition
Enter edition information as you want it to appear in reports. For example, “2nd Ed.” or “2nd rev. Ed.” Edition information is saved in MARC field 250_a.
Extent
Enter physical information about the item (e.g. number of pages, total playing time, number of slides, illustration information). You can specify which subfield the extent data is saved in by following AACR2 rules of punctuation.
- 300_a (Extent), has no proceeding punctuation.
- 300_b (Other Physical Details, such as illustration info), preceded by a colon.
- 300_c (Dimensions), preceded by a semicolon.
- 300_e (Accompanying Material), preceded by a plus sign.
Examples:
- "300_a161 pp._c22 cm._e161 pages with ills." is shown as "161 pp.; 22cm. 161 pages with ills."
- "300_aFilmstrip_bColor_c35mm_eSound cassette." is shown as: "Filmstrip: Color; 35mm Sound cassette."
Year
Enter the year of publication. Omit ending punctuation. Estimated dates are enclosed in brackets. Saved in MARC field 260_c.
Publisher
Enter the name of the publisher. Saved in MARC field 260_b.
Place
Enter the place of publication. Saved in MARC field 260_a.
Are you cataloging ebooks or equipment? Here are some resources!
The fields of the Publication subtab are used to supply title-specific publication information.
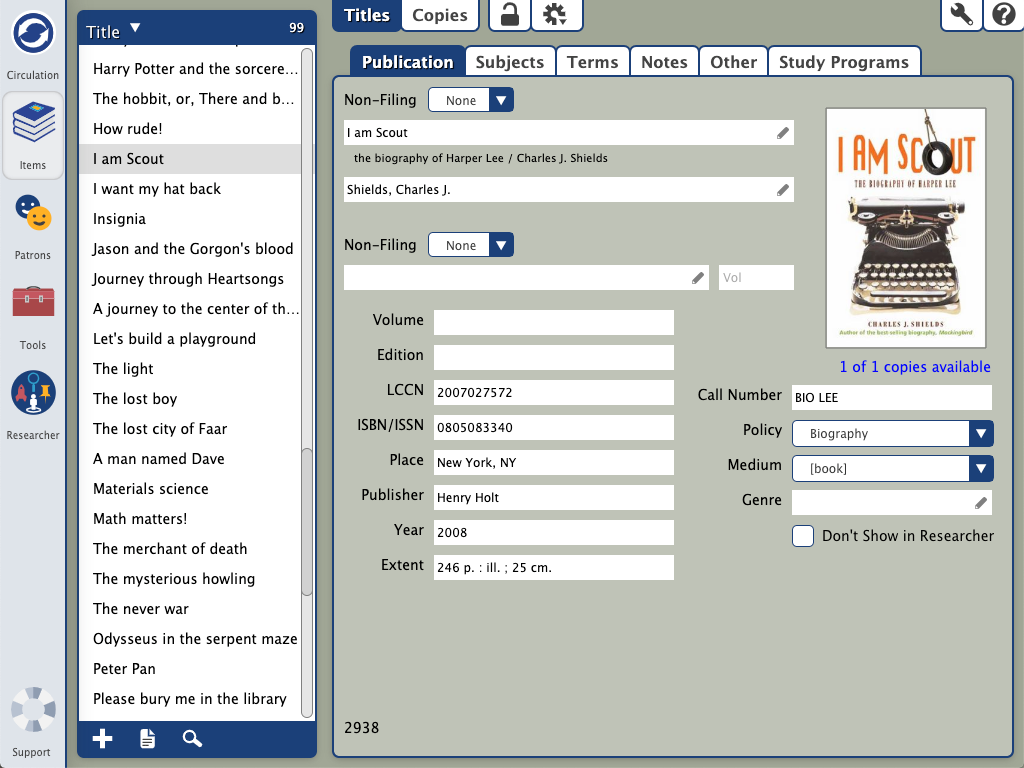
Non-Filing (Title)
This drop-down menu allows you to specify terms (less than eight characters long) in the title to ignore when indexing the title. Thus, if your title is “The Wizard of Oz”, you can select The from the Non-Filing drop-down menu so the book is sorted (indexed) as “Wizard of Oz”. Alexandria will also ignore following spaces or punctuation characters.
Title
This is a required field; the record will not be saved unless a Title value is entered. The title is saved under MARC field 245_a.
Author
This is the primary author saved in MARC tag 100_a; enter the author's name in “Last Name, First Name” format. To add/edit additional authors, use the MARC View editor and add them as repeating 700_a or other appropriate tags.
Non-Filing (Series)
This drop-down menu allows you to specify terms (less than eight characters long) in the title to ignore when indexing the series. Thus, if your series is “The Chronicles of Narnia”, you can select The from the Non-Filing drop-down menu so the series is sorted (indexed) as “Chronicles of Narnia”. Alexandria will also ignore following spaces or punctuation characters
Series
If the item is part of a series, enter the series name here. Otherwise, leave this field blank. Saved in MARC fields 800-830.
Volume
The Volume field distinguishes multiple-volume works such as encyclopedias, certain periodicals, and books. Only volumes that are catalogued as separate titles are valid in this field (the word Volume automatically appears when volume is referenced on an Alexandria window). If the item isn't part of a multiple-volume work, leave the field blank. The volume is saved at MARC tags 800-830 (you can also use 092_v or 490_v).
Edition
Enter edition information as you want it to appear in reports. For example, “2nd Ed.” or “2nd rev. Ed.” Edition information is saved in MARC field 250_a.
LCCN
Enter the item's Library of Congress Control Number. The LCCN is a unique 8-digit identifier assigned to an item's bibliographic record. You may enter the LCCN with or without punctuation, however, only numeric digits are saved. LCCN is saved in MARC field 010_a.
ISBN/ISSN
Enter the item's International Standard Book Number; saved in MARC field 020_a. The ISBN is a unique identifier. A title may have more than one ISBN (e.g., the ISBN for the hardback edition differs from the paperback edition). Alexandria only displays the first ISBN found in the MARC record. You can enter an ISSN rather than an ISBN. If the number you enter is 8 digits, Alexandria assumes the number is an ISSN and saves it at MARC tag 022_a. If it has 10 digits, Alexandria assumes it is an ISBN.
If you enter an invalid ISBN number, a question mark (?) appears at the beginning of the number to indicate that it is not valid. Any punctuation, dashes, or spaces are not valid and will be removed by Alexandria.
Place
Enter the place of publication. Saved in MARC field 260_a.
Publisher
Enter the name of the publisher. Saved in MARC field 260_b.
Year
Enter the year of publication. Omit ending punctuation. Estimated dates are enclosed in brackets. Saved in MARC field 260_c.
Extent
Enter physical information about the item (e.g. number of pages, total playing time, number of slides, illustration information). You can specify which subfield the extent data is saved in by following AACR2 rules of punctuation.
- 300_a (Extent), has no proceeding punctuation.
- 300_b (Other Physical Details, such as illustration info), preceded by a colon.
- 300_c (Dimensions), preceded by a semicolon.
- 300_e (Accompanying Material), preceded by a plus sign.
Examples:
- "300_a161 pp._c22 cm._e161 pages with ills." is shown as "161 pp.; 22cm. 161 pages with ills."
- "300_aFilmstrip_bColor_c35mm_eSound cassette." is shown as: "Filmstrip: Color; 35mm Sound cassette."
Cover Art
The item picture field. If you would like to add or change an item’s picture at this time, you can upload a GIF, BMP, PIC, JPG, PNG (or any other standard image file) using the Browse for Item Picture selection found in the primary Actions ![]() menu of Items Management. There is a 250kb size limit for uploaded images.
menu of Items Management. There is a 250kb size limit for uploaded images.
Call Number
Each title is assigned a call number; saved in MARC field 900_a. The call number designates the location of an item in the library. Because call numbers are site-specific rather than universal (such as LCCN and ISBN), you must enter call numbers that are specific to your library. Depending on their source, imported MARC records may or may not include a call number for your items. Copies will “inherit” the title call number unless a specific copy call number is changed.
Policy
The item policy determines the circulation rules for a particular group of items. Every title is given a policy. In addition to enforcing circulation rules, an item's policy is used to group items for statistical analyses and reporting purposes. Copies will “inherit” the title policy unless a specific policy is assigned.
Medium
The medium identifies the “media type” or physical format of the item. This drop-down menu lets you choose from existing mediums that have been used so far in your library. The default is Book. You can create a new medium by saving a new 245_h MARC field in the MARC View editor. If you would like to remove a medium from this list, you must replace the unwanted “media type” in all records that use it; it will then completely disappear as a selection.
The following is a list of Mediums that Alexandria supports by default; entering any of the terms in the MARC View exactly as they're shown below will create a medium with the default image already provided. Of course, you can change this later if you would like in your Cover Art preferences.
Genre
A “genre” indicates the formand/or physical characteristics of the item; for example, biography, essay, reviews, journal, diary, etc. You can create a new genre by saving a new 655_a MARC field in the MARC View editor.
Don't Show in Researcher
Use this checkbox if you don’t want the title to appear in your Researcher results when a patron performs a search. This setting applies to all copies across all collections in a database.
Title RSN
This number that appears in the bottom-left corner of the Publication subtab is a title's unique RSN (i.e. resource number). This number can be used with the titlersn:: query type when composing your own search strings
Myra: I would have a bit of an introduction to Copies (above the record list heading). so they know what sections there will be in this tab. e.g. "The Copies tab lets you manage the physical copies of your selected title using the copy record list on the left, and the copy information on the right."
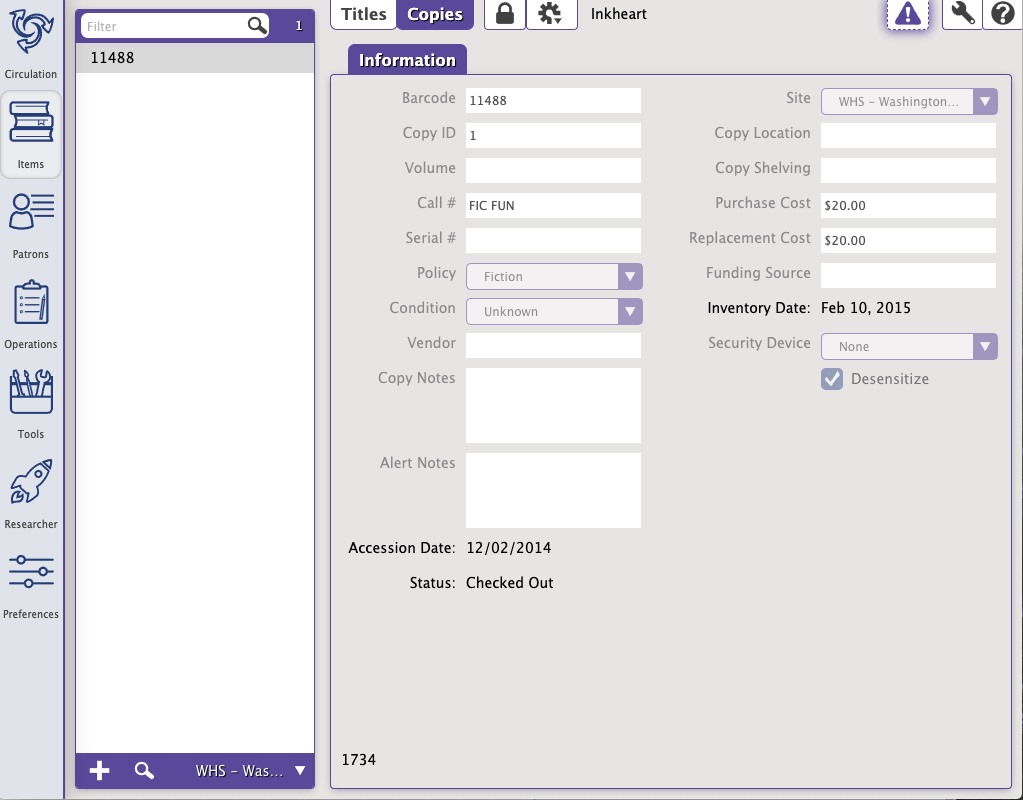
![]() Items > Copies tab
Items > Copies tab
Records List
The Records list on the left of the Copies Management window includes all of the copy records for the title you selected. For titles with only a few copies, you can easily scroll through them to find what you're looking for. If there are a lot of copies for that title, you may need to narrow your search.
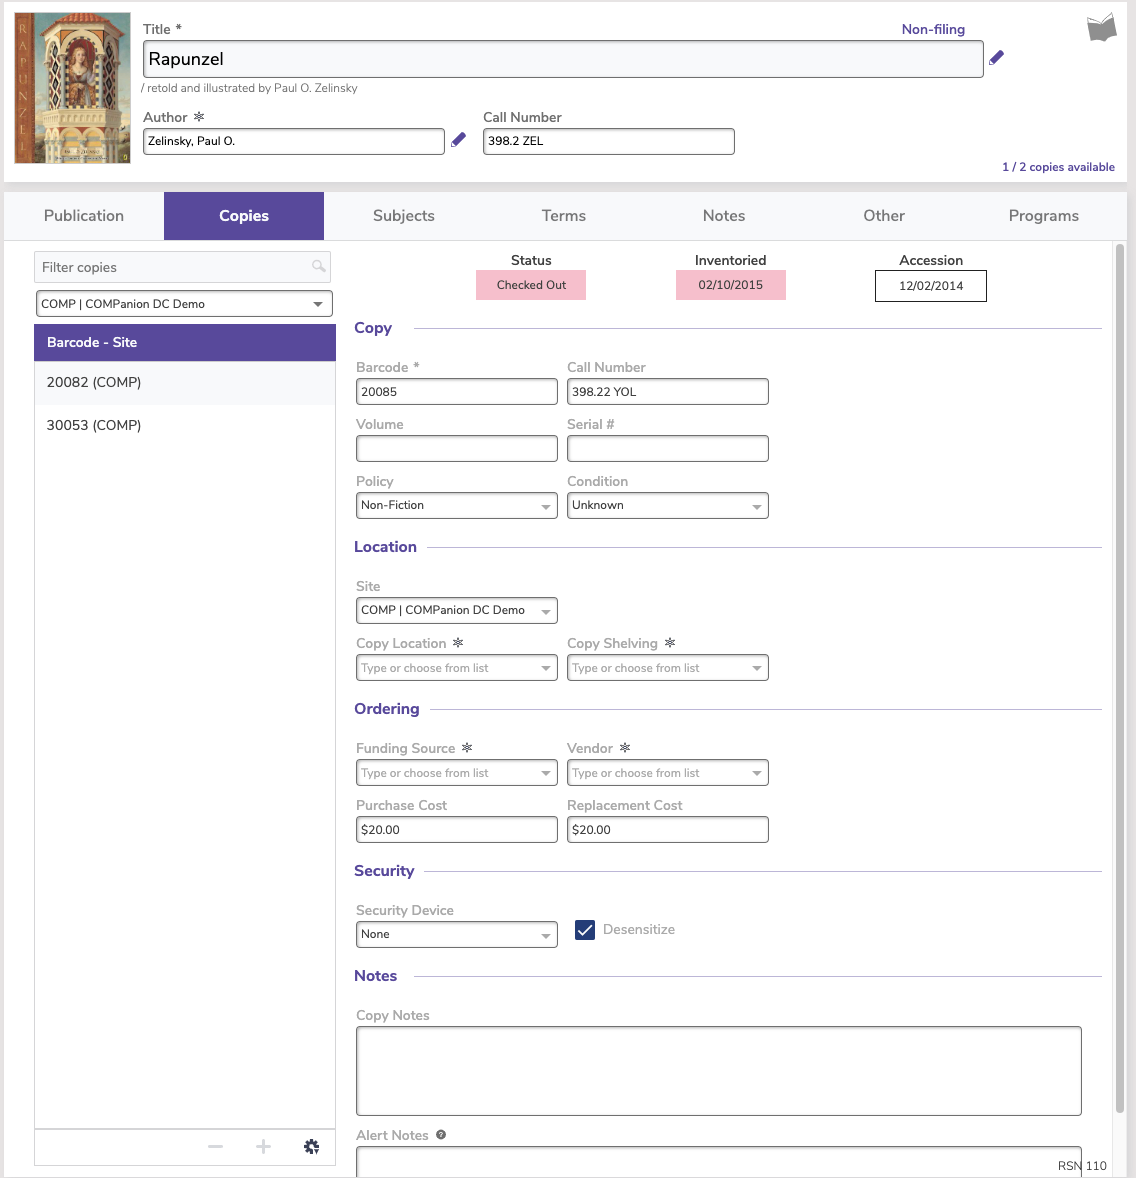
You can differentiate between copies by looking at the data in the Information tab to the left of the Copy information.
Filter
Do you know part of the barcode for the copy you're looking for? Enter it here. The number of copies matching your filter is listed to the right.
Add Copy
Click ![]() to add a new copy to this title. Enter the copy information in the fields to the right, then click Save.
to add a new copy to this title. Enter the copy information in the fields to the right, then click Save.
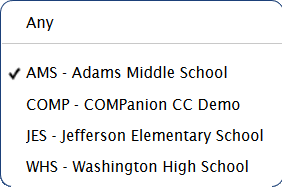
Site
Click ![]() to change the site you're searching in. Each site is listed by the site code and name.
to change the site you're searching in. Each site is listed by the site code and name.
Copies Actions Menu
When the Copies tab is selected, the ![]() Actions Menu contains copy record-specific actions and other tools.
Actions Menu contains copy record-specific actions and other tools.
- Add Copy. This selection adds a new copy record to the title. Remember, new copies are part of the title record and will not be added until you click Save.
- Remove Copy. Selecting this option will remove the currently selected copy, regardless whether it is Lost or Available. This selection is only available when there are copies available in the Copies tab.
- Duplicate Copy. This duplicates the currently selected copy; duplicated copy records are provided a new Barcode depending on the Next Barcode setting in your Item Defaults preferences.
- Show Map. If the copy's Call Number falls within the Call Number range of a corresponding map (created in Maps Management), selecting Show Map will display the map, detailing where the copy is located in your library. If the current copy lacks a Call Number (or there is no map with an associated call number range), the Show Map selection is disabled.
- Statistics. The Statistics dialog shows copy-specific circulation information; this information is used to help assess individual copy usage. It can be used for reference when ordering additional copies of items in high demand or weeding out infrequently used items. The information shown is a summary for all copies, and can not be modified.
- Transit History. This selection opens a dialog containing a summary of the copy's interlibrary transit history for the last two years.
Add Copy
Add, view, or modify copy information directly from any of the Copies tab in the Items Management module. However, you must first have a valid title record saved before you can proceed.
To locate a specific copy in your database, use the Item Lookup dialog by clicking the Find icon at the bottom of the items Records List pane.
Before you can make changes to the record, you'll have to manually unlock it by clicking the Unlock icon in the control strip at the top of the Items Management module.
- To add or modify item information, place your cursor in a field with an existing value (e.g. Barcode or Copy Location) and provide additional information. You can also highlight the entire value and replace it. To move to the next data entry field, press the <tab> key.
- To move to the previous data entry field, press <shift-tab> or <-tab>.
- To select a particular data entry field to edit, click in the field.
- To select from a drop-down menu, <tab> until the drop-down menu you desire is highlighted and use the <up> and <down> arrow keys to make your selection.
Once you've provided all the necessary information for this item, click the Save button in the upper-right corner of the Items management window. If you want to ignore the information you have entered, click the Revert button and the previous item record will be displayed. Clicking Save button causes the new item to appear in the item Records List pane of the Items management module. You will be unable to select another record or leave the Items management module until you first Revert or Save your changes.
Remove Copy
Items that have been discarded, given to other libraries, sold, or permanently lost should be routinely removed from your database to keep reports and searches from becoming cluttered with obsolete information. However, be absolutely certain that the copies you are about to remove should be permanently expunged from your collection.
For example, a lost item may eventually be found or later returned. In cases like these, it is better to record items as Lost, Discarded, On Repair, On Order, Archived, or Unknown. These special statuses (i.e. System Patrons) allow you to keep track of items that may eventually return to your library. Only remove copies that you know will never return to your collection.
Record List
The Records list on the left of the Copies Management window includes all of the copy records for the title you selected in the Titles tab. For titles with only a few copies, you can easily scroll through them to find what you're looking for. But if there are a lot of copies for that title, you may need to narrow your search.
You can differentiate between copies by looking at the data in the Information tab to the right of the Records list.
Filter
Do you know part of the barcode for the copy you're looking for? Enter it here. The number of copies matching your filter is listed to the right.
Add Copy
Click ![]() to add a new copy to this title. Enter the copy information in the fields to the right, then click Save.
to add a new copy to this title. Enter the copy information in the fields to the right, then click Save.
Search Copies
At the bottom of the Copy Records list on the left, click ![]() to open the Search Copies dialog. Enter your search criteria in the fields below, then click Search.
to open the Search Copies dialog. Enter your search criteria in the fields below, then click Search.
- Barcode
- Copy Call #
- Serial #
- Copy Policy
- Condition
- Status
- Copy Location
- Copy Shelving
- Funding Source
- Vendor
- Copies Added. Enter the From and Through dates.
- Site. Select the site for
Site
Click ![]() to change the site you're searching in. Each site is listed by the site code and name.
to change the site you're searching in. Each site is listed by the site code and name.
Copies Actions Menu
When the Copies tab is selected, the ![]() Actions Menu contains copy record-specific actions and other tools.
Actions Menu contains copy record-specific actions and other tools.
- Add Copy. This selection adds a new copy record to the title. Remember, new copies are part of the title record and will not be added until you click Save.
- Remove Copy. Selecting this option will remove the currently selected copy, regardless whether it is Lost or Available. This selection is only available when there are copies available in the Copies tab.
- Duplicate Copy. This duplicates the currently selected copy; duplicated copy records are provided a new Barcode depending on the Next Barcode setting in your Item Defaults preferences.
- Show Map. If the copy's Call Number falls within the Call Number range of a corresponding map (created in Maps Management), selecting Show Map will display the map, detailing where the copy is located in your library. If the current copy lacks a Call Number (or there is no map with an associated call number range), the Show Map selection is disabled.
- Statistics. The Statistics dialog shows copy-specific circulation information; this information is used to help assess individual copy usage. It can be used for reference when ordering additional copies of items in high demand or weeding out infrequently used items. The information shown is a summary for all copies, and can not be modified.
- Transit History. This selection opens a dialog containing a summary of the copy's interlibrary transit history for the last two years.
Add Copy
Add, view, or modify copy information directly from any of the Copies subtabs in the Items Management module. However, you must first have a valid title record saved before you can proceed.
To locate a specific copy in your database, use the Item Lookup dialog by clicking the Find icon at the bottom of the items Records List pane.
Before you can make changes to the record, you'll have to manually unlock it by clicking the Unlock icon in the control strip at the top of the Items Management module.
- To add or modify item information, place your cursor in a field with an existing value (e.g. Barcode or Copy Location) and provide additional information. You can also highlight the entire value and replace it. To move to the next data entry field, press the <tab> key.
- To move to the previous data entry field, press <shift-tab> or <-tab>.
- To select a particular data entry field to edit, click in the field.
- To select from a drop-down menu, <tab> until the drop-down menu you desire is highlighted and use the <up> and <down> arrow keys to make your selection.
Once you've provided all the necessary information for this item, click the Save button in the upper-right corner of the Items management window. If you want to ignore the information you have entered, click the Revert button and the previous item record will be displayed. Clicking Save button causes the new item to appear in the item Records List pane of the Items management module. You will be unable to select another record or leave the Items management module until you first Revert or Save your changes.
Remove Copy
Items that have been discarded, given to other libraries, sold, or permanently lost should be routinely removed from your database to keep reports and searches from becoming cluttered with obsolete information. However, be absolutely certain that the copies you are about to remove should be permanently expunged from your collection.
For example, a lost item may eventually be found or later returned. In cases like these, it is better to record items as Lost, Discarded, On Repair, On Order, Archived, or Unknown. These special statuses (i.e. System Patrons) allow you to keep track of items that may eventually return to your library. Only remove copies that you know will never return to your collection.
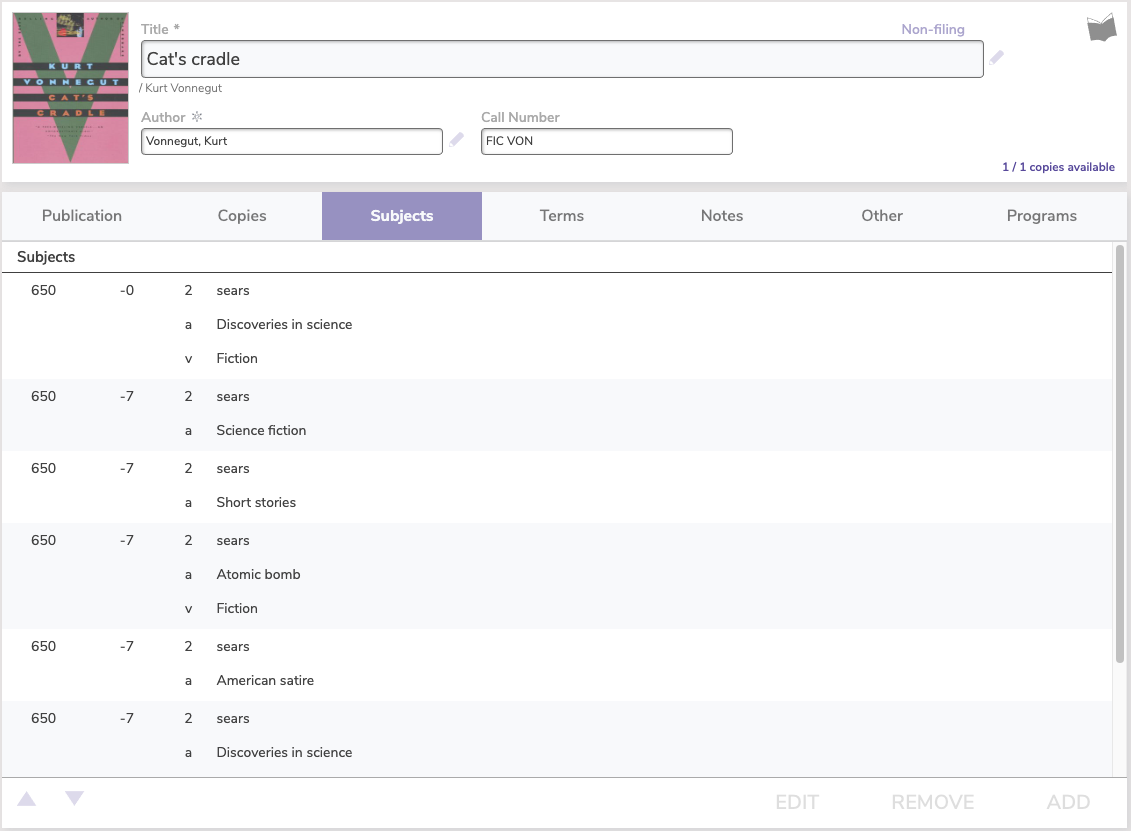
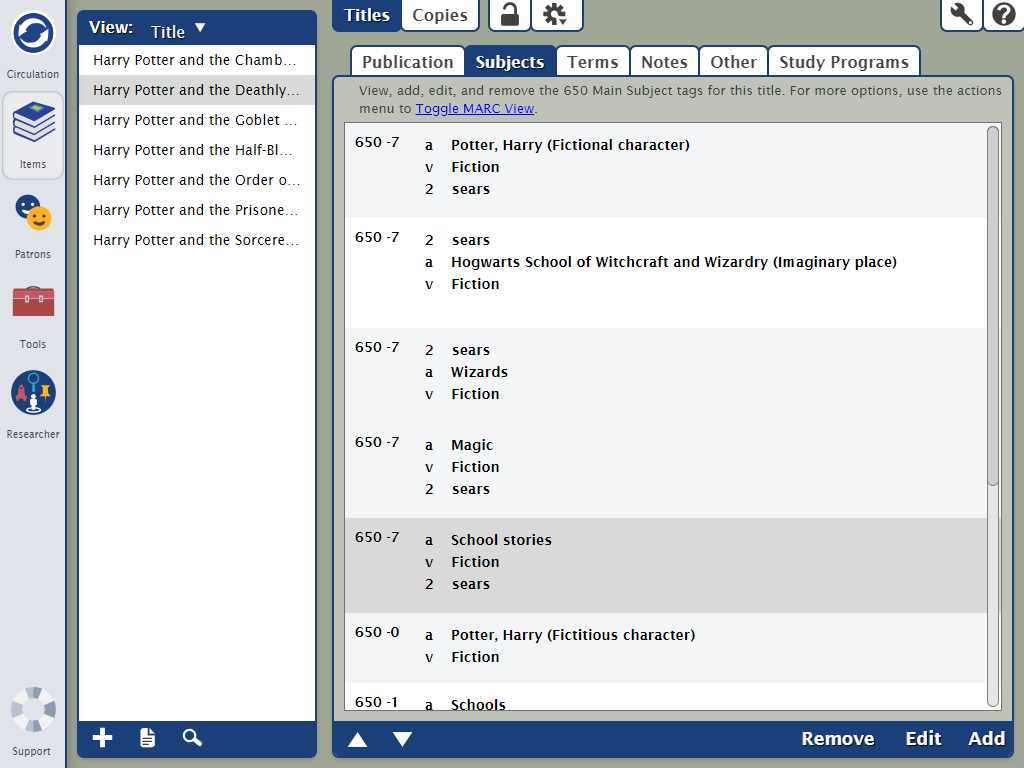
Tag View
This is where you can add, edit, or remove MARC tags, indicators, and subfield data. Click the padlock icon to unlock the record for editing.
- Add. Opens the editor to add a new subject tag:
- 600 - Subject Added Entry - Personal Name
- 610 - Subject Added Entry - Corporate Name
- 611 - Subject Added Entry - Meeting Name
- 630 - Subject Added Entry - Uniform Title
- 650 - Subject Main Subject
- 651 - Subject Added Entry - Geographic Name
Select an item to enable these controls:
- Edit. Open the editor for the selected tag.
- Remove. Delete the selected tag.
- Arrows. Use the up and down arrows to change the order of the MARC record in the list.
- You can re-order records within the same tag numbers. For example, 650 tags can be moved higher or lower than another 650 tag, but they can't be moved under 651 tags.
- You can re-order records within the same tag numbers. For example, 650 tags can be moved higher or lower than another 650 tag, but they can't be moved under 651 tags.
Keyboard Shortcuts
- Use the arrows on your keyboard to select the tag above or below the one you've selected.
- <double-click> or <enter> to open the editor.
- <delete> to remove the tag.
You can switch between title tabs (Publication, Subjects, Terms, Notes, Other, Study Programs) without losing your changes, but don't forget to click Save before you move to another title!
Editor
The tag editor allows you to add, edit, or remove tags, indicators, and subfield information. Select a field to edit it, or click New Subfield to add a new one. When you're done, click OK to go back to tag view.
Keyboard Shortcuts
- <Alt+Enter> creates a new subfield.
- <Esc> cancels the changes you've made and returns to the tag view.
- <Enter> OK’s the changes you've made in the editor and returns to the tag view.
Every term in MARC subject fields are cataloged by Alexandria, searched by Researcher, and can be referenced in reports.
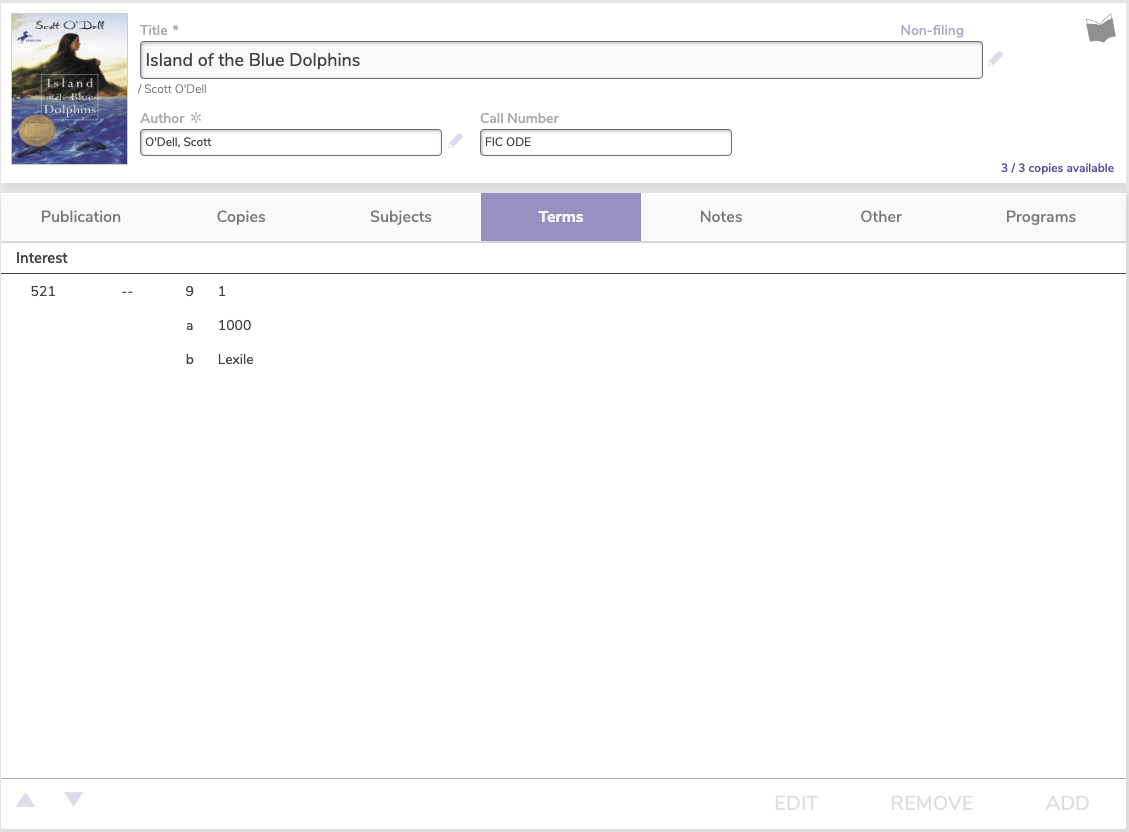
Terms Tab
This tab provides a way to group items into custom categories and searchable groups.
For example, say you want a way to quickly search for a group of books in Researcher. An easy way to do this would be to add a Bibliographic (653_a), Curriculum (658_a), or Interest Term (521_a) to the desired titles, and then use the Explore Builder to create a search pane and icon that performs the desired Bibliographic/Curriculum Term/Interest Level search. This allows you to guide your patrons to the recommended list (such as a makeshift “bibliography” created by the librarian per teacher's request) of titles for specific projects or assignments.
Terms Settings
When you add text to the categories in this window, patrons can search the text and find items in your collection. For example, you can create groups in the Curriculum Term column for a particular teacher's class. You can then catalog the books for that class with that Curriculum Term value. When students search the curriculum group, the search results will display all books required for that teacher's class.
- Bibliographic Term. Used to create bibliographies of interest to patrons. An item may belong to several different bibliographic categories. Bibliography data is saved in the MARC tag 653_a. This is also called an Index Term - Uncontrolled by the Library of Congress and is shown as that in the MARC View editor.
- Curriculum Term. Contains curriculum information for a title. For example, items that Mrs. Andres is using in her Geography 212 class can include curriculum categories such as “Geography 212” and “Mrs. Andres”. From an Alexandria Researcher, students can search for items by teacher or course name. Reports can be sorted by “curriculum”. The curriculum code data is stored in the MARC tag 658_a. This is also called a Index Term - Curriculum Objective by the Library of Congress and is shown as that in the MARC View editor.
- Interest Term. Contains information regarding the item's intended audience. Be consistent in how you enter the values in this field and be sure your patrons know what values to search for (e.g. if you enter “8th grade” as an interest category, be sure your patrons know to enter “8th grade” rather than “Eighth Grade”)[1]. Interest level data is saved in MARC tag 521_a[2]. This is also called a Target Audience Note by the Library of Congress and is shown as that in the MARC View editor.
This subtab provides a way to group items into custom categories specific to your location. Category groupings make it easier to access related items in your collection.
One way that Terms are useful is when you create searchable groups of correlated items.
For example, say you want a way to quickly search for a group of books from an Alexandria Researcher interface; an easy way to do this would be to add a Bibliographic (653_a), Curriculum (658_a), or Interest Term (521_a) to a set of desired title records and then use the Explore Builder to create a search pane and icons that performs the desired Bibliographic/Curriculum Term/Interest Level search.
This allows you to guide your patrons to a recommended list (such as a makeshift “bibliography” created by the librarian per teacher's request) of titles for specific projects or assignments. In a school library, this is a very valuable tool, especially since even the most advanced of searches will rarely produce a complete list of titles that a teacher may want their students to use.
However, when you apply the Perform Search action to a button in the Explore interface, it will conduct a search for any title containing those specific Bibliographic/Curriculum/Interest terms when clicked by a patron. Since titles in an ordinary “saved list” can be removed by patrons at any time, another advantage of using the keyword classifications method is that you can add or remove Bibliographic/Curriculum/Interest terminology from individual title records at any time and not have to worry about changing Explore Button configurations.
Terms Settings
When you add text to the categories in this window, patrons can search the text and find items in your collection. For example, you can create groups in the Curriculum Term column for a particular teacher's class. You can then catalog the books for that class with that Curriculum Term value. When students search the curriculum group, the search results will display all books required for that teacher's class.
- Bibliographic Term. Used to create bibliographies of interest to patrons. An item may belong to several different bibliographic categories. Bibliography data is saved in the MARC tag 653_a. This is also called an Index Term - Uncontrolled by the Library of Congress and is shown as that in the MARC View editor.
- Curriculum Term. Contains curriculum information for a title. For example, items that Mrs. Andres is using in her Geography 212 class can include curriculum categories such as “Geography 212” and “Mrs. Andres”. From an Alexandria Researcher, students can search for items by teacher or course name. Reports can be sorted by “curriculum”. The curriculum code data is stored in the MARC tag 658_a. This is also called a Index Term - Curriculum Objective by the Library of Congress and is shown as that in the MARC View editor.
- Interest Term. Contains information regarding the item's intended audience. Be consistent in how you enter the values in this field and be sure your patrons know what values to search for (e.g. if you enter “8th grade” as an interest category, be sure your patrons know to enter “8th grade” rather than “Eighth Grade”)[1]. Interest level data is saved in MARC tag 521_a[2]. This is also called a Target Audience Note by the Library of Congress and is shown as that in the MARC View editor.
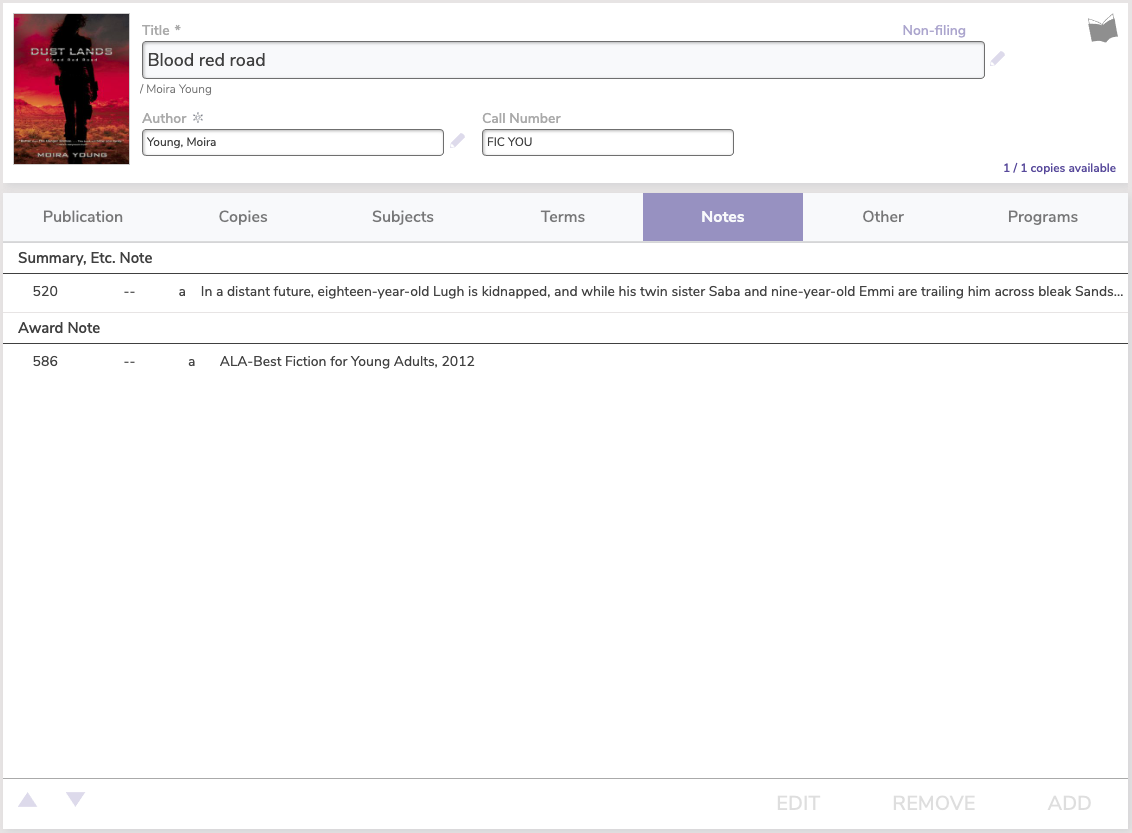
The Summary section allows you to input title summaries either manually or from information provided from the MARC record.
- 500 - General Note. Provide general information for this title; for example, general notes can read “Translated from Greek” or “Includes Index”. General notes are saved under MARC field 500_a.
- 505 - Formatted Contents Note. Provide title content notes. For example, content notes for an anthology may list the works included within the anthology. You can separate content notes by pressing the <return | enter> key after a content entry; this will automatically create the proper MARC content separator (in this case, <space> — <space>) in the MARC tag. Content notes are saved under MARC field 505_a.
- 520 - Summary, Etc. Note.
- 586 - Awards Note. Contains any award information for this title. Some examples of useful awards notes include “Caldecott Medal, 1979”, “National Book Award, 1981”, and “Pulitzer Prize for Nonfiction, 1981”. Awards notes are saved under MARC field 586_a.
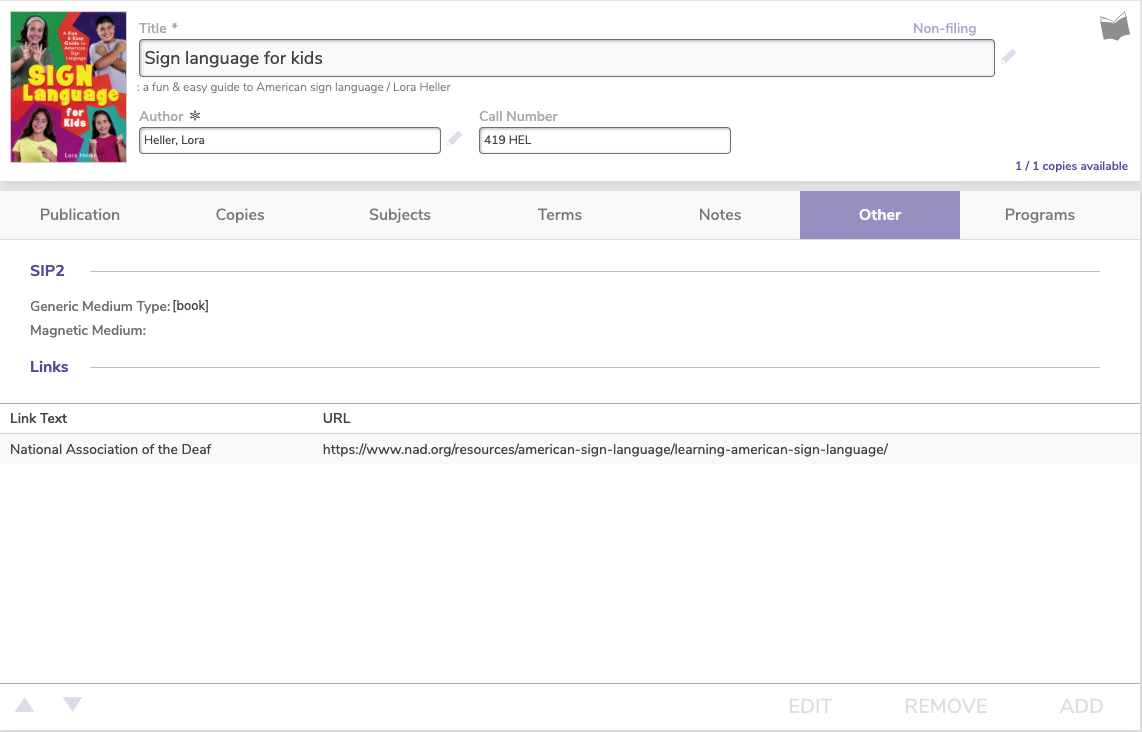
The Other subtab handles SIP2 magnetic medium settings and the ability to add, remove, or edit URLs attached to the title record. Links appear in the Results Details of the Alexandria Researcher when an item is found through a search. Your patrons can click on attachments to view or launch them from Results Details.
SIP2 Options
Generic Medium Type
Use this drop-down menu to select the title record's medium type. If you already have a medium type specified from the primary information section of the Items Management window, the Generic Medium Type field will automatically try to match them by making an educated guess.
Magnetic Medium
Use this checkbox to indicate if the medium of this item is magnetic to prevent your security hardware from erasing the data contained within.
If the medium you have selected is usually a magnetic medium (e.g. a VHS tape or cassette tape), then the Magnetic Medium checkbox will automatically be checked. However, this can be further customized depending on the title. For example, if you have a medium type of Video Tape, and you’re applying it to a reel-to-reel film, you can uncheck the Magnetic Medium box because it can’t be demagnetized going through an automated desensitization security device.
Links
Add links to an online version of the item or other related information. For those who are MARC-savvy, links are stored in the 856 tag with _y being the link description and _u being the URL. Use the buttons at the bottom of the screen to add, remove, edit, or rearrange URLs in the list.
![]()
![]()
Select a link and then use the arrows to move it up or down within the list. Order matters! We recommend listing them in order of most to least relevant, because only the first link in the list will be displayed in Researcher search results, but you can, click View Links to see the rest of them.
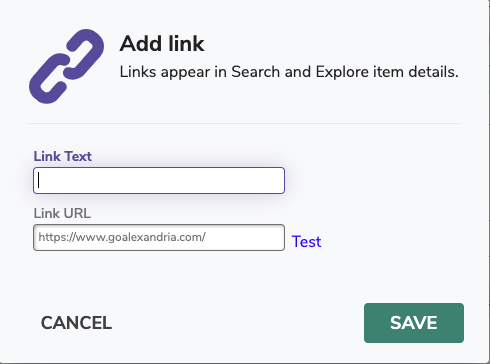
Add
Enter the complete URL (e.g. https://www.goalexandria.com/) and a link description (e.g. COMPanion Support Center) so your patrons know where it goes. You can make sure your link works by clicking Test, which will open the destination in a new tab. If it doesn't work, check the URL and try again, or click Cancel.
Remove
Select the URL you would like to remove from the Links list and click Remove.
Edit
Select the URL you would like to modify from the Links list and click Edit.

The Other subtab handles SIP2 magnetic medium settings and the ability to add, remove, or edit URLs attached to the title record. Links appear in the Results Details of the Alexandria Researcher when an item is found through a search. Your patrons can click on attachments to view or launch them from Results Details.
SIP2 Options
Generic Medium Type
Use this drop-down menu to select the title record's medium type. If you already have a medium type specified from the primary information section of the Items Management window, the Generic Medium Type field will automatically try to match them by making an educated guess.
Magnetic Medium
Use this checkbox to indicate if the medium of this item is magnetic to prevent your security hardware from erasing the data contained within.
If the medium you have selected is usually a magnetic medium (e.g. a VHS tape or cassette tape), then the Magnetic Medium checkbox will automatically be checked. However, this can be further customized depending on the title. For example, if you have a medium type of Video Tape, and you’re applying it to a reel-to-reel film, you can uncheck the Magnetic Medium box because it can’t be demagnetized going through an automated desensitization security device.
Links
Add links to an online version of the item or other related information. For those who are MARC-savvy, links are stored in the 856 tag with _y being the link description and _u being the URL. Use the buttons at the bottom of the screen to add, remove, edit, or rearrange URLs in the list.
![]()
![]()
Select a link and then use the arrows to move it up or down within the list. Order matters! We recommend listing them in order of most to least relevant, because only the first link in the list will be displayed in Researcher search results, but you can, click View Links to see the rest of them.
Add
Enter the complete URL (e.g. https://www.goalexandria.com/) and a link description (e.g. COMPanion Support Center) so your patrons know where it goes. You can make sure your link works by clicking Test, which will open the destination in a new tab. If it doesn't work, check the URL and try again, or click Cancel.
Remove
Select the URL you would like to remove from the Links list and click Remove.
Edit
Select the URL you would like to modify from the Links list and click Edit.
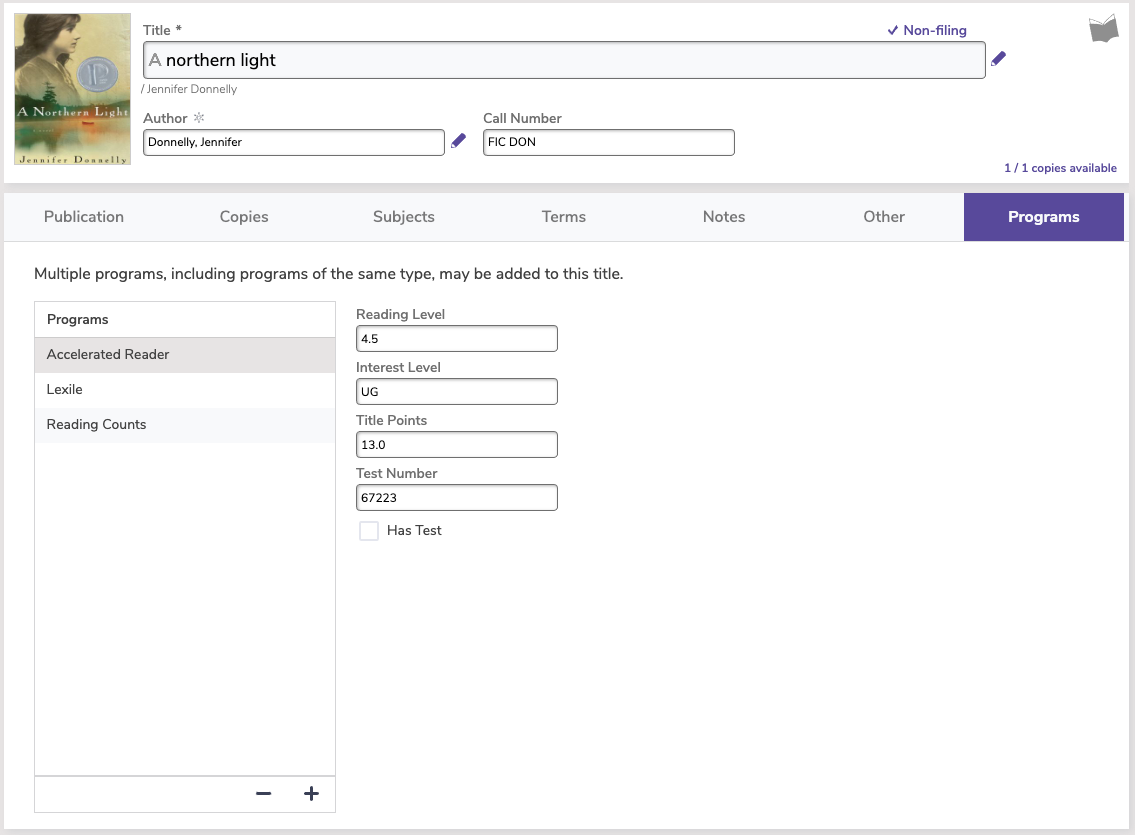
The Programs tab contains all of the study programs associated with this title. Selecting a study program from the the list will display its associated settings on the right. You may add multiple study programs for each title record, including programs of the same type.
Study Program Settings
Select the study program you would like to add; doing so will create a new 521 or 526 MARC tag for the current title record.
Accelerated Reader
- Interest Level
- Reading Level
- Reading Points
- Test Number
Reading Counts
- Interest Level
- Reading Level
- Reading Points
- Test Number
Fountas and Pinnel
- Interest Level
Guided Reading
- Interest Level
Lexile
- See Item Lexiles
Examples of Study Programs in MARC 21 format:
| Accelerated Reader | Reading Counts | Fountas & Pinnell | Other |
|---|---|---|---|
| 526 0 _aAccelerated Reader _c1.9 _d0.5 _xPull for holiday viewing! _z1831. _5CDL _91 | 526 0 _aReading Counts RC _b6-8 _c6.2 _d13. _z365. _5CDL _91 | 521 0 _aA-C _bFountas and Pinnell | 526 8 _aWinter Break Reading list. |
| 526 0 _aAccelerated Reader _c3.6 _d0.5 _z666 _5LMS | 526 0 _aReading Counts _bK-2 _c1.2 _d1 _5JMS | 521 0 _aA _bFountas and Pinnell | 526 8 _iOctober 2012 selection for: _aCOMPanion Reading Club. |
| 526 0 _aAccelerated Reader _c7.9 _d25 _z43 | 526 0 _aReading Counts _bK-2 _c2.7 _d2 _z1201 _5WMD | 521 0 _aQ _bFountas and Pinnell Leveled Books |
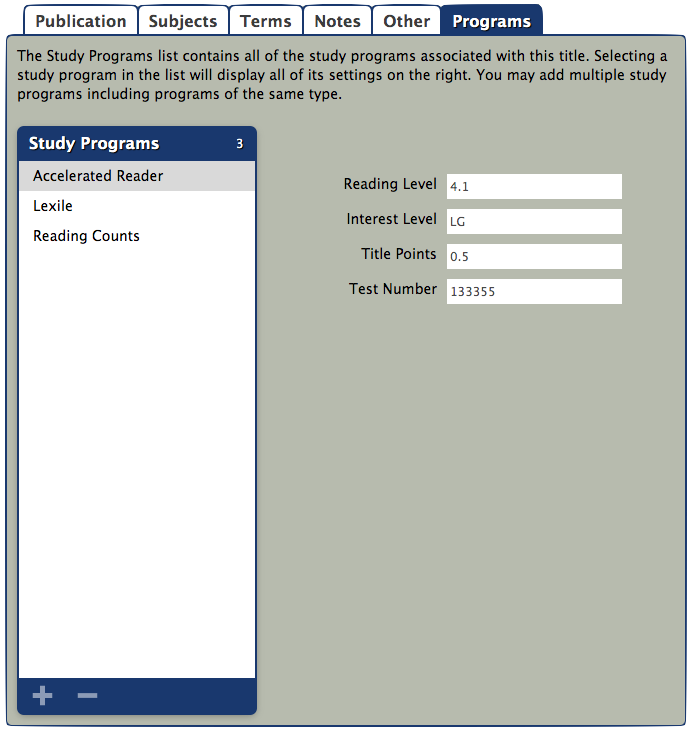
The Programs subtab contains all of the study programs associated with this title. Selecting a study program from the the list will display its associated settings on the right. You may add multiple study programs for each title record, including programs of the same type.
Study Program Settings
Select the study program you would like to add; doing so will create a new 521 or 526 MARC tag for the current title record.
Accelerated Reader
- Interest Level
- Reading Level
- Reading Points
- Test Number
Reading Counts
- Interest Level
- Reading Level
- Reading Points
- Test Number
Fountas and Pinnel
- Interest Level
Guided Reading
- Interest Level
Lexile
- Lexile Score. For more information on how to use this field and the From Title Match checkbox, please see Assigning An Item Lexile.
- Lexile Code. For more information on how to use this field and the From Title Match checkbox, please see Assigning An Item Lexile.
- From Title Match. When you run the Import Lexiles utility, you can choose to be either very strict and match only by ISBN or you can allow it to match on title, author, and publisher if there isn’t an ISBN match. When the utility performs the less strict matching, it will mark the From Title Match checkbox so that librarians can later verify the Lexile measurement.
Examples of Study Programs in MARC 21 format:
| Accelerated Reader | Reading Counts | Fountas & Pinnell | Other |
|---|---|---|---|
| 526 0 _aAccelerated Reader _c1.9 _d0.5 _xPull for holiday viewing! _z1831. _5CDL _91 | 526 0 _aReading Counts RC _b6-8 _c6.2 _d13. _z365. _5CDL _91 | 521 0 _aA-C _bFountas and Pinnell | 526 8 _aWinter Break Reading list. |
| 526 0 _aAccelerated Reader _c3.6 _d0.5 _z666 _5LMS | 526 0 _aReading Counts _bK-2 _c1.2 _d1 _5JMS | 521 0 _aA _bFountas and Pinnell | 526 8 _iOctober 2012 selection for: _aCOMPanion Reading Club. |
| 526 0 _aAccelerated Reader _c7.9 _d25 _z43 | 526 0 _aReading Counts _bK-2 _c2.7 _d2 _z1201 _5WMD | 521 0 _aQ _bFountas and Pinnell Leveled Books |