The Support Center has moved!! See the new website https://support.goalexandria.com/ ![]()

How helpful was this page?
Related Blog Posts
Blog Posts
-
Say cheese! All about patron pictures
created by
Aug 10, 2022
-
Assigning policies–the complete guide
created by
Mar 23, 2022
-
Update title records with exports & imports? Yes, you can!
created by
Jan 19, 2022
-
Getting equipped: Cataloging items for your library
created by
Jan 13, 2022
-
Saved field mapping—Easy peasy imports
created by
Feb 10, 2021
-
As you like it—Import Headings
created by
Nov 30, 2018
-
Importing MARC Records from a Vendor
created by
Oct 19, 2018
-
New Copies? In Processing
created by
Oct 06, 2014
Patron Imports Best Practices
Last Updated: $action.dateFormatter.formatDateTime($content.getLastModificationDate())

Overview
Most libraries import and remove patron records once a year. Depending on how you manage your patrons, there are different steps to ensuring your patron database is properly kept clean and up-to-date.

SIS
Using GG4L, Clever, or SIF

Manual Import or FTP
Running Quick or Saved Patron Imports
Manual Entry
Adding patrons through Patrons Management
See our Beginning-of-Year Procedures and End-of-Year Procedures for more information on preparing your library for different times of the school year.
SIS
1. Change patron locations (SIF only)
COMPanion will be discontinuing SIF support as of version Alex 22.1 in Summer 2022. Contact our Sales Team to learn more about GG4L!
If your tab-delimited import file includes patron homerooms, change the homeroom for all of your currently-enrolled students to the same value. This example will replace the homeroom for all of your currently enrolled students to “Gone”.
- Go to Operations > Utilities.
- Select the Patrons > General category.
- Choose the Change Patron Location utility on the right.
- In the Selections tab, choose the options needed to select a group of student patron records. For example, you may want to select a student-only policy and/or security group — you don't want to accidentally update operators and/or staff records.
- Patrons with a Status of: Active
- Patrons in Security Group: Patron
- Patrons with a Policy of: (Student)
- Patrons from: Homeroom
- Leave the From and Through fields blank if you want to update them all.
- In the Options tab, type “Gone” in the Change Location to field.
- Run the utility.
The Homeroom field for all of the patrons matching your selections will be changed to "Gone". Next, import your new student records from your SIS.
If you changed the term "Location" to "Homeroom" in Localization Preferences, the utility will show up as Change Patron Homeroom. If not, it will show up as Change Patron Location.
2. Update records
Enable your SIS integration in Alexandria and sync your new patron data.
3. Change patron policies
If you're using SIF, wait until the following day to change patron policies.
Do your patron policies match your patron grade levels? If not, you need to update each patron record so their policy matches their new grade. Run the Change Patron Policy utility for each grade.
- Go to Operations > Utilities.
- Select the Patrons > General category on the left.
- Choose the Change Patron Policy utility on the right.
- In the Selections tab, enter the criteria needed to select the patrons you intend to update.
- Patrons with a Status of: Limit the operation to one particular status, like Active, or choose Any to include them all.
- Patrons in Grade: Enter the user-defined value for the grade that needs to change (e.g. 8th), as defined in Grade Table preferences.
- In the Options tab, choose the policy that will be assigned to the selected patrons.
- Run the utility.
- Repeat steps 4-6 for each grade, as needed.
Do you keep records for graduated patrons?
You can also assign your Graduated policy to your recently graduated patrons with the Change Patron Policy utility. If you don't have a Graduated policy, create one first.
4. Remove patrons
Confirm patrons to be removed
Before you remove any patrons, first make sure that you won't accidentally remove anyone who isn't supposed to be removed.
- Go to Operations > Reports.
- Select the Patrons > Information category.
- Choose the Patron Information report on the right.
- On the Selections tab, choose the criteria for the patrons you want to remove.
- Patrons from Homeroom: Gone (if you used a manual import, FTP, or SIF)
- Patrons with a Status of: Transferred (if you use GG4L or Clever)
- Click Run.
- Download the report PDF from
 Operations.
 - Check for any patrons who shouldn't be removed (staff, teachers, etc). If you find any, you'll need to modify their homeroom either manually or by using the Change Patron Location utility (with the Patrons with Barcodes selection).
- After making any necessary modifications, run this report again and get an updated list.
- Once your list is acceptable, move on to removing patrons.
Remove gone and transferred patrons
Now that your student records have been updated, run the Remove Patrons utility to remove those patrons who aren't returning.
- Go to Operations > Utilities.
- Select the Patrons > General category on the left.
- Choose the Remove Patrons utility on the right.
- In the Selections tab, choose the criteria for the patrons whose records should be removed. Make sure Patrons from Homeroom is set to "Gone".
- Patrons from Homeroom: Gone (if you used a manual import, FTP, or SIF)
- Patrons with a Status of: Transferred (if you use GG4L or Clever)
- In the Options tab, choose if you want to remove patrons matching your criteria who still have items checked out or outstanding financial items. (Optional)
- Run the utility.
And that's it! You may need to run this utility a few times, depending on your selection criteria.
Remove graduated patrons
![]() Beginning or End of Year
Beginning or End of Year
![]() Skip this step if you keep records for graduated patrons.
Skip this step if you keep records for graduated patrons.
Run a Patron Information report and select by Patrons in Grade Graduated (or whatever your Last Grade is). Review the PDF to make sure you want to remove everyone who shows up on that list.
Then, run the Remove Patrons utility to remove graduated students from the database. You may need to run it multiple times with different selections, depending on your needs.
- Go to Operations > Utilities.
- Select the Patrons > General category.
- Choose the Remove Patrons utility on the right.
- On the Selections tab, enter the criteria needed to select the individual patrons or groups of patrons you intend to remove. Make sure the correct status is selected (like Active or Transferred, or choose Any to include them all). Then depending on your method for tracking graduated patrons, you can use two different selections:
- If you keep track of graduation dates in patron records, enter the appropriate date range or relative date in the Graduation Date field.
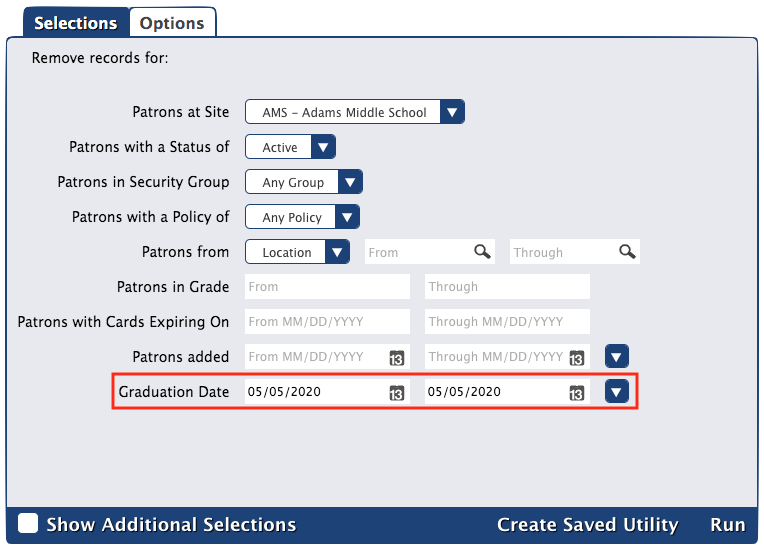
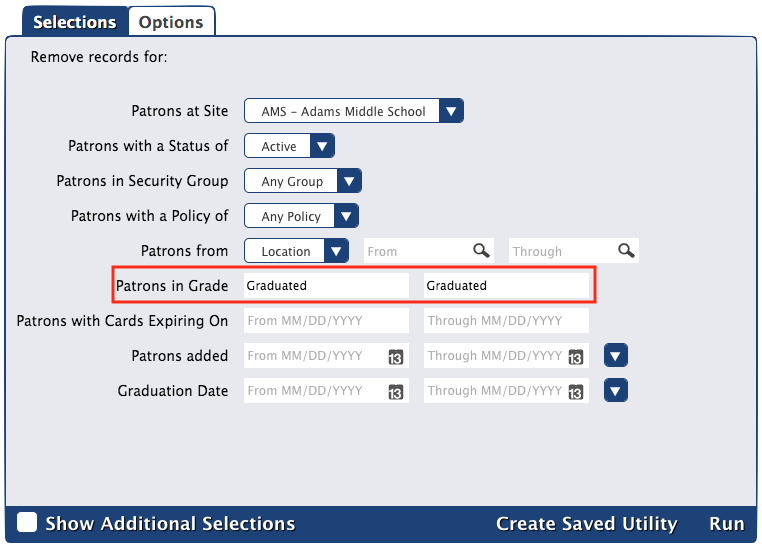
- If you use Last Grade in the Grade Table Preferences, enter the user-defined value for Last Grade in the Patrons in Grade field (most commonly "Graduated").
- If you keep track of graduation dates in patron records, enter the appropriate date range or relative date in the Graduation Date field.
- On the Options tab, choose if you want patrons to be removed even if they have items checked out or outstanding charges.
- Click Run.
Manual Import or FTP
Here are the steps to follow if your library updates patron data through a text file in a tab-delimited file format; most word-processing and spreadsheet applications support files in tab-delimited format. In most cases, patron data is readily available in a machine-readable format from your school’s front or district office.
Clean up Your Records with Patron Imports (2:44) 
Some students leave during the summer. Learn how to weed those records out using your patron import.
1. Change patron locations
If your tab-delimited import file includes patron homerooms, change the homeroom for all of your currently-enrolled students to the same value. This example will replace the homeroom for all of your currently enrolled students to “Gone”.
- Go to Operations > Utilities.
- Select the Patrons > General category.
- Choose the Change Patron Location utility on the right.
- In the Selections tab, choose the options needed to select a group of student patron records. For example, you may want to select a student-only policy and/or security group — you don't want to accidentally update operators and/or staff records.
- Patrons with a Status of: Active
- Patrons in Security Group: Patron
- Patrons with a Policy of: (Student)
- Patrons from: Homeroom
- Leave the From and Through fields blank if you want to update them all.
- In the Options tab, type “Gone” in the Change Location to field.
- Run the utility.
The Homeroom field for all of the patrons matching your selections will be changed to "Gone". Next, import your new student records from your SIS.
If you changed the term "Location" to "Homeroom" in Localization Preferences, the utility will show up as Change Patron Homeroom. If not, it will show up as Change Patron Location.
2. Run the import
Either set up and run a Quick Patron Import or Saved Patron Import (FTP). For FTP imports, you could either set up a daily schedule and wait for it to run the following day, or run the import to make sure it's set up correctly and then set the schedule to run daily.
Quick Patron Import
This macro has been removed. See the information under Manual Import > Quick Patron Import on Patron Imports Best Practices.
3. Change patron policies
If you're using a scheduled FTP import, wait until the following day after it's run to change patron policies.
Do your patron policies match your patron grade levels? If not, you need to update each patron record so their policy matches their new grade. Run the Change Patron Policy utility for each grade.
- Go to Operations > Utilities.
- Select the Patrons > General category on the left.
- Choose the Change Patron Policy utility on the right.
- In the Selections tab, enter the criteria needed to select the patrons you intend to update.
- Patrons with a Status of: Limit the operation to one particular status, like Active, or choose Any to include them all.
- Patrons in Grade: Enter the user-defined value for the grade that needs to change (e.g. 8th), as defined in Grade Table preferences.
- In the Options tab, choose the policy that will be assigned to the selected patrons.
- Run the utility.
- Repeat steps 4-6 for each grade, as needed.
Do you keep records for graduated patrons?
You can also assign your Graduated policy to your recently graduated patrons with the Change Patron Policy utility. If you don't have a Graduated policy, create one first.
4. Remove patrons
Confirm patrons to be removed
Before you remove any patrons, first make sure that you won't accidentally remove anyone who isn't supposed to be removed.
- Go to Operations > Reports.
- Select the Patrons > Information category.
- Choose the Patron Information report on the right.
- On the Selections tab, choose the criteria for the patrons you want to remove.
- Patrons from Homeroom: Gone (if you used a manual import, FTP, or SIF)
- Patrons with a Status of: Transferred (if you use GG4L or Clever)
- Click Run.
- Download the report PDF from Operations.
- Check for any patrons who shouldn't be removed (staff, teachers, etc). If you find any, you'll need to modify their homeroom either manually or by using the Change Patron Location utility (with the Patrons with Barcodes selection).
- After making any necessary modifications, run this report again and get an updated list.
- Once your list is acceptable, move on to removing patrons.
Remove gone and transferred patrons
Now that your student records have been updated, run the Remove Patrons utility to remove those patrons who aren't returning.
- Go to Operations > Utilities.
- Select the Patrons > General category on the left.
- Choose the Remove Patrons utility on the right.
- In the Selections tab, choose the criteria for the patrons whose records should be removed. Make sure Patrons from Homeroom is set to "Gone".
- Patrons from Homeroom: Gone (if you used a manual import, FTP, or SIF)
- Patrons with a Status of: Transferred (if you use GG4L or Clever)
- In the Options tab, choose if you want to remove patrons matching your criteria who still have items checked out or outstanding financial items. (Optional)
- Run the utility.
And that's it! You may need to run this utility a few times, depending on your selection criteria.
Remove graduated patrons
![]() Beginning or End of Year
Beginning or End of Year
![]() Skip this step if you keep records for graduated patrons.
Skip this step if you keep records for graduated patrons.
Run a Patron Information report and select by Patrons in Grade Graduated (or whatever your Last Grade is). Review the PDF to make sure you want to remove everyone who shows up on that list.
Then, run the Remove Patrons utility to remove graduated students from the database. You may need to run it multiple times with different selections, depending on your needs.
- Go to Operations > Utilities.
- Select the Patrons > General category.
- Choose the Remove Patrons utility on the right.
- On the Selections tab, enter the criteria needed to select the individual patrons or groups of patrons you intend to remove. Make sure the correct status is selected (like Active or Transferred, or choose Any to include them all). Then depending on your method for tracking graduated patrons, you can use two different selections:
- If you keep track of graduation dates in patron records, enter the appropriate date range or relative date in the Graduation Date field.
- If you use Last Grade in the Grade Table Preferences, enter the user-defined value for Last Grade in the Patrons in Grade field (most commonly "Graduated").
- If you keep track of graduation dates in patron records, enter the appropriate date range or relative date in the Graduation Date field.
- On the Options tab, choose if you want patrons to be removed even if they have items checked out or outstanding charges.
- Click Run.
Manual Entry
Some libraries, such as small schools and public libraries, update their patron records manually in Patrons Management. Exact procedures for users in this group will vary depending on your library type, but here are some general steps that may be helpful. Contact Customer Support if you need assistance figuring out the best procedure for your library.
1. Advance patrons
![]() Beginning or End of Year
Beginning or End of Year
If you have a school library, advance patron grade levels all at once. Some libraries do it at the end of the year, and others do it at the beginning of the year. Either way is fine, just don't skip it.
Advancing Patron Grades (3:19)
Learn how to Advance All Patron Grades and update patron policies afterwards.
Advance patron grade levels
There are two ways to advance your patron grade levels for the next year. Advance All Grades in Patron Preferences is the easiest option, but the Advance Patron Grade utility allows you to advance a more select group of patrons. Patrons who advance past the final grade in the grade table are assigned the value for Last Grade, which is usually "Graduated". You may only need to do this step if you want to keep track of graduated students. Otherwise, your import will update grade information.
Advance All Grades
Advance all of your patrons to the next grade level at the same time.
- Go to Tools > Preferences > Patrons.
- Open the Grade Table tab.
- Double-check the grade table and the Last Grade field for accuracy.
- Check the Advance Grade After date, and change it if necessary. This is usually the graduation date or the last day of school.
- Click Advance All Grades.
Advance Patron Grade utility
Need to be more precise about which patrons to advance? Select patrons by one or more options, including status, security group, policy, homeroom, grade, last name, and barcode.
- Go to Tools > Utilities.
- Select Patrons > General category on the left.
- Choose the Advance Patron Grade utility on the right.
- In the Selections tab, enter the criteria needed to select the patrons you intend to update.
- Click Run.
2. Add new patrons
Go into Patrons Management and add new patron records.
3. Change patron policies
Do your patron policies match your patron grade levels? If not, you need to update each patron record so their policy matches their new grade. Run the Change Patron Policy utility for each grade.
- Go to Operations > Utilities.
- Select the Patrons > General category on the left.
- Choose the Change Patron Policy utility on the right.
- In the Selections tab, enter the criteria needed to select the patrons you intend to update.
- Patrons with a Status of: Limit the operation to one particular status, like Active, or choose Any to include them all.
- Patrons in Grade: Enter the user-defined value for the grade that needs to change (e.g. 8th), as defined in Grade Table preferences.
- In the Options tab, choose the policy that will be assigned to the selected patrons.
- Run the utility.
- Repeat steps 4-6 for each grade, as needed.
Do you keep records for graduated patrons?
You can also assign your Graduated policy to your recently graduated patrons with the Change Patron Policy utility. If you don't have a Graduated policy, create one first.
4. Remove patrons
You can either remove patrons in Patrons Management manually or use utilities to remove multiple patrons at once. If you decide to go with utilities, public libraries may want to remove patrons by card expiration dates, and school libraries may want to remove patrons who are graduated.
Confirm patrons to be removed
If you plan on removing patrons who are graduated, run a report before removing those patrons to see who will be included. This will ensure you won't accidentally remove anyone who isn't supposed to be removed.
- Go to Tools > Reports.
- Select the Patrons > Information category.
- Choose the Patron Information report on the right.
- On the Selections tab, choose the criteria for the patrons you want to remove.
- Patrons in Grade: Graduated (if you are a school library)
- Click Run.
- Download the report PDF from
Operations Management.
- Check for any patrons who shouldn't be removed (staff, teachers, etc). If you find any, you'll need to modify their grade.
- After making any necessary modifications, run this report again and get an updated list.
- Once your list is acceptable, move on to removing patrons.
Remove patrons by card expiration dates
Run the Remove Patrons utility to remove those with cards that have expired.
- Go to Tools > Utilities.
- Select the Patrons > General category on the left.
- Choose the Remove Patrons utility on the right.
- In the Selections tab, choose the criteria for the patrons whose records should be removed.
- Patrons with Cards Expiring On: Enter a date range.
- In the Options tab, choose if you want to remove patrons matching your criteria who still have items checked out or outstanding financial items. (Optional)
- Run the utility.
And that's it! You may need to run this utility a few times, depending on your selection criteria.
Remove patrons who are graduated
![]() Beginning or End of Year
Beginning or End of Year
![]() Skip this step if you keep records for graduated patrons.
Skip this step if you keep records for graduated patrons.
Run a Patron Information report and select by Patrons in Grade Graduated (or whatever your Last Grade is). Review the PDF to make sure you want to remove everyone who shows up on that list.
Then, run the Remove Patrons utility to remove graduated students from the database. You may need to run it multiple times with different selections, depending on your needs.
- Go to Operations > Utilities.
- Select the Patrons > General category.
- Choose the Remove Patrons utility on the right.
- On the Selections tab, enter the criteria needed to select the individual patrons or groups of patrons you intend to remove. Make sure the correct status is selected (like Active or Transferred, or choose Any to include them all). Then depending on your method for tracking graduated patrons, you can use two different selections:
- If you keep track of graduation dates in patron records, enter the appropriate date range or relative date in the Graduation Date field.
- If you use Last Grade in the Grade Table Preferences, enter the user-defined value for Last Grade in the Patrons in Grade field (most commonly "Graduated").
- If you keep track of graduation dates in patron records, enter the appropriate date range or relative date in the Graduation Date field.
- On the Options tab, choose if you want patrons to be removed even if they have items checked out or outstanding charges.
- Click Run.