The Support Center has moved!! See the new website https://support.goalexandria.com/ ![]()

Items
The root page ALEX:Items could not be found in space Alexandria.
Related Blog Posts
Blog Posts
-
Items: a few things you may not know...
created by
Apr 12, 2023
-
Searching by Subject
created by
Nov 16, 2022
-
Assigning policies–the complete guide
created by
Mar 23, 2022
-
Title Assistant to the rescue!
created by
Jan 27, 2022
-
Overdue Items Notices? We've got you cover-ed
created by
Nov 24, 2021
-
Search smarter!—Combine search results
created by
Oct 13, 2021
-
Using Contents Notes
created by
Sep 23, 2021
-
Introducing... FAQs!
created by
Jul 07, 2021
-
Changing call numbers—helpful utilities
created by
Mar 03, 2021
-
From our librarians—Reusable book menu cards
created by
Nov 18, 2020
Cataloging Best Practices

Overview
Getting ready to catalog? Take a look at our recommended steps and helpful tips! Whether this is your first or fiftieth time adding items to Alexandria, we've got you covered.
Prepare
Make the process easier by making a plan and getting to know your tools.
Catalog
Learn how to add books, ebooks, and equipment!
Enhance
Keep your catalog clean and enhance your records.
You may also want to check out our Items Management Workshop and FAQs.
Prepare
Before cataloging items, there are a few things you should do to prepare.
Familiarize yourself with Items Management and Researcher
Items Management is where you manage title records and copy records. Title records contain general information about the item that is the same for every copy. This includes author, publisher, subjects, Lexile, and more. Each title can have one or more copies. Copy records represent each individual (physical) copy of the title in your collection; each copy is assigned an individual barcode number. "Items" may refer to either or both.
Your license determines how many title and copy records you can have; go to the Special tab in Circulation to see your current record totals.
Once you've added titles and copies to Items Management, patrons will be able to search for them in Researcher. Learning how Alexandria's various search interfaces work will help you make your catalog more searchable for patrons.
Here are a few pages you should briefly check out:
Decide on call number and barcode formats
Call Numbers
Barcodes
You'll also want to decide on a standard format for your barcodes. Here are some resources to help you:
If you need a list of unused barcodes for a vendor or yourself, use the Unused Barcodes report (Range Information or Barcode List formats).
Set your cataloging preferences
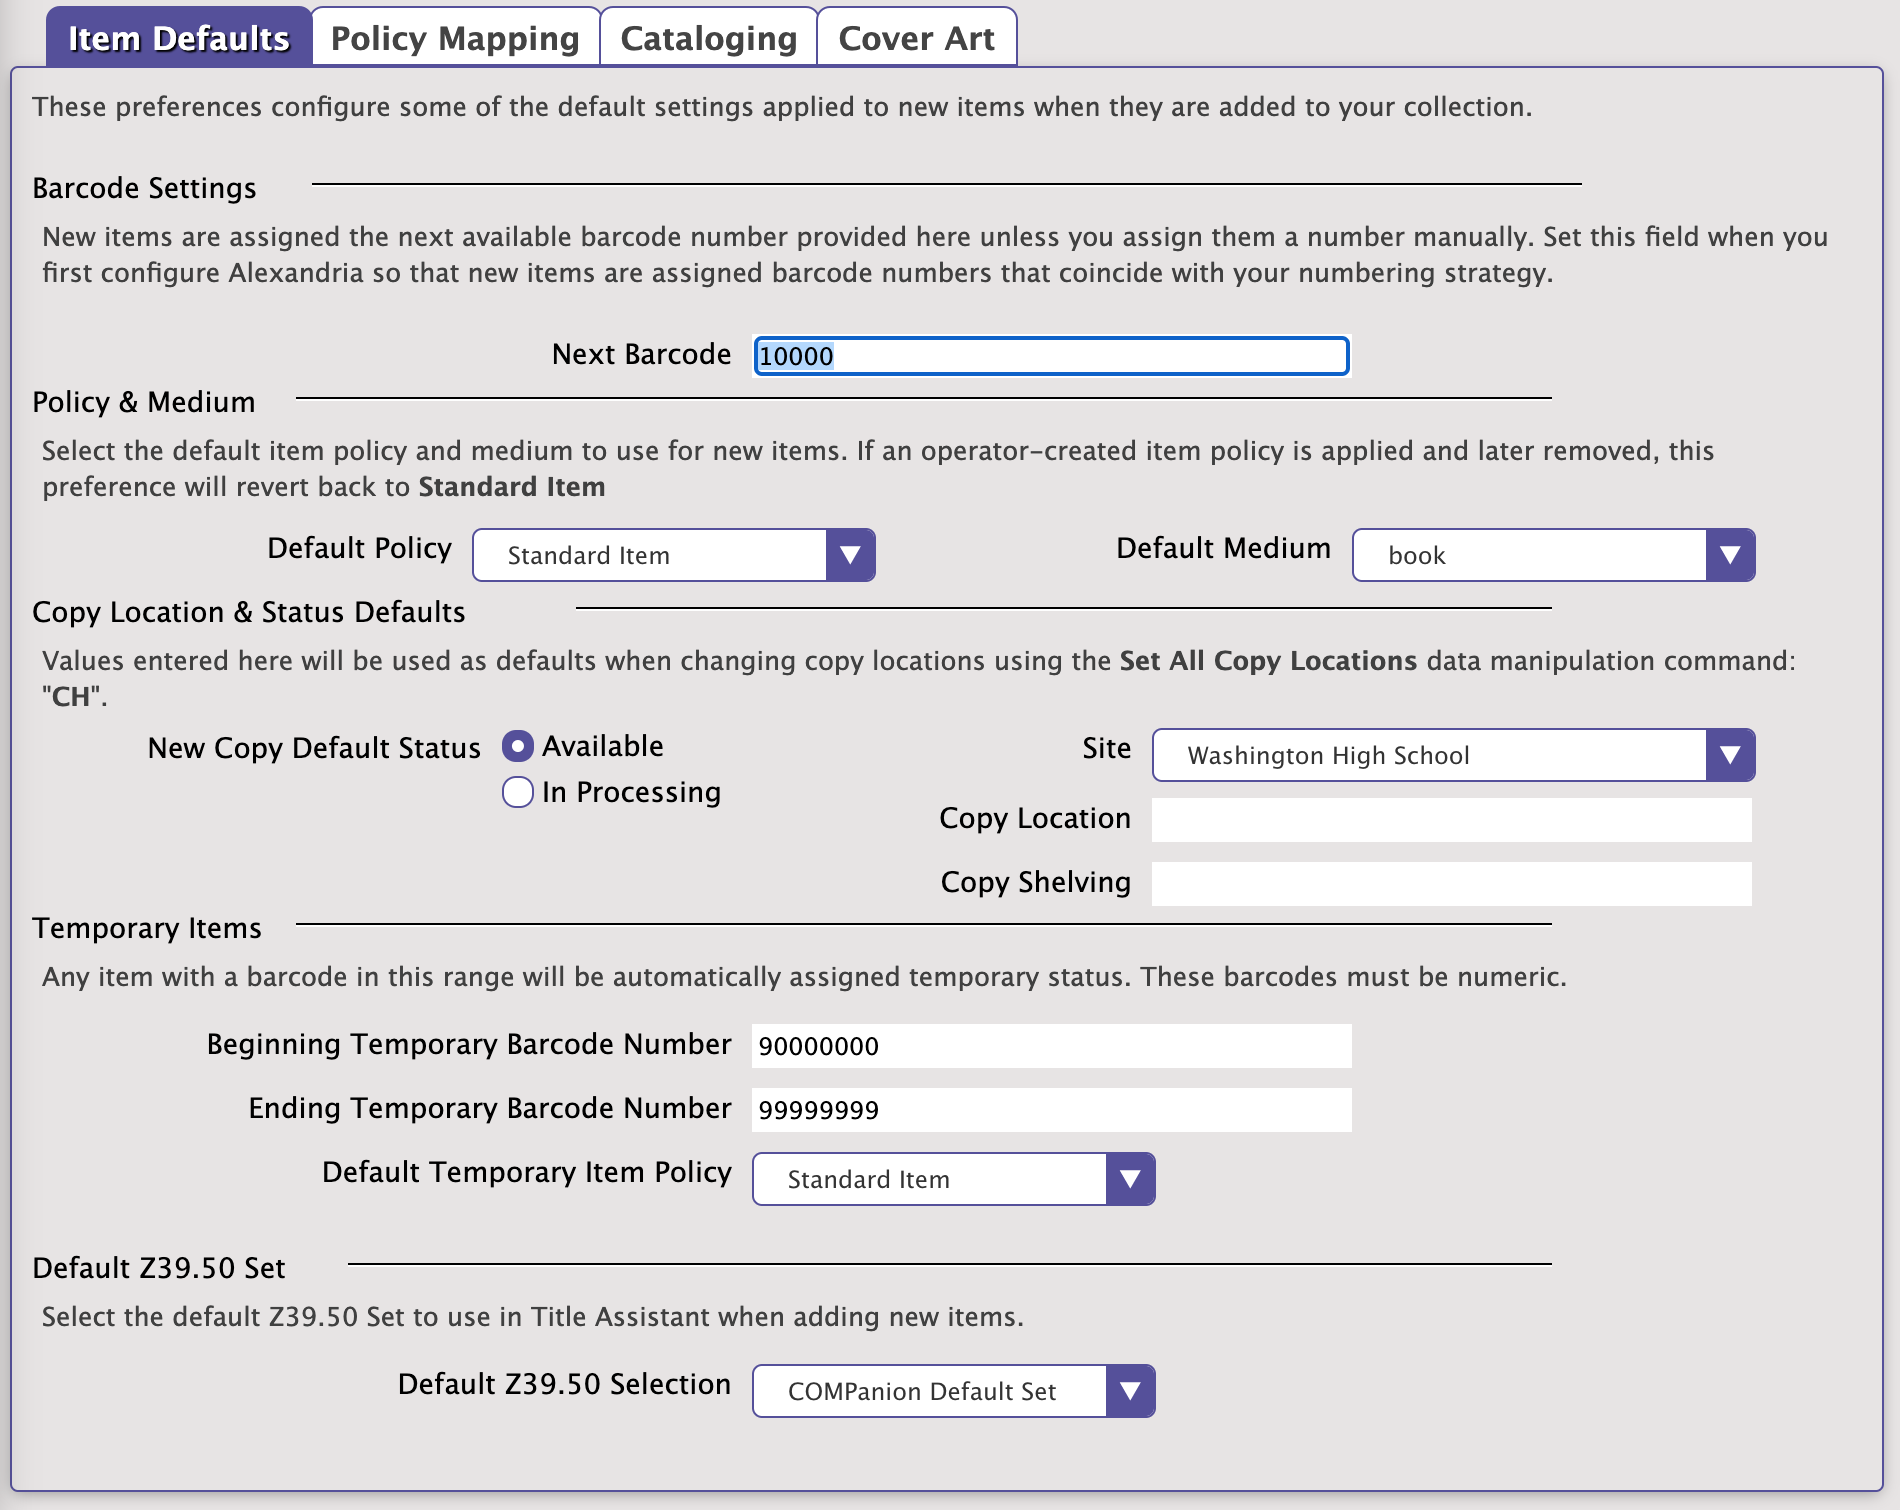
Adjust your Items Preferences—especially the Cataloging tab—so that your defaults are set for new items.
Prepare
Before cataloging items, there are a few things you should do to prepare.
Familiarize yourself with Items Management and Researcher
Items Management is where you manage title records and copy records. Title records contain general information about the item that is the same for every copy. This includes author, publisher, subjects, Lexile, and more. Each title can have one or more copies. Copy records represent each individual (physical) copy of the title in your collection; each copy is assigned an individual barcode number. "Items" may refer to either or both.
Your license determines how many title and copy records you can have; go to the Special tab in Circulation to see your current record totals.
Once you've added titles and copies to Items Management, patrons will be able to search for them in Researcher. Learning how Alexandria's various search interfaces work will help you make your catalog more searchable for patrons.
Here are a few pages you should briefly check out:
Decide on call number and barcode formats
Call Numbers
Barcodes
You'll also want to decide on a standard format for your barcodes. Here are some resources to help you:
If you need a list of unused barcodes for a vendor or yourself, use the Unused Barcodes report (Range Information or Barcode List formats).
Set your cataloging preferences
Adjust your Items Preferences—especially the Cataloging tab—so that your defaults are set for new items.
Catalog
It's time to add those items! Here are some general instructions and tips.
Catalog books
There are two places you can add items in Alexandria:
Items Management
Add titles and copies individually through Items Management.
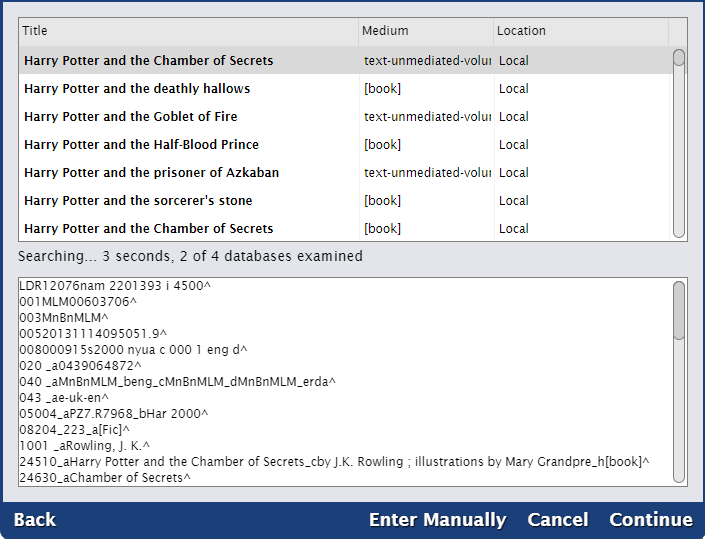
Title Assistant is a cataloging tool that helps you see whether a title already exists in your collection so you can avoid duplicates. It can also find the title's complete MARC record if it can be located in one of your Z39.50 servers. Then you can add that MARC record to your collection without having to enter all that information manually. You'll be prompted to add copies after saving the title record.
Searching by ISBN will give you the most accurate matches.
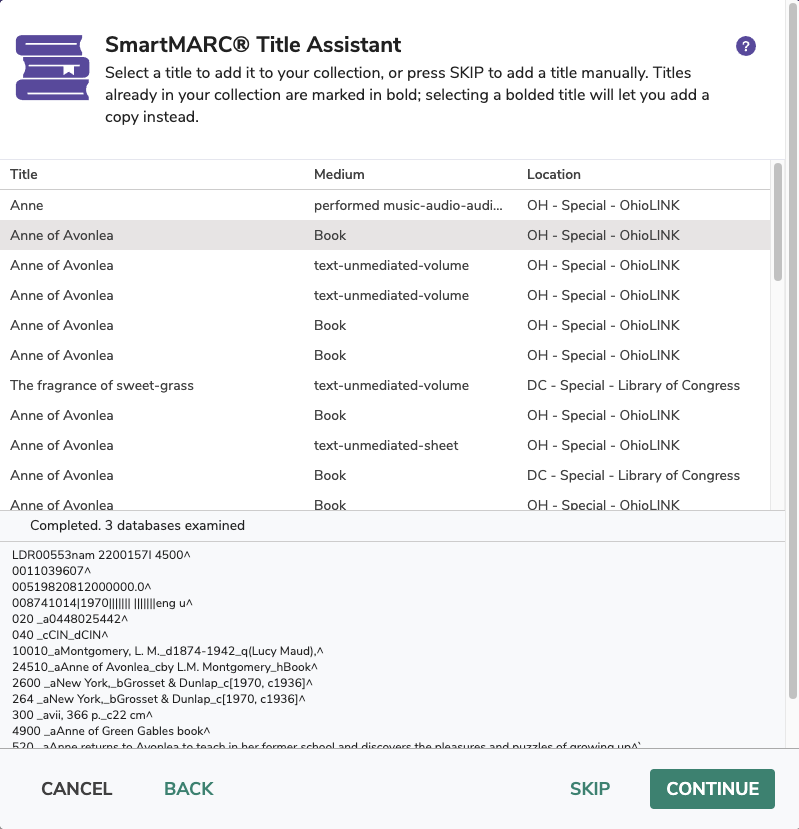
- If you want to skip Title Assistant to manually add a title—equipment, for example—simply click Search or hit <enter> on your keyboard. This will bring up a blank title record.
- The MARC View Editor allows you to view and modify the entire MARC record for a title. You can also use Item Editors, which allow you to customize the MARC record for an item without having to toggle to the MARC View Editor.
Import
Using an import is the easier option if you need to add a lot of records at once. With a tab-delimited file or MARC/MicroLIF records from a vendor, you can import a bunch of items all at once into Alexandria. We recommend adding titles and copies together.
If item records are imported with a non-existent or invalid site code, they will be assigned to the Union Site. Copies assigned to the Union Site have a status of In Processing and can't be circulated to regular patrons.
You can move those records to their correct site with the Reassign Union Site Copies utility.
Catalog other resources (ebooks, Chromebooks, etc)
Cataloging non-book items is a very similar process. You can manually add other resources in Items Management and/or import ebooks.
Items Management
- In Items Management, add a new item by clicking the plus icon
 at the bottom left corner of the window.
 - Click Search or hit <enter> on your keyboard to skip Title Assistant. This will bring up a blank title record.
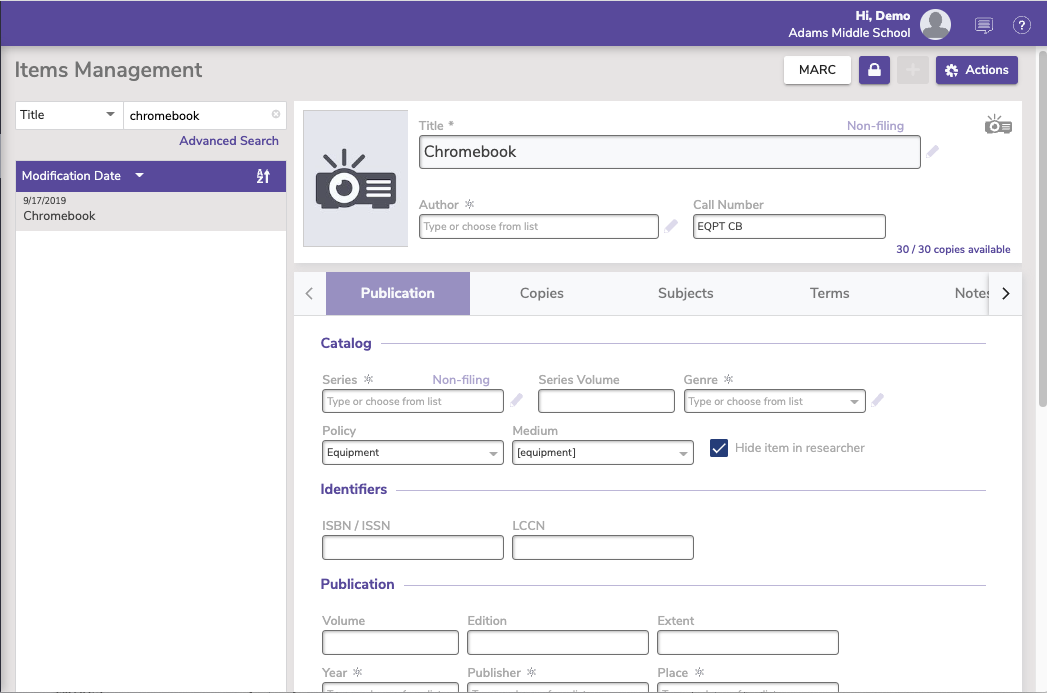
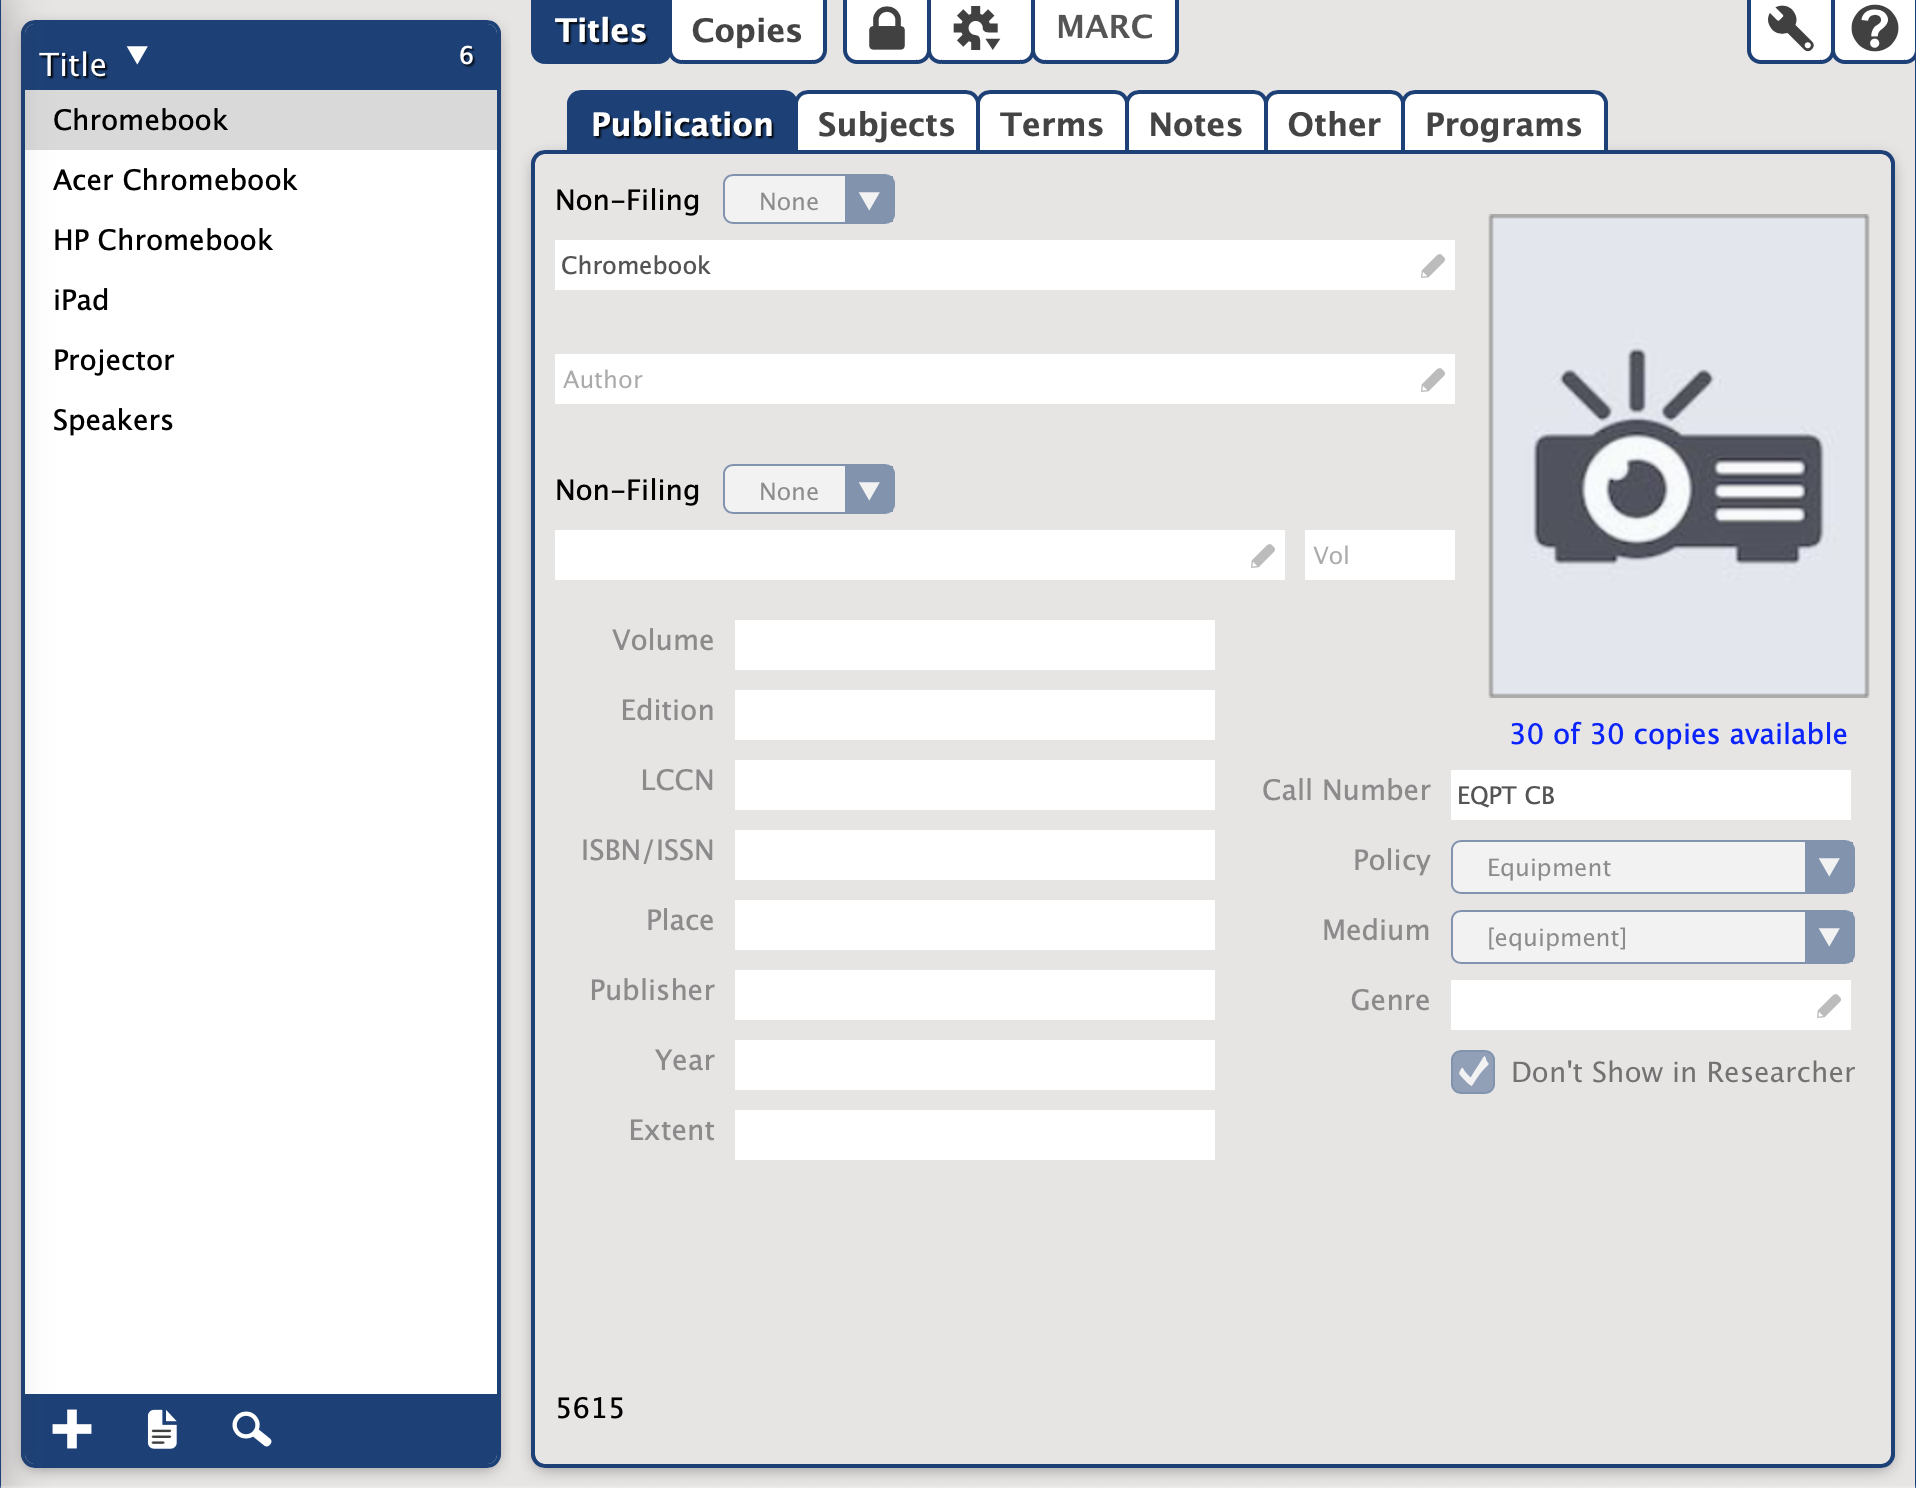
- Next, fill out the record. Use the Title, Author, and Publisher fields for what would be the best equivalent. For example, in the Title field, you might type "Chromebook" or whatever term that represents your specific equipment. Similarly, you can use other fields to add other important information; this information will help you reference the item throughout Alexandria, select it in Reports, or find it in Researcher.
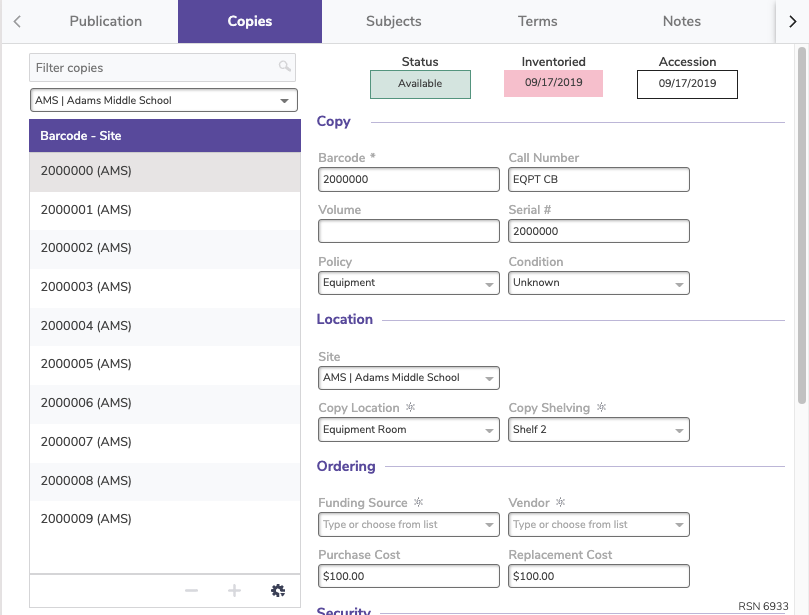
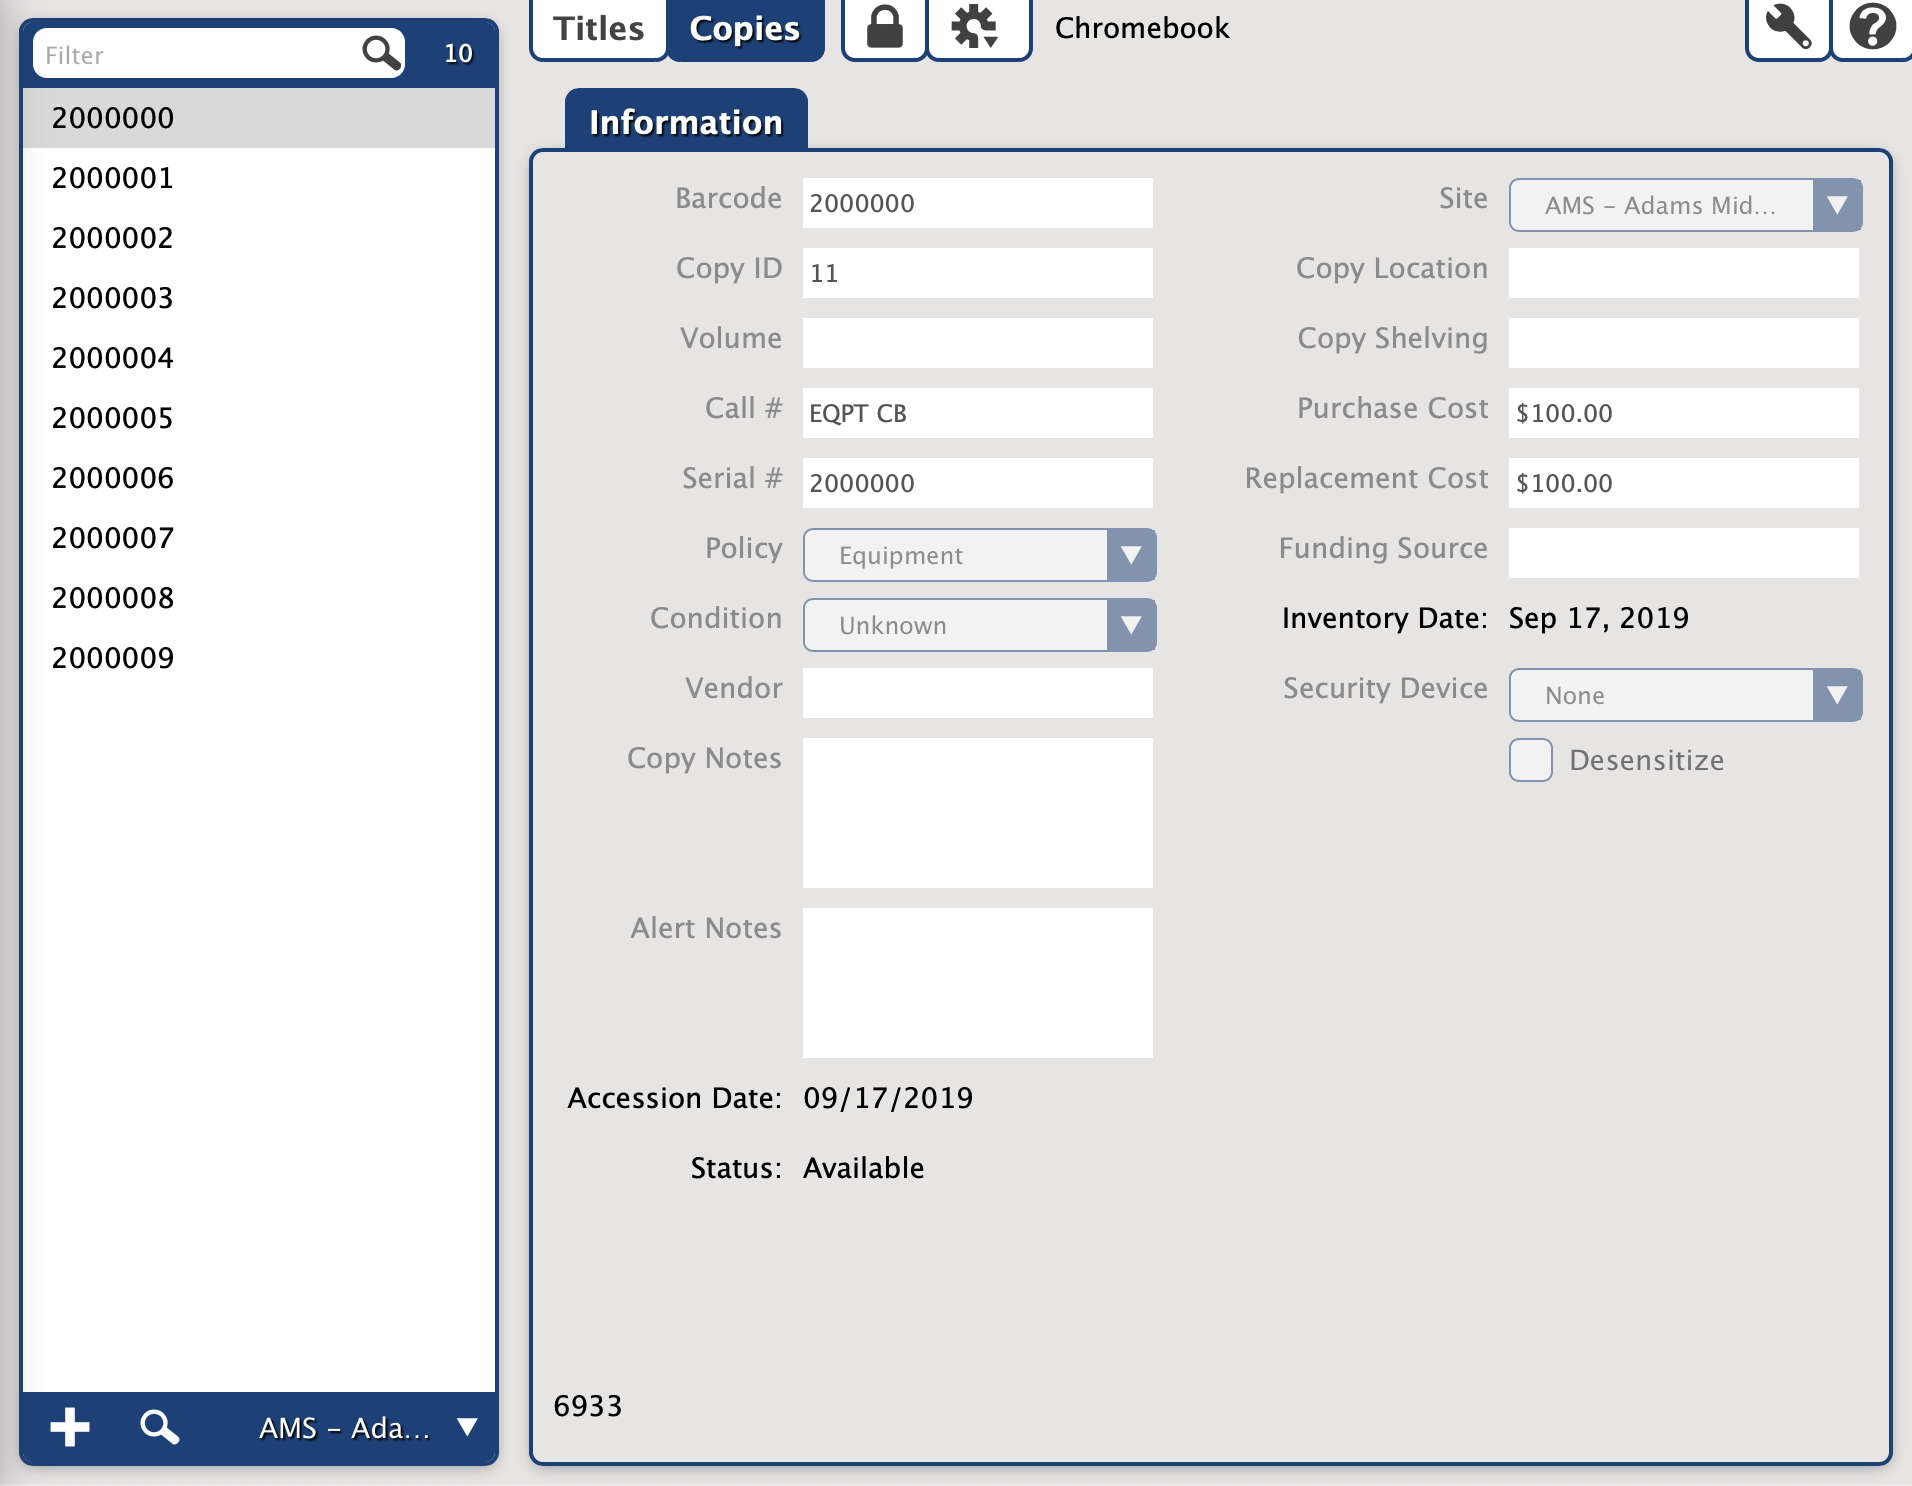
The Copy tab is where you add information unique to individual items, such as the serial number. Keep in mind that you'll want to barcode non-book items the same as you would a book, so be sure to not use the item's serial number as its barcode.
- We suggest initially only adding one title and one copy. With this first item, you can conduct tests in Alexandria to see how the item appears where you plan to look for and use it. For example, you may want to run some reports to make sure you can select the item and that the information is where you'd like it to be. When adding a lot of data, it's always helpful to start small and test things out.
Chromebook title record example |
Chromebook copy record example |
When adding non-book items, you'll also want to create new policies and mediums to accommodate these new and different items. With new policies, you will be able to better manage longer or unusual check out times, increase replacement costs, track usage, and more. And with new mediums, you will be able to more easily get information through reports, find the items in Items Management and Researcher, and manipulate the data for these items with utilities.
See our Cataloging eBooks and eReaders pages for information specific to those items.
Import
If you have a tab-delimited file or MARC/MicroLIF records from a vendor, you can also import ebooks.
Modify records
You may need to make some adjustments to your records after adding them.
- Mediums in Alexandria. Learn the differences between General Material Designation (GMD) and Resource Description & Access (RDA) and switch from one to the other if necessary.
- Cataloging Series and Serials. Fix your series and volumes so patrons can find items easily.
- Subjects. We recommend looking for your newly added items in Search and making sure they're showing up how/when you expect them to. If not, you may need to add more subjects.
- Call Numbers. If you imported records, you may need to make adjustments to your call numbers, such as making all of the letters uppercase. This can easily be done with the Change Title Call Numbers utility.
- Don't Show in Researcher. If you don't want certain items—such as equipment or teacher-only materials—to show in Researcher, you'll want to make sure Don't Show in Researcher is turned on for those title records. You can turn this on for individual titles in Items Management or use the Hide Titles in Search utility to turn it on for multiple titles at once. Those who need to can still view hidden items in Researcher by searching while holding down Option / Alt on their keyboard.
Print labels
You can print labels for both cataloged and uncataloged items.
- Copies Labels Reports. Print barcode and spine labels for items already cataloged in Alexandria.
- Unused Barcodes report. If you receive new items that don't have assigned barcodes yet, run this report with the Barcode Labels (3x10) format to generate and print some unused barcodes. Then, simply scan the unused barcodes as you enter new copy records.
Catalog
It's time to add those items! Here are some general instructions and tips.
Catalog books
There are two places you can add items in Alexandria:
Items Management
Add titles and copies individually through Items Management.
Title Assistant is a cataloging tool that helps you see whether a title already exists in your collection so you can avoid duplicates. It can also find the title's complete MARC record if it can be located in one of your Z39.50 servers. Then you can add that MARC record to your collection without having to enter all that information manually. You'll be prompted to add copies after saving the title record.
Searching by ISBN will give you the most accurate matches.
- If you want to skip Title Assistant to manually add a title—equipment, for example—simply click Search or hit <enter> on your keyboard. This will bring up a blank title record.
- The MARC View Editor allows you to view and modify the entire MARC record for a title. You can also use Item Editors, which allow you to customize the MARC record for an item without having to toggle to the MARC View Editor.
Import
Using an import is the easier option if you need to add a lot of records at once. With a tab-delimited file or MARC/MicroLIF records from a vendor, you can import a bunch of items all at once into Alexandria. We recommend adding titles and copies together.
If item records are imported with a non-existent or invalid site code, they will be assigned to the Union Site. Copies assigned to the Union Site have a status of In Processing and can't be circulated to regular patrons.
You can move those records to their correct site with the Reassign Union Site Copies utility.
Catalog other resources (ebooks, Chromebooks, etc)
Cataloging non-book items is a very similar process. You can manually add other resources in Items Management and/or import ebooks.
Items Management
- In Items Management, add a new item by clicking the plus icon
 at the bottom left corner of the window.
 - Click Search or hit <enter> on your keyboard to skip Title Assistant. This will bring up a blank title record.
- Next, fill out the record. Use the Title, Author, and Publisher fields for what would be the best equivalent. For example, in the Title field, you might type "Chromebook" or whatever term that represents your specific equipment. Similarly, you can use other fields to add other important information; this information will help you reference the item throughout Alexandria, select it in Reports, or find it in Researcher.
The Copy tab is where you add information unique to individual items, such as the serial number. Keep in mind that you'll want to barcode non-book items the same as you would a book, so be sure to not use the item's serial number as its barcode.
- We suggest initially only adding one title and one copy. With this first item, you can conduct tests in Alexandria to see how the item appears where you plan to look for and use it. For example, you may want to run some reports to make sure you can select the item and that the information is where you'd like it to be. When adding a lot of data, it's always helpful to start small and test things out.
Chromebook title record example |
Chromebook copy record example |
When adding non-book items, you'll also want to create new policies and mediums to accommodate these new and different items. With new policies, you will be able to better manage longer or unusual check out times, increase replacement costs, track usage, and more. And with new mediums, you will be able to more easily get information through reports, find the items in Items Management and Researcher, and manipulate the data for these items with utilities.
See our Cataloging eBooks and eReaders pages for information specific to those items.
Import
If you have a tab-delimited file or MARC/MicroLIF records from a vendor, you can also import ebooks.
Modify records
You may need to make some adjustments to your records after adding them.
- Mediums in Alexandria. Learn the differences between General Material Designation (GMD) and Resource Description & Access (RDA) and switch from one to the other if necessary.
- Cataloging Series and Serials. Fix your series and volumes so patrons can find items easily.
- Subjects. We recommend looking for your newly added items in Search and making sure they're showing up how/when you expect them to. If not, you may need to add more subjects.
- Call Numbers. If you imported records, you may need to make adjustments to your call numbers, such as making all of the letters uppercase. This can easily be done with the Change Title Call Numbers utility.
- Don't Show in Researcher. If you don't want certain items—such as equipment or teacher-only materials—to show in Researcher, you'll want to make sure Don't Show in Researcher is turned on for those title records. You can turn this on for individual titles in Items Management or use the Hide Titles in Search utility to turn it on for multiple titles at once. Those who need to can still view hidden items in Researcher by searching while holding down Option / Alt on their keyboard.
Print labels
You can print labels for both cataloged and uncataloged items.
- Copies Labels Reports. Print barcode and spine labels for items already cataloged in Alexandria.
- Unused Barcodes report. If you receive new items that don't have assigned barcodes yet, run this report with the Barcode Labels (3x10) format to generate and print some unused barcodes. Then, simply scan the unused barcodes as you enter new copy records.
Enhance
Keep your catalog clean and updated.
Keep your data clean and consistent
- Use Authority Control to maintain consistency in your catalog.
- Routinely weed out items in your library to make room for new items.
- Standardize your series information to make items searchable.
See our Clean Up Your Data article for more recommendations.
Update and enhance information
- In addition to finding new titles, Title Assistant can also enhance titles already in your collection.
- Use Sneak Peek to get updated cover art, reviews, and summaries.
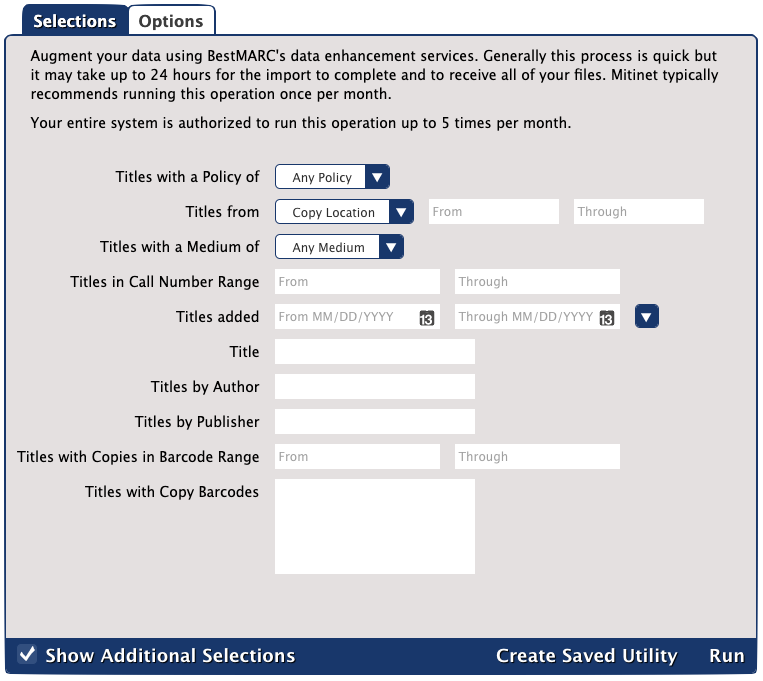
- Look into getting the BestMARC add-on to enhance your records. This can make your catalog more helpful and discoverable by adding reading program information, converting to RDA format, fixing tags, genrefying, and more!
Enhance
Keep your catalog clean and updated.
Keep your data clean and consistent
- Use Authority Control to maintain consistency in your catalog.
- Routinely weed out items in your library to make room for new items.
- Standardize your series information to make items searchable.
See our Clean Up Your Data article for more recommendations.
Update and enhance information
- In addition to finding new titles, Title Assistant can also enhance titles already in your collection.
- Use Sneak Peek to get updated cover art, reviews, and summaries.
- Look into getting the BestMARC add-on to enhance your records. This can make your catalog more helpful and discoverable by adding reading program information, converting to RDA format, fixing tags, genrefying, and more!